
User Manual V2.0
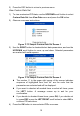
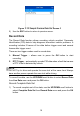
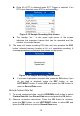
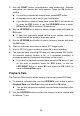

Table Of Contents
- Safety Information
- Safety Messages
- Safety Instructions
- 1 Using This Manual
- 2 Using the Scan Tool
- 3 OBD II Diagnostics
- 4 ABS
- 5 SRS
- 6 DTC Lookup
- 7 Playback Data
- 8 System Setup
- 9 Compliance Information
- 10 Warranty and Service

19
Drive till a DTC is detected when DTC Trigger is selected. If no
DTCs are detected, press ESC to exit recording.
Figure 3- 22 Sample Recording Data Screen
The number “x/x...” to the upper right corner of the screen
indicates the maximum frames that can be recorded and the
number of recorded frames.
6) The scan tool keeps recording PID data until user presses the ESC
button, selected memory location is full, or it completes recording. A
message prompting to playback data shows on the screen.
Figure 3- 23 Sample Recording Done Screen
If you wish to playback recorded data, press the OK button; if you
do not wish to playback, press the ESC button, or use
LEFT/RIGHT button to select NO and press the OK button to
return to Record Data menu.
Record Custom Data Set
1) To record customized data, use the UP/DOWN scroll button to select
Custom Data Set from Record Data menu and press the OK button.
2) Observe on-screen instructions. Press the OK button to continue;
press the ESC button, or use LEFT/RIGHT button to select NO and
press the OK button to return to Record Data menu.