
User Manual


56
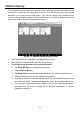
2. The Main Screen – located at the center of the screen displaying content based on
the vehicle attributes and keywords specified. The tabs on the main screen vary in
accordance with the section selected on the Navigation Menu, allowing you to
switch between functions.
3. The Navigation Menu – the main menu at the bottom of the screen, which provides
you access to different sections of MaxiFix.
The Header
The Header at the top of the screen, features:
⚫ A Select Vehicle button to open the vehicle identification window, and vehicle
information bar, for example “2014>Hyundai> Accord Coupe > L4-2.4L (K24W1)”.
⚫ A search field to find relevant information by entering keywords, codes, or
problems.
Select Vehicle Button
The “Select Vehicle” button on the Header allows you to specify the vehicle that you
want to reference on MaxiFix, by selecting each of the vehicle attribute from a
sequence of option lists. This feature helps to filter out the searches that allow only the
information that applies to the identified vehicle to display.
NOTE
All attributes must be specified to make a complete vehicle selection for the most
efficient search results.
➢ To select a vehicle
Follow the procedure below to select a vehicle:
1. If you haven’t already done so, click the “Select Vehicle” button on the Header.
2. Select the year of the vehicle from the list.
3. Select the make of the vehicle from the list.
4. Select the model of the vehicle from the list.
5. Select the submodel of the vehicle from the list.
6. Select the engine of the vehicle from the list.
After completing the vehicle selection procedure, the identified vehicle is shown on the
Header.
Terminology
MaxiFix Tip
A MaxiFix Tip provides practical information of a real fix of a specific vehicle repair
issue with detailed descriptions. It is combined with proven fix and vehicle specific data,