
User Manual

32
AUDIO IN
Stereo
CHANNE L
1 2
AUDIO O UT
DC 12 V
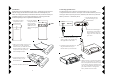
Back of Sender
1. Push open the battery
compartment on the
Wireless Sender.
2. Insert the supplied
rechargeable battery.
Observe polarity.
Replace only with
NiMH AAA 1.2V,
800 mAh rechargeable
battery.
3. Make sure the “Hold” switch on your
iPod Mini is set to off (to the left),
and then attach your iPod Mini to the
Wireless Sender by sliding it on to
the jack that fits into your iPod
Mini’s headphone socket.
5. Move the ON-OFF switch to ON
4. Set the Channel Switch to
match the setting on your
Wireless Receiver.
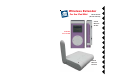
Introduction
Send music from your iPod Mini to your stereo – without any wires. The iPod
Mini fits snugly into the Wireless Sender and fits onto its headphone jack.
There’s a rechargeable battery in the Wireless Sender (so it doesn’t drain your
iPod Mini’s battery). You can charge the battery by removing it from the
Sender and placing it in the compartment in the Receiver.
6. Set the Channel Switch to
match the setting on your
Wireless Sender.
7. Connect the included plug-in
power supply to the Wireless
Receiver and plug the power
supply into an AC outlet near
your stereo
8. Attach the Wireless Receiver to your
stereo’s Audio or AUX input using
the supplied RCA audio cable.
9. Extend the antenna and point it in
the general direction that you
intend to listen to your music from.
9. When the battery in your Wireless Sender
goes flat, you can charge it by inserting it
into the compartment in the Receiver. Keep
a spare battery charging in the Receiver so
you can swap the batteries when the one in
your Sender needs to be charged. The
battery should last about 8 hours.
Connecting up the Receiver
The Wireless Receiver connects to your Stereo Receiver, or any audio
component that has an Audio or AUX input. You can then sit back in your easy
chair, up to 50 ft. away from your stereo, and send your music from your iPod
Mini to your stereo – without any wires!