INDOOR/OUTDOOR COL OR CAMERA OLOR T-IN 2.
I NTRODUCTION Your Wireless Motion Activated Camera consists of a Color Video Camera with built-in 2.4 GHz transmitter. It is activated by its built-in Motion Sensor so that when someone approaches your home, the camera turns on and also turns on the attached floodlights to light up the area that the camera sees (bulbs not included). The camera transmits its picture and sound via a built-in 2.4 GHz transmitter, to a Video Receiver (sold separately) which you connect to a TV anywhere in your home.
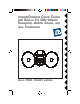
C ONTROLS C ONNECTIONS AND FRONT V IEW Bulbs not included Camera B OTT OM VIEW ( WITH TTOM S IDE V IEW Motion Sensor LID CL OSED) CLOSED Controls under this weatherproof lid. Remove clear cap if you need to refocus the camera. Replace to keep rain out.
A SSEMBLING THE PARTS Referring to the diagram below: 1. Screw the base of each lamp holder into the outer holes on the mounting plate. 2. Rotate the locking ring on each lamp holder towards the plate until the lamp holder is secure against the plate. 3. Screw the threaded end of the motion activated camera into the center hole on the mounting plate. 4. Lock the motion activated camera into place using the locking ring. 5.
I NST ALLING NSTALLING THE A SSEMBL Y SSEMBLY Referring to the diagram below: You can install the motion activated camera in a wall box that is power at all times or in a wall box that is controlled by a wall switch, but if it is powered from a wall switch, make sure you leave the switch on at all times. Turning the switch off will completely disable the motion activated camera.
CONTROLS AND CONNECTIONS Your motion activated camera turns on whenever someone approaches your home and also turns on the connected floodlights to light up the area that the camera sees. The camera transmits its picture and sound to a 2.4 GHz receiver (sold separately) which you connect to your TV. Open the lid on the underside of the motion activated camera to reveal the controls below. You set the channel switch (A, B, C, or D) to match the setting on the receiver.
CONNECTING SEP ARA TEL Y) SEPARA ARATEL TELY THE R ECEIVER ( SOLD V IDEO A UD IO 1. Connect a set of Audio/Video cables to the A/V OUT jacks on the VR31A Video TV Receiver. Connect the other end to your TV (use Yellow for video, and either L or R channel for audio). Note, VR36A receivers do not have an audio output. 2. Plug the Video Receiver's Power Supply jack into the Video Receiver and plug the power supply into a 120 volt wall outlet. 3. Turn the Video Receiver's power switch (on side of unit) on.
IF A YOUR TV IS ALREADY HOOKED UP DBS R ECEIVER OR OTHER A/V TO DEVICE If a DBS Receiver or other A/V component is connected to the TV using A/V cables, you can connect the Video Receiver to the free LINE IN jacks on the component. If there are no LINE IN jacks, you will need to use a TV antenna splitter as described earlier (VR31A receivers only).
TROUBLESHOO TING ROUBLESHOOTING If you do not see a picture on your TV TV:: Check that the receiver and the camera are on the same letter channel (A, B, C, or D). The channel switch on the camera is located under the lid on the bottom of the unit. Make sure you close the lid and screw it tightly shut afterwards. There is a power light on the front of the receiver. Check that the power switch on the side of the receiver is ON. Verify that your connections to the TV are correct.
If you are having difficulty turning the camera on/off remotely: Try plugging the transceiver (the module with the antenna) into a different AC outlet. How do you focus the camera? The motion activated camera is shipped preset to be in focus for normal use, but if you want to change the focus you can remove the clear plastic cover and rotate the inner portion of the lens. It might be a bit tight. Try turning it counterclockwise first. If you turn it clockwise do not force or over tighten it.
12 MONTH LIMITED WARRANTY X10.COM A DIV. OF X10 WIRELESS TECHNOLOGY, INC. (X10) WARRANTS ITS PRODUCTS TO BE FREE FROM DEFECTIVE MATERIAL AND WORKMANSHIP FOR A PERIOD OF ONE (1) YEAR FROM THE ORIGINAL DATE OF PURCHASE AT RETAIL. X10 AGREES TO REPAIR OR REPLACE, AT ITS SOLE DISCRETION, A DEFECTIVE X10 PRODUCT IF RETURNED TO X10 WITHIN THE WARRANTY PERIOD AND WITH PROOF OF PURCHASE. IF SERVICE IS REQUIRED UNDER THIS WARRANTY: 1. CALL 1-800-675-3044, OR VISIT WWW.X10.COM, OR E-MAIL SALES@X10.
X10.com, a division of X10 Wireless Technology, Inc. (Returns Depot), 3824 North 5th St., Suite C, North Las Vegas, NV 89030 Web Site: www .x10.com www.x10.