EXP-52 OPERATION INSTRUCTIONS THIS PRODUCT IS DESIGNED FOR PROFESSIONAL INSTALLATION ONLY!!
Congratulations on your purchase of the EXP-52 vehicle security system. Please take the time to read over this operation manual to thoroughly familiarize yourself with the many features and options. THIS PRODUCT IS DESIGNED FOR PROFESSIONAL INSTALLATION ONLY!! !!NOTICE!! THIS DEVICE COMPLIES WITH PART 15 OF THE FCC RULES.
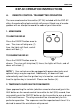
EXP-52 EXP-52 OPERATION INSTRUCTIONS A. REMOTE CONTROL TRANSMITTER OPERATION The new remote control transmitter (XT-54) included with the EXP-52 offers the code rolling feature which will prevent illegal use of a codegrabber with an attempt to record the code of your transmitter. 1. ARM/DISARM ON/OFF TO ARM THE EXP-52 AUX Press the ON/OFF button once to arm. The siren will chirp one (1) time, the lights will flash, and all doors will lock.
EXP-52 3. PANIC FUNCTION The EXP-52 remote control may be used as a remote panic switch to trigger the siren in cases of emergency. To activate the PANIC FUNCTION press and hold the ON/OFF button on the remote transmitter for a minimum of 3 seconds. The siren will sound. To stop the PANIC FUNCTION press the ON/OFF button on the transmitter. 4.
EXP-52 6. OPTIONAL ACCESSORY OPERATION Simultaneously pressing both the ON/OFF and AUX buttons will allow third channel operation. A negative pulse begins and will continue until buttons are released. It is not recommended to press the buttons longer than 3 seconds. 7. SECOND CAR OPERATION Refer to SECTION “(K)” of this operation manual. Arming and disarming will be determined by how the transmitters have been programmed for multiple vehicle operation. 8.
EXP-52 B. 1. 2. 3. 4. 5. LED STATUS INDICATOR OPERATION LED OFF= The EXP-52 is disarmed. LED CONSTANT ON= Indicates open trigger circuit. LED FAST FLASHING= Passive arming timer is counting down. LED FLASHING= The EXP-52 is armed. LED FLASHING IN A 2 FLASH/HOLD SEQUENCE= Alarm breach. NOTE: Unless a door is opened after disarming, the EXP -52 will automatically rearm in 60 seconds, and the LED will continue to flash. See Section (G) AUTOMATIC RE-ARMING for details. C.
EXP-52 (siren will sound); switch the vehicle ignition to ON. Move the VALET/OVERRIDE switch to ON; then OFF; the siren will stop. The EXP52 will be disarmed. Quickly replace or service the remote transmitter to insure continued vehicle protection. 2.
EXP-52 2. The LED STATUS INDICATOR will begin fast flashing and the passive arming timer will begin counting down. 3. If you re-open the exit, the LED will stop flashing. 4. Close the exit, and the LED will start flashing again. 5. The EXP-52 will count down for 30 seconds. After 30 seconds, the siren will chirp 1 time indicating the EXP-52 has armed. NOTE: If the optional remote power door locks feature is installed, the doors will automatically lock 10 seconds after the PASSIVE arming cycle is completed.
EXP-52 This feature is optional at time of installation. I. TRIGGER TEST After arming the EXP-52 in either the PASSIVE or MANUAL mode, test the system in the following manner. 1. Open any door or other protected opening. The siren will sound instantly, and the lights will flash. 2. If the pre-warning feature is activated, the EXP-52’s SIS-5 impact sensor will respond to a light shock with a chirp sound, and trigger the alarm when a heavier shock is detected. (Please refer to A-4 for details). 3.
EXP-52 1. Flip the VALET/OVERRIDE switch to "ON" position. 2. Turn the ignition switch to "ON", then "OFF", then immediately 3. Flip the VALET/OVERRIDE switch "OFF", "ON/OFF", "ON/OFF". The siren will chirp one (1) time. 4. Turn the ignition switch "ON/OFF", "ON/OFF". The siren will chirp two (2) times. You are now in the programming mode. 5. Press the ON/OFF button on one of the remote transmitters until the alarm siren responds with a confirm ing chirp. The first transmitter is now programmed.
EXP-52 To code the EXP-52 transmitters for two or three vehicles follow the diagrams as shown below. Before multiple vehicle programming can be achieved, it is necessary to enter the programming mode as described in SECTION K. 1. TWO VEHICLE OPERATION VEHICLE #1 Enter the programming mode on vehicle #1 and push the ON/OFF button on the transmitter for Vehicle #1. The alarm siren will respond with a confirming chirp. Within five (5) seconds, push the AUX button on the transmitter for Vehicle #2.
A.P.I.