QStart Mac User Guide Release version 1.0 (35) QStartMAC2010 UserGuide Page 1 © 2003-2010 Autocue Group Ltd.
Contents Contents Introduction Getting started Install the QStart for Mac software Licensing considerations Scripts Main menu options and actions File, Edit and Format menus Window and Help menus Control key guide Scroll controllers Making the most of your QStart for Mac software If you need to contact Autocue or QTV QStartMAC2010 UserGuide 2 3 4 4 4 5 6 6 11 12 13 16 18 Page 2 © 2003-2010 Autocue Group Ltd.
Introduction Mac specific behaviour Unlike other Autocue products running on Windows platforms, the QStart for Mac application requires a restart in order for any altered preferences to be applied. For example, if you disable the prompt monitor within the Preferences menu, it will still appear when you next prompt. It will only be disabled when you restart the QStart for Mac application. QStartMAC2010 UserGuide Page 3 © 2003-2010 Autocue Group Ltd.
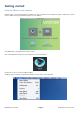
Getting started Install the QStart for Mac software QStart for Mac is currently distributed as a DMG file (*.dmg) . Double-click on the QStart_for_MAC_1.0.dmg file to open it, agree to QStart License. New Window appears on your desktop Drag QStart.app to the Applications folder to install. Now inside Application folder you can find QStart icon is as shown below: Double-click on the icon to launch QStart for Mac. The Menu options and GUI are described in detail in a later section of this document.
Scripts QStart for Mac uses a specific file format that stores not only the script text but also marker, size and formatting data. The file suffix for QStart for Mac files is .qms. This is short for QStart Mac Script. QStartMAC2010 UserGuide Page 5 © 2003-2010 Autocue Group Ltd.
Main menu options and actions File, Edit and Format menus Creating new scripts, opening existing scripts and saving edited scripts is done from the File menu. Other actions are also available. File menu New – Start a new script. A blank script is opened automatically if this option is selected. If text is entered within this script you will be prompted to save if you attempt to close it. Open – Open an existing script from a specific location using the file browser dialogue that appears.
Open Recent – A list of recent files. This allows the user to quickly recall a file that has been worked on previously. Start Prompting – Begins prompting (Command key + R) Cruise Control – Enabling this option causes the prompt output to continue scrolling at the last set speed on the scrollcontrol. Close – Close the script that is currently open. Save – Save changes to the script that is currently open. Save As – Save changes to the script but save as a new filename.
Copy – Copy the highlighted selection of text. Paste – Paste the previously copied text. Paste and Match Style – Allows pasting of text from richly formatted sources whilst retaining their formatting. Delete – Delete the highlighted selection of text. Select All – Select all the data within the script. Format menus Font Submenu: Bigger - Increase the size of the currently selected text by one point. Smaller - Decrease the size of the currently selected text by one point.
Subscript – Apply subscript formatting to the selected text. Raise - Raise the currently selected text above the height of other text on the same line. Lower - Lower the currently selected text below the height of other text on the same line. Text Submenu: Align Left – Move text to the left most position within its text box. Center - Center the currently selected text within its text box. Justify - Align text flush with left and right margins.
Next Marker - Whilst in prompting mode press Command + ] key to jump to the next marker. Previous Marker – Whilst in prompting mode press Command + [ key to jump to the previous marker. QStartMAC2010 UserGuide Group Ltd.
Window and Help menus Window menu: Minimize - Minimizes the window to the right side of the Dock and will show up as a very small window. Zoom - Toggles window between two states, the standard state and the user state. The standard state is determined by the application developer. Bring All to Front - Brings a window to the front ahead of other application windows.
Control key guide Mouse and keyboard control can both be enabled (see preferences).
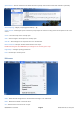
Scroll controllers Keyboard and mouse scroll are supported for basic control of the prompt output. Scroll Control Shuttle Express – To use this device, you will need to install the drivers from the Contour Designs CD for Mac OSX 64-bit. Thereafter you will need to copy a template for the Shuttle Pro V2 from the Autocue CD Disc or from DMG file and import it to the Contour Shuttle Express Panel. 1 – After installing the drivers for the Shuttle Express from the CD, eject the CD, and insert the Autocue CD.
4 – Navigate to the Autocue CD and choose folder QStart for MAC 1.0 and then subfolder ShuttleExpress Settings. Click on the QStart Shuttle Express Template: 5 – The settings for QStart should have been imported successfully and you can now use the Shuttle Express with QStart for Mac. QStartMAC2010 UserGuide Group Ltd.
Monitor configuration In order to prompt out successfully, you will need to output to an external monitor. It is likely (if you have a modern Apple Mac device) that you will need to purchase the Apple Mini DisplayPort to VGA adapter. This will enable you to connect your MacBook Pro to a VGA cable allowing you to connect to the external monitor.
Making the most of your QStart for Mac software To access these settings, go to the QStart menu and select Preferences. In this section the available preferences are explained, along with any notes on behaviour: Basic settings: Prompt output options: Normal – Standard text orientation. Flipped – Flip text vertically for use with an On Camera Unit. Reversed – Reverse position of text and Cue Marker. Scroll Controllers: You can define which scroll control you wish to use within this section.
Cue Marker Position: You can define the position (left hand side, or right hand side) of the Cue Marker. Text and Background Colour: This option allows the changing of the colour of the background and of the text (default colour is black background with white text) to a colour scheme that will suit the requirements of the operator. Advanced settings: Make prompt window full screen – Display the prompt text in Full screen on the external monitor.
If you need to contact Autocue Support Our hardware and software support is provided by in-house teams of experienced and dedicated staff. We provide free telephone support for prompting customers during UK office hours (9am till 6pm GMT) and US office hours (9am till 5pm EST). When contacting the technical support teams, please provide as much detail as possible. Check the FAQ section of the web site to see if the answer you need has already been provided: http://www.autocue.