SSP07 & QStart 7” Starter Series Prompter Installation and and Operation Guide
Contents Latest additions ................................................................ ................................................................................................ ...................................................................3 Getting started ................................................................ ................................................................................................ .....................................................................
Latest additions This document cument was written for build 1900 of the QStart software, released on 3 March 2010. 2010 Any changes since that point have been referenced below. These changes have not been reflected in the rest of the document. Revision history Build number SSP07-QStartUserManual.docx Changes Release date 2010-10-01 3 © 2003-2010 Autocue Group Ltd.
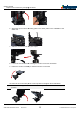
Getting started - Prepare and connect the prompting hardware Getting started This section is designed to get your Starter Series Prompter setup as quickly as possible so that you can start writing and prompting your scripts. Components of the SSP07 Hood and glass Hood mounting bracket Camera mounting bracket Monitor Monitor mounting plate Slider plate Drop bracket Prepare and connect the prompting hardware 1. Unpack your SSP07 and check heck that the following items have been received: a.
Getting started - Prepare and connect the prompting hardware 4 5 6. Attach the tripod camera mounting plate to the slider plate on the underside of the SSP07 unit. 7. Slide the on-camera camera unit onto your tripod. 8. Loosen the two thumbscrews holding the monitor and hood assemblies. 9. Rotate the monitor assembly so that the monitor is horizontal. 10. Raise the hood assembly to the vertical position and tighten the thumbscrews.
Getting started - Prepare and connect the prompting hardware 11. Loosen the retaining thumbscrews thumbs holding the camera mounting bracket.. 12. Rotate the camera mounting bracket so that it is on the top of the unit and behind the hood. er the thumbscrews and tighten tighten all four thumbscrews to secure it. 13. Slot the bracket over Note: It is likely that the position of the unit will have to be adjusted after you have mounted your camera so that it is balanced on the tripod.
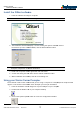
Getting started - Install the QStart software Install the QStart software 1. Insert the software CD into your computer Note: Do not insert the hardware licence dongle until after the software has been installed. 2. Click Install Software on the QStart installation window. 3. The installation wizard will display a screen showing the options available. If this is the first time you have installed QStart, click c the Install software button.
Getting started - Using your Starter Series Prompter 4. The Prompt Output tab is displayed. Prompt output You can configure a secondary output monitor by changing the Windows display properties. The most important property to change iss the option to extend your computer desktop top across both screens. screens Refer to the user manuals for your computer or graphics card for guidance on changing the display settings.
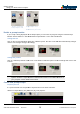
Getting started - Using your Starter Series Prompter Before selecting teleprompter icon Teleprompter icon selected and output automatically mirrored Enable a prompt monitor If your script is being displayed on the teleprompter you can follow its progress using the in-built Prompt Monitor window. When it is first enabled the Prompt Monitor tor is set to Full Screen mode. Change the size Click on the required thumbnail in the Size of Monitor panel.
Getting started - Using your Starter Series Prompter 1. Click the Import File button. 2. Navigate to select the required file. file 3. If requested, select the appropriate file format. format 4. The text is inserted at the position of the cursor. Save your script When you have finished typing your you script you should save the file so that you do not lose your work. It is good practice practic to regularly save your work. 1. Click the Save button. 2.
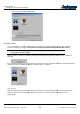
Make the most of your prompter - Import, edit and prompt scripts Make the most of your prompter QStart allows you to quickly and simply create, edit, format format and prompt the scripts you write. The QStart user interface is illustrated below. Import, edit and prompt scripts New File Open File Import File Save File Export File Begin Prompting Prepare your text Create a new script QStart opens with a blank script already open in the Editor window.. You can start typing directly into this area.
Make the most of your prompter - Import, edit and prompt scripts 2. Navigate to select the required file 3. If requested, select the appropriate file format 4. The text is inserted at the position of the cursor. Don’t lose your work Save file Click the Save button to save any changes you have made to the current script. If the file has not been saved before, the standard Windows save file dialog will be displayed.
Make the most of your prompter - Format your scripts Use your selected scroll control device to prompt your script. To stop prompting, press the ESC key on your computer keyboard. Format your scripts If no text is selected, changes made using the Format All interface will apply to the entire script. Most of the buttons of the Format All interface have three states. • Leave: retain formatting already applied to the selected text. • On: apply the formatting to the selected text.
Make the most of your prompter - Dividing long scripts or using multiple presenters Extra line spacing The default value for text line spacing is 0. Use the up/down arrows or type the required spacing in directly. The space between each line of text of the prompt output will be increased. The distance added by each increment iss proportional to the size of the text in your script. For example, if your text is set to 100 and you set the extra spacing value to 0.
Make the most of your prompter - Dividing long scripts or using multiple presenters 4. Click the Add button 5. Enter a description or name for the marker in the Comment field 6. Enter a sequence of keystrokes that you can use to jump to this marker position while the script is being prompted Note: If an inappropriate key sequence is selected, selected, the dialog box will show this. 7. When you have entered a comment and valid shortcut click OK and the marker will be added to the list.
Make the most of your prompter - Dividing long scripts or using multiple presenters Delete markers You can remove markers by highlighting a marker symbol in the script and deleting it. This will automatically remove the entry from the Markers list. You can also remove them using the controls of the Markers dialog. 1. Click the Marker button 2. The Markers list window is displayed. 3. Select an entry 4. Click the Delete button The entry is removed from the list and deleted from the script.
Make the most of your prompter - Different ways to control scrolling Different ways to control scrolling When prompting a script, movement of the text on the screen is controlled by a scroll control device. The default device is a standard computer mouse. QStart supports a range of other dedicated scroll control devices that you can connect to your computer. Select an alternative scroll controller 1. Click on the System Options button to access the configuration interface. 2. Click on the Controller tab.
Make the most of your prompter - Different ways to control scrolling Keyboard arrow keys The Up arrow key increases the speed each time it is pressed and the down arrow key decrease the scroll rate. Press the left arrow key to change direction and the right arrow key to stop scrolling. Use the Home key to jump to the top of your script and the End key to jump to the bottom of the script. script Mouse Move the mouse forward to increase the scroll speed. Move the mouse backwards to decrease the speed.
Make the most of your prompter - Improve the performance of your prompter Improve the performance of your prompter 1. Click on the System Options button to access the configuration interface. 2. Click on the Display Sensitivity tab Display Sensitivity compensates for the performance capabilities of different computers when controlling both the e main prompt output and the prompt monitor window. This is usually shown by movement of the text in the prompt output halting as the CPU is made to work harder.
Make the most of your prompter - Using a single monitor The link ed image cannot be display ed. The file may hav e been mov ed, renamed, or deleted. Verify that the link points to the correct file and location. Prompt output If required you can configure your computer by clicking the “OS Display Properties” button to access the standard operating system display splay controls.
Make the most of your prompter - Alternative operating systems you may use Alternative operating systems you may use Your QStart software will run on computers using the following operating systems: • Windows XP Pro SP3 • Windows Vista Special requirement. You must first download and install winhlp32.dll from the Microsoft web site http://go.microsoft.com/fwlink/?LinkID=82148 (For legal reasons Autocue-QTV Autocue cannot distribute this with its software.
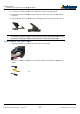
Use your prompter in different situations Use your prompter in different situations You may not always need to use your prompter with a camera. The Starter Series hardware is designed to allow you to put your SSP07 in to alternative mounting arrangements depending on how you wish to use your system. When altering the position of the different components of yourr Starter Series Prompter, always handle with care to avoid damaging them, especially the mirrored glass.
Use your prompter in different situations 4. Remove the hood mounting bracket completely and carefully place it in the SSP07 carry case. 5. Remove the two thumbscrews attaching the monitor mounting bracket to the drop bracket. 6. Remove the two thumbscrews securing the monitor to the monitor mounting bracket. 7. Align one of the screw holes on the back of the monitor with the hole in the centre of the drop bracket and use one of the thumbscrews to attach the monitor to the drop plate.
Use your prompter in different situations 3. Remove the hood mounting bracket completely and carefully place it in the SSP07 carry case. 4. Remove the two thumbscrews attaching the monitor mounting bracket to the drop bracket. 5. Remove the two thumbscrews securing the monitor to the monitor mounting bracket. 6. Align one of the screw holes on the back of the monitor with the hole in the centre of the drop bracket and use one of the thumbscrews to attach the monitor to the drop plate.
Upgrading Starter Series Prompter rompter components Upgrading Starter Series Prompter Prompter components Upgrade software You can download the latest build of the QStart software from the Autocue-QTV Autocue QTV web site: www.autocue.co.uk/filelibrary/downloads/release/QStart 2009 This file will be a .ZIP file containing the compressed installation files. Contact the Autocue-QTV technical support team to request the password to extract the files. 1.
If you need to contact Autocue or QTV Support Our hardware and software support is provided by in-house in house teams of experienced and dedicated staff. We provide free telephone support for prompting customers during UK office hours (9am till 6pm GMT) and US office hours (9am till 5pm EST). When contacting the technical support teams, please provide as much detail as possible. Check the FAQ section of the web site to see if the answer you need has already been provided: http://www.autocue-qtv.