
Product data


26
Autodesk Design Review Getting Started Guide
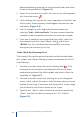
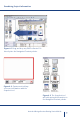
downward pointing arrow of the measure tool button and select
it from the expanded list.) (Figure 4.1)
. Hover the cursor over the switch until you see the red snap point
with the white center .
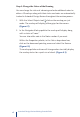
. Click and drag until you see the same snap point on the other side
of the switch. A measurement should appear between the two
end points. (Figure 4.2)
. You can change the units display of the measurement by
selecting, Tools > Units and Scale. The measurement above for
example can be changed to centimeters or inches for example.
. Once you’ve noted the measurement of the switch, select the
measurement with the Select Objects tool and hit your
“Delete” key. You can delete any measurement or markup
throughout your review in this way.
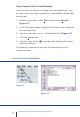
Step 5: Mark Up a Drawing Sheet
The Autodesk Design Review markup tools include revision clouds,
text, shapes, and stamps allowing reviewers to comment on the D
and D designs.
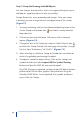
. To create a revision cloud, click on the Markup tool . If the
rectangular markup cloud is not displayed, click on the down-
ward pointing arrow of the Markup tools and select it from the
expanded list. (Figure 5.1)
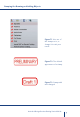
. To create a revision cloud, click and drag the cursor diagonally
across switch, release the mouse, and click again where you want
to place the text tag. If you chose to markup with a unique shape,
you will want to click at each corner on the shape.
. Type the text: “Adjust switch terminal to extend on position by
.mm” and click outside the markup or hit “Esc” to finish.
(Figure 5.2)