
Technical data

Reusing Your Existing 2D Design Data
65
Adding a Cutout to the Rim
Next, you will add a cutout to the rim. Since the cutout must start on the inner face of the rim, you must create
a new sketch. You can then copy the sketch geometry from the shared sketch to this new sketch.
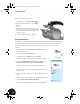
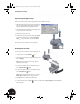
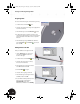
1. Restore the Isometric View and then use the
Zoom Window tool to zoom in on the rim.
2. Select the circular planar face of the rim,
right-click, and then choose New Sketch.
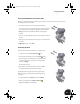
3. In the Browser, just above Revolution1, right-click
the AM_1 sketch and then choose Copy.
4. In the Browser, right-click Sketch3 and choose
Paste.
The sketch geometry is now pasted into your new
sketch.
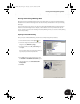
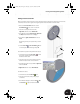
5. Use the Zoom All and Zoom Window tools
to view the part and the sketch geometry.
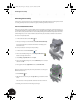
To constrain the position of the profile for the cutout:
1. On the Panel bar, click the Concentric tool. You
may need to click the down arrow next to
Horizontal or Coincident.
2. Select the large outer arc in the sketch geometry
and then select one of the circles on the rim.
3. To quit the Concentric tool, press Esc or right-click
and choose Done.
4. Right-click and then choose Finish Sketch.
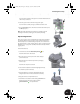
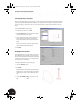
To extrude the cutout:
1. On the Panel bar, click the Extrude tool.
2. Select the semicircular cutout profile you just
constrained.
3. In the Extrude dialog box, select the Cut , All,
and Centered options and then click OK.
INV8_TD_Book5.book Page 65 Tuesday, October 28, 2003 10:51 AM