Pro Import AE 5.0 User Guide last updated October 16, 2011 About Pro Import AE Pro Import AE is Automatic Duck's oldest plug-in, first released in the spring of 2001. This plug-in imports into After Effects AAF and OMF files from your Avid, XML files from Final Cut Pro as well as Motion project files. Using Pro Import AE To use Pro Import AE you must first export from Final Cut Pro an XML file, an AAF or OMF 2.
Settings The settings dialog is organized into two tabs, the Footage and Media tab for options dealing specifically with the imported media files and the Comp and Layers tab that has settings for how the composition is created and layers added. Footage and Media In After Effects parlance the media that gets imported into After Effects to potentially be used in a composition is referred to as footage.
Validate timecode of found Final Cut media Sometimes customers run into a situation where they have multiple copies of a media file available on their system, each with different durations perhaps due to running stuff through FCP's Media Manager. In a case like this when Pro Import AE searches for media to import into After Effects it is possible to connect up with the wrong media file, producing undesirable results.
Avid Media options After Effects cannot by itself play all Avid media files, indeed when Automatic Duck started After Effects couldn't read any Avid media files. Pro Import AE's way around this has always been to "fool" After Effects into playing Avid's OMF and MXF media files via QuickTime reference movies. This generally works well, but there are situations where other options would be more desirable.
Superimpose, but if you have a third party AVX effect applied it will not be translated. If you have a sweet effect that you created in the Avid and want to bring that into After Effects you can enable this option and as long as you have rendered the effect before you export from the Avid, Pro Import AE will create a separate layer pointing to the Avid rendered media file.
Custom search paths Just like you might want to instruct Pro Import AE to never search certain places you might also want to give the plug-in some priority locations where the plug-in should search for media files. Pro Import AE will search these locations you add to this list before any other. This is especially useful on Windows where the plug-in is not able to search the entire system for media files.
Override composition setting preset Sometimes you want your After Effects comp to be setup differently than your editing timeline was set, you can use this setting to override how the new comp is created. The composition created by Pro Import AE will match the size and frame rate defined by the selected preset.
As you would expect, when Layers step down in comp is selected, layers from earlier in the comp appear higher in the layer order and later clips appear lower. The clips look like stairs going downwards. So there you go, more choices for you. Keep vertically adjacent clips together Historically Pro Import AE has added clips to the timeline as they were processed as the plug-in processed clips, first left to right on V1, then left to right on V2, etc.
Precompify layers based on track While certainly the power of Pro Import AE is that it builds an AE comp with each video clip as a separate layer. But sometimes you want the option to treat everything from a single video track together as one element in After Effects. It can be helpful to know at a glance that layers came from different tracks. When Precompify clips based on track is enabled, all the clips from a track in the AAF/ OMF/XML file are placed into a nested composition.
Label audio and video tracks separately This option will color all of the video layers one label color and all the audio layers the other. What is translated Pro Import AE is able to translate a lot of metadata from your Avid, Final Cut Pro or Motion project into After Effects. Not everything translates, of course, but a lot does. Translation from Avid editing systems The following table outlines how Pro Import AE deals with the supported effects when importing from Avid editing systems.
Effects and parameters that are not supported are not translated, and are therefore lost. Please keep this in mind as you prepare to migrate from your Avid editing system to After Effects. The following table shows what is translated from Final Cut Pro to After Effects.
Crop Media Playback Rate Perspective > Flop (Horizontal) Perspective > Flop (Vertical) Perspective > Flop (Both) Blend Mode Audio Level and Audio keyframes Rectangular Mask created Playback Rate in Interpret Footage Transform Effect applied, Scale set to -100, 100 Transform Effect applied, Scale set to 100, -100 Transform Effect applied, Scale set to -100, -100 Transfer/Blending Mode Audio level keyframes created Third Party Effects Pro Import AE is able to apply many third party filters in After Effects
This warning notifies you that some “effects” are not supported. In the context of this dialog, the term effects refers not only to effect filters, but to any parameter or feature that modifies your clip. In most cases it appears because of unsupported features or filters, not any kind of dramatic failure. Clip Markers When Pro Import AE sees an effect it doesnʼt know how to translate, it places a marker on the layer with the effect or parameter name in the marker.
Motion must be installed on the Mac youʼre using After Effects on, without Motion installed QuickTime cannot open the mini Motion project files created by Pro Import AE. Time Remapping Time Remapping information from Final Cut Pro and Time Warps from Avid editing systems can be translated into After Effects using Pro Import AE. The keyframe values in the FCP time remap keyframes or the Avid time warp keyframes are translated to the keyframe values of Time Remapping in After Effects.
supports nesting, so your nested sequences from FCP will become nested compositions in After Effects. Be aware that audio from nested compositions may not appear in After Effects as you expect. In Avid editing systems, nesting isnʼt possible like it is in Final Cut Pro. However some level of nesting is available, where layers can be nested inside of effects such as Picture in Picture. The Submaster effect is another way nesting is possible in an Avid.
This structure of a layer named “Layer” containing a clip called “Rocket Launch” could easily be recreated in After Effects. You can imagine a comp called “Layer” and that comp contains a layer named “Rocket Launch”. But this setup is a bit inconvenient in After Effects, nested comps in After Effects-- while powerful-- can get in the way. So in this example the Motion clip loses its layer-wrapping and becomes an After Effects layer. In cases where nesting needs to happen, it does.
the clips (and perhaps even other layers) contained within and the “bounding box” that represents the nest in the Motion canvas is drawn on the fly. Nested comps in After Effects do have a size, however, and Pro Import AE needs to calculate what that is. Pro Import AE considers Position and Scale when it calculates what the size of the nested comp needs to be. In the following example, three clips of a ski jumper are nested into a layer and the layer is scaled so the three clips appear on screen together.
As the middle jumper is rotated, the virtual nest in Motion widens, but Pro Import AE doesnʼt consider rotation when it calculates the size of the nested comp, so in After Effects the corners of the jumper get cut off. You can easily fix this by changing the comp settings for the nested composition. Source Clip Markers / Locators Markers from source clips in FCP sequences are translated into layer markers in After Effects. Both the name and the description fields from the FCP markers are translated.
Locators from Avid editing systems are also translated into After Effects markers. Motion offers markers that can be applied to either clips in the timeline or project. Both kinds translate into After Effects, the markers on Motion clips appear on their translated After Effects layers. Motion project markers appear on a switched off layer at the top of the comp. Markers are a great way to make comments about clips that need special attention in After Effects.
Text and Titles Pro Import AE is able to read the text from titles created in Avid (Media Composer 10 and later) and Final Cut editing systems then create text layers in After Effects. Text from Motion is translated into a mini Motion project so that the visual results in After Effects match what you saw in Motion. Pro Import AE will attempt to set the font, alignment, color and size of the text in After Effects CS4 and CS5.
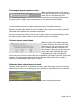
Avid Matte Key When you bring in Matte Key effects from your Avid system, they will result in Luma Track Mattes. This is good, but what isnʼt good is that your Avid media is in the 601 color space, so your blacks will be RGB 16 and your whites RGB 235. The composite on the left has a bit of the spaceship motor stage bleeding through the next shot (note to the left of the “A” where the arrow is pointing), while the right side is correct.
Set the effect so that the Input Black is 16 and the Input White is 235. You can leave the other settings, you want the Output Black to be 0 and the Output White to be 255. The matte layer will now properly key the video elements involved in the matte key. Square pixel elements in non-square pixel sequences Final Cut Pro and After Effects deal differently with the problem of a square-pixel element in a non-square-pixel sequence/comp (and vice-versa).