
Instruction Manual


Diamond PD Power Drive : Instruction Manual
Dominator Tempo & Syncro Instruction Manual ATS-3AM & ATS-2AM
11
© Copyright 2019
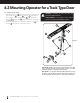
Fig.6.2.4
6.2.4 Securing the Powerhead Perforated Angle or equivalent
a. Measure across the ceiling from the centre point 10.3 ft (+/- 2”) to find a
supporting beam.
b. Create a perforated angle which best suits your site. Use a hack saw to
cut the L shape metal strips. Secure the perforated angle to a supporting
beam using diagrams shown below (Fig.6.2.4 & Fig.6.2.5).
c. Raise the drive unit to the ceiling mounted perforated angle and secure
with
51
/
64
screws and nuts (not supplied). Strips should not extend more
than 0.708” (18mm) below centre of drive unit mounting holes.
d. To prevent moisture on the C-rail running into the powerhead it is
recommended a strip of silicon sealant is placed across the top of the
C-rail just before the opener.
Fig.6.2.5
Fig.6.2.6
6.2.6 Mounting Door Bracket
a. The door bracket locator
7
is placed over the door bracket
8
, on the
door’s centre line one-third down the top panel and mounted using
1
/
4
”
or equivalent screws (not supplied) (Fig 6.2.6),
b. STEEL DOORS ONLY: Bracket can be welded in place.
NOTE: As various types of doors exist, if in doubt about the strength of
the door, reinforcement may need to be added to the frame of the door
panel where necessary. Damage to the door panel may occur if the bracket is
installed incorrectly on a panel with insufficient strength. The door operator
warranty does not cover damage caused by the operator to the door and/
or door panel.
REMARQUE: Étant donné qu’il existe divers types de porte, il est possible
d’ajouter un renfort au cadre du panneau en cas de doute quant à sa solidité.
Le panneau de porte peut être endommagé si la patte de support est mal
fixée et s’il est insuffisamment rigide. La garantie du dispositif d’ouverture de
la porte ne couvre pas les dommages causés à la porte et/ou au panneau par
le dispositif d’ouverture.
6.2 Mounting Operator for a Track Type Door
Ceiling Beams that run towards the door requires:
1 x perforated L shape metal strip and
2 x shorter perforate L shape metal drop down strips.
Ceiling Beams that run parallel to the door requires:
2 x perforated L shape metal strips and
2 x shorter perforate L shape metal drop down strips.
8
7
WARNING! The operator must be securely fastened to
a structural support of the garage. Failure to fasten the
operator correctly may lead to operator failure causing
serious personal injury and/or property damage.
AVERTISSEMENT! Le dispositif d’ouverture doit être
solidement fixé à un support structurel du garage.
Sinon, les utilisateurs risquent de se blesser ou le
matériel de s’abîmer.
ELECTROCUTION! This operator is not equipped for
permanent wiring. Contact a qualified electrician to
install a suitable receptacle if one is not available.
AVERTISSEMENT! Ce dispositif d’ouverture n’est pas
conçu pour un câblage permanent. En l’absence de
réceptacle approprié, contactez un électricien qualifié
pour en installer un.
Straighten the antenna on the opener, by pulling
straight down to ensure optimal reception.
tip