
Installation manual


14
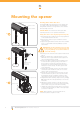
GDO-8V2 EasyRoller® II Owner Installation Instructions
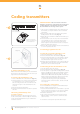
Setting limits
6.3 Setting limits via remote control
PLEASE NOTE: The opener is factory preset for
installation on the RIGHT HAND SIDE. When the opener
is mounted on the left side of the door the opener will
travel in reverse.
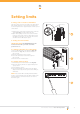
1. Press button 4, the door will start closing. If the door
starts to open - press the Operate button (Fig. 10)
within two (2) seconds. Press button 4 again - the
door should now close. Release the button once you
are 1 to 2cm from your desired closed limit position.
2. Press button 3 for two (2) seconds to switch to slow
inching mode.
3. Press button 4, each press will enable you to inch the
door to your desired closed position.
4. Once you are happy with the position press button 2,
to store the closed limit position into memory.
5. Press button 1, the door will start opening. Release
the button once you are 1 to 2cm from your desired
open limit position.
6. Press button 3 for two (2) seconds to switch to slow
inching mode.
7. Press button 1. Each press will enable you to inch the
door to your desired closed position.
IMPORTANT WARNING: Please be aware that
the garage door will start closing automatically
once step 8 is performed. The door will also
automatically re-open after fully closing with a
short pause between the cycles.
8. Once you are happy with the position press button 2,
to store the open limit position into memory.
The door will now automatically close to its limit position
then fully open to calculate the safety obstruction forces
(ISS). Please be aware of the above warning.
7. Resetting door limits positions
The door curtain has to be secured to the drum wheel
with suitable fasteners.
The door limit positions can be deleted for new
positions by following the steps below:
1. Press and hold the Minus button (Fig. 10) for six (6)
seconds until you hear three beeps and the red Close
Limit LED starts to fl ash. Release the button.
2. Follow STEP 6.3 above to set new travel limit
positions.
IMPORTANT: There is no need to re-code the
transmitter used for setting the limit positions. After
the limits are set the transmitter will automatically
reset to normal operation.
Go to STEP 8 and test the Safety Obstruction Force.
10
fi g
11
fi g
Inch close
button 4
Inch open
button 1
Set
button 2
Switch between
fast and slow
inching
button 3