
Installation manual


Owner Installation Instructions GDO-8V2 EasyRoller® II 17
PE beam and fi nal set up
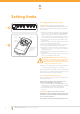
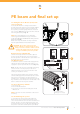
13. Fitting the Photo Electric (P.E.) beam
sensor (optional)
Locate the P.E. Beam in a strategic location within
doorway. Automatic Technology recommends 150mm
above the fl oor level and as close as possible to the
door opening, inside the garage. Remove shunt from
P.E. connector (Fig. 16) and connect the wires from the
P.E. wiring harness as per Fig. 17.
NOTE: The wiring diagram is for an Automatic
Technology Transmitter/Receiver type P.E. beam:
model: PE-2 (Order Code 90214) with Wiring Harness
(Order Code 01900).
Make sure to align the beams correctly. Follow the
manual supplied with the Photo Electric Beam.
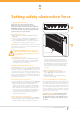
WARNING: The location of the beam and
manner in which it is installed might not give
safety protection at all times. Check to make
sure that the height of the beam and type
used give maximum protection possible.
External Secure Light Module
external secure light can be connected to gdo8 as
shown in fi g 16. the light stays on for three minutes
after the opration of the door.built in oprate button can
be used to open or close the door
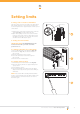
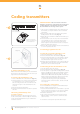
14. Manual release
To switch the opener to manual mode simply pull the
red manual release handle down and release. To re-
engage the opener repeat the above action (Fig. 18).
Note: The door may move uncontrollably if the spring
tension is weak or not set properly or the door is
unbalanced. If this occurs do not use the door and
contact your installer for service.
The manual release handle can be locked to prevent
unwanted disengagement (where fi tted). This is useful
if the opener is mounted on an exposed carport or
perimeter door. To disable the manual release turn the
key clockwise to the locked position as indicated on the
label. To enable turn the key anti-clockwise.
15. Reset all factory defaults
1. Turn power off.
2. Press and hold Set button.
3. Turn power on and continue holding Set until all
LEDs are off.
NOTE: This does not erase transmitter codes stored
in memory.
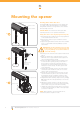
16. Re-initialising the opener
To re-initialise the opener press and hold the Set
Button for two (2) seconds, the beeper will sound
once. The door will start to move and re-calculate force
margins. The door can move between the open and
close limit positions up to four (4) times (depending on
the position of the door and the power up condition).
1 2 3 4 5
0V
PE
24V
16
fi g
17
fi g
18
fi g
Remove
PE shunt
Receiver Transmitter
Cable 1 Cable 2
Red 24V
Black 0V
Yellow
Pull down handle to
disengage or re-engage