
User Guide


Let’s do this!
Everything you need is inside the box. Well, nearly everything...
If you are going to pair KaiBot with your Chromebook, PC or MAC then that device is not inside the box,
lol that would be funny if your computer was also in the box!
The great thing about KaiBot is that it can work without your computer (screen-free) or it can work
alongside it using Kainundrum.com.
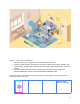
1. Help KaiBot feel at home.
KaiBot works best on clean, flat surfaces with or without his optional Kai-Tiles . He likes open spaces
either on the floor or on a table. But he prefers his magnetic blue Kai-Tiles because he always knows
where he is when he's placed on them. He’ll work fine without the blue magnetic tiles though.
2. Power up .
Plugin the USB charge cable to the back of KaiBot to charge him up.
He feels more secure if you have the optional Charge Dock as then he’ll be able to charge himself when
he gets tired and be refreshed and ready for the day ahead.
Do not use the robot during charging. KaiBot gets around 1-2 hours of play from a 30-minute charge
when connected to a powered USB outlet.
3. Layout the Coding Cards
Once you’ve got KaiBot charged, it’s time to teach him how to code and be ready for World Domination.
(don’t forget to pack lunch).
KaiBot acts as a computer interpreter. KaiBot interprets and translates the coding cards into machine
code, instruction by instruction, and then KaiBots CPU executes each instruction before the internal
interpreter moves on to translate/scan the next instruction. If KaiBot scans a coding card that is invalid
the interpreted code will show an error Bug message on the screen as soon as it encounters a
problem, so this makes it easier to debug your code.
What’s included
What’s in the box
5