
Installation Manual


7
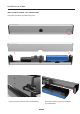
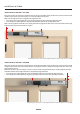
Fully close the door. Fix the base on the frame with six countersunk wood screws, (if the frame is steel structure should
use M6*15 hex countersunk head screws). Make sure the edge of the base is aligned to the edge of the door. Use a level
throughout this process.
Make sure the base is just low enough so the arm is able to rotate freely without hitting or scraping against the frame
of the door. Make sure the edge of the base is aligned to the edge of the door.
• If installing onto a right hinged door, align the left edge of the base to the back left edge of the door
• If installing onto a left hinged door, align the right edge of the base to the back right edge of the door.
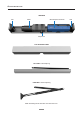
INSTALLATION
INSTALLATION OF THE BASE - PUSH ARM
INSTALLATION OF THE BASE - PULL ARM
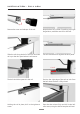
Fully close the door. Fix the base on the frame with six countersunk wood screws, (if the frame is steel structure should
use M6*15 hex countersunk head screws). use a level throughout this process.
Make sure the edge of the base is aligned to the edge of the door.
• If installing onto a right hinged door, align the right edge of the base to the right edge of the door.
• If installing onto a left hinged door, align the left edge of the base to the left edge of the door.
Make sure the top of the ball of the arm is slightly below the top edge of the door panel. Ensure the bottom of the hinge
of the arm does not hit the door panel as it opens
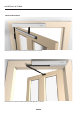
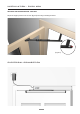
AutoSwing with Pull Arm on left hinged door (front view, hinges are on the left)
AutoSwing with Push Arm on left hinged door (back view, hinges are on the right)