
Owners manual


Installation Instructions
Page 1 of 3
Ventvisor® Deector
I - Sheet Number VV113 Rev.B
Important Safety Information
• CAUTION - Before driving, ensure that the vent visor is properly secured to vehicle.
• Do not use automatic “brush-style” car washes.
• Do not use cleaning solvents of any kind.
• Periodically check all components for tightness.
For proper installation and best possible fit, please read all instructions BEFORE you begin.
For technical assistance or to obtain missing parts, please call Customer Relations at 1-800-241-7219.
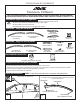
Contents - 4 Piece Set
Contents - 6 Piece Set
Alcohol Pad x4
Front Passenger
Side Visor
Front Driver
Side Visor
Rear Driver
Side Visor
Rear Passenger
Side Visor
Preparation Before Painting / Installation
• A trial fit is recommended to ensure proper positioning and fit.
• Check fit of parts before painting as we will not accept the return of modified or painted parts.
• Wash and dry your vehicle to remove any debris and/or dirt from the installation area.
Tools Required
Car Wash Supplies Clean Towel
NOTE: Actual product may vary from illustration.
Installation Steps
NOTE: Actual application may vary slightly from illustrations.
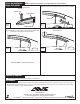
11 12
front flange
free end
Peel back 2” (5cm) of tape liner from rear end of top flange.
Ensure free end is accessible. Remove tape liner from front and
rear flange.
Clean the window frames with an alcohol pad and dry
with a soft cloth.
top flange
Alcohol Pad x6
Front Passenger
Side Visor
Front Driver
Side Visor
Rear Driver
Side Visor
Rear Passenger
Side Visor
Ext. Rear Driver
Side Visor
Ext. Rear Passenger
Side Visor
rear flange
(remove tape liner)
(remove tape liner)