® VISION BEYOND SOUND ® INSTRUCTION MANUAL MSW1150 HI-FI VERTICAL CD/MP3 SHELF SYSTEM WITH USB FLASH/SD CARD READERS, AM/FM TUNER, AND 6-WAY DETACHABLE SPEAKERS Product and Instruction Manual subject to change. Photo is for reference only.
Table Of Contents Caution / Warning..................................................................................................... 02 Location of Controls ................................................................................................. 03 Remote Control Functions .................................................................................... 04 Connection of Speaker Boxes .............................................................................. 04 Power Supply...............
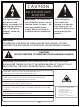
C A U T IO N R IS K OF E L E C TR IC S HOC K DO NOT OP E N The lightning flash and arrow head within the triangle is a warning sign alerting you of "dangerous voltage" inside the product. WARNING: To reduce the risk of electric shock, do not remove cover (or back). No user-serviceable parts inside. Refer servicing to qualified service personnel. The exclamation point within the triangle is a warning sign alerting you of important instructions accompanying the product.
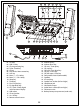
3 2 TUNE R /B AND US B /S D 1 FIND DIS PLAY +10 ME M (+) -10 ME M(-) S LE E P 9 10 11 7 A UX PLAY-MODE MONO/S TE R E O TIME R 12 6 CD PR OGR AM EQ 13 5 4 8 14 15 16 27 26 25 24 23 22 21 28 15. 16. 17. 18. 19 18 17 27 34 29 01. 02. 03. 04. 05. 06. 07. 08. 09. 10. 11. 12. 13. 14. 20 30 CD door USB / SD key CD programming key Tuner / Band key CD key Play mode / Mono stereo key Aux.
1 2 7 3 8 4 9 5 10 6 11 12 14 13 15 17 16 19 18 20 Remote Control 01. 02. 03. 04. 05. 06. 07. 08. 09. 10. On / Off key Find / M/S key Timer key EQ key Sleep key Memory down key Band key Intro key Function key Repeat key 11. 12. 13. 14. 15. 16. 17. 18. 19. 20.
Quick Start 1. Connect the speakers and table stand. 2. Plug the AC cord into a wall socket and connect the FM antenna wire. SPEAKER CABLES AC CORD PLUG FM ANTENNA WIRE 3. Press the On/Off key to switch “On” the unit.
5. How to listen to the radio USB DRIVE USB/SD TUNER/BAND CD AUX ULTRA HIG H PO WER HIG H FIDELITY SYSTEM SD C ARD BACK KEY TO TUNE STATION DOWN HIG H VELO C ITY G EAR DRIVEN MOTO RIZED C D C O MPARTMENT VOLUME ON /OFF SD CARD READER USB FLASH READER PLL DIGITAL TUNING MP3 iR PLAYBACK CAPABLE - SENSOR - Press Tuner/Band key to switch to Radio Mode. - Press Tuner key to switch to “FM” radio band. - Press Tuner key again to switch to “AM” radio band.
Important Operating Instructions - This unit is designed to operate without ever being totally powered “Off”. It will either be “On” or in “Standby Mode”. - In “Standby Mode”, the blue backlight of the digital display will be switched off. However, the clock display will still be viewable. - When in “Standby Mode”, you can use the power switch (on the remote control or on the front panel of the main unit) to turn “On” or “Off” the unit.
Digital Clock Functions - This unit also has a built-in digital clock, which is displayed when the unit is in Standby Mode or when you press and hold the Program key for two seconds during the CD or Radio operation. - To set the correct time, follow the procedure below: Switch unit to Standby Mode. Display light will be “Off” Press and hold Program for 3 seconds. Display shows 12 hour or 24 hour (flashing). Press Next or Back to select 12-hour or 24-hour clock display system.
Automatic Power On/Off Timer Function This unit has a timer function that enables you to program the unit to automatically turn “On” or “Off” at preset times. This function can also serve as an alarm clock. How To Set Timer 01. Press and hold Timer key. The symbol appears in the display. 02. Press Next or Back key to adjust the hour of the desired "Power on" time and then press Timer key to confirm. 03.
Electronic Volume Control - This unit uses an electronic volume control . To increase or decrease the loudness of this unit, press the volume up Vol + or volume down Vol - keys. Release the key when volume level is at the desired loudness. Sometimes, especially during listening to the radio, you may notice a "click-click-click" repeating) sound when you are increasing or decreasing the volume.
Radio Operation - Press the On/Off key once to switch on the unit. Press the Tuner key to select the desired radio band. For AM stations, rotate or reposition the set to improve radio reception. For FM stations, extend and adjust the telescopic antenna to obtain the best reception. Use the FM Mono/Stereo key to select the desired mode. In some cases, where reception is poor, it may be advisable to select “Mono” mode to improve clarity of the radio signal.
Insertion And Removal Of Discs - Press the CD key. The display will show “CD”. - Press the Open/Close key to open the CD door. Carefully place a compact disc (CD or MP3 disc) onto the center of the CD spindle. Make sure the printed side of the CD is facing up before closing the CD door. - The CD display will show the total number of tracks on the disc. After a few seconds, the CD will be ready to play. - To remove the disc from the unit, press the Open/Close button. The CD door will open.
Normal CD Operation - cont. - cont. Normal CD Operation - The CD player can be programmed to play up to 64 tracks (songs). - Always press the Stop key before programming. - Press the Program key once, the display will show the memory symbol to indicate that the set is now programmed into the CD player. - There are different procedures for programming a CD and a MP3 CD. Read how below: Programming Procedure For Normal Audio CD: - Press Next or Back key to select the song you would like to program.
Finding (Searching) MP3 Songs By Song Name - During Stop or Play modes, press Find key once. The “Find” symbol will flash in the display, and the letter “A” will be shown (see example below). This is the “Search Alphabet”. Press the Next or Back key to advance the Search Alphabet to select the desired letter. At every selected letter, the lower part of the display will show the name of the first song beginning with that selected letter on the disc.
Finding (Searching) MP3 Songs By Album - MP3 files (songs) can be organized into folders (directories) when you record them on to a CD-R disc. Each folder is called an "Album" and you can (for example) organize your albums on a disc so that each album contains songs by a particular artist, or alternatively, by a different genre or type. You can organize songs and albums in any way you wish so that you can locate and play back those songs with greater ease and convenience.
THIS MEANS YOU ARE IN ALBUM FIND MODE A LBUM NAME (WHICH YOU WANT TO OPEN) ALBUM NUMBER ALBUM VEGETABLES... 02 Press and hold for 2 seconds. NE X T SONG NUMBER ON WHOLE DISC (BASED ON ALL SONGS ON THAT CD) ALBUM 02 CARROT... NAME OF FIRST SONG IN THE SELECTED ALBUM Press and release repeatedly to scroll through all the songs contained within the selected album. NE X T NAME OF DESIRED SONG IN THE SELECTED ALBUM TOMATO... 09 Press the Play key to play the song displayed.
USB Flash Drive / SD Card MP3 Playback - This unit is equipped with a USB socket which can accept and play MP3 files stored on standard USB flash drives which are for memory storage. This unit is compatible with USB version 1.1 & 2.0. - This unit is equipped with a SD card slot which can accept and play MP3 files stored on standard SD cards which are for memory storage. - The USB and SD card sockets are located on the side of the unit as shown in the picture below.
Play Modes (CD, CD MP3, USB MP3, SD MP3) - During anytime of play mode, press Play-Mode key repeatedly to select from the following: Repeat Repeat Album Repeat All Intro Random To repeat current track. To repeat all songs from currently selected Album (availble for MP3 only). To repeat all tracks from any type of media. To sample the first 12 seconds of all music using any type of media. To play a random mix of all of the songs on all media types.
Connecting An External Powered Subwoofer (Not Included) - This unit has a built-in subwoofer connection which can be connected to any standard powered subwoofer. - By connecting to a powered subwoofer, the low frequency (Bass sound) can be strongly enhanced to provice a much richer and deeper sound to your music. - To use this facility, simply connect any standard powered sub woofer (easily available from most music equipment shops) using the RCA jack on the rear panel of the main unit.
System Setup Procedure A. Shelf Use Setup (For Table / Desktop Use) - The main unit can be placed on a flat surface either with or without the supplied pedestal. See below. Desktop use without pedestal stand - Place the main unit on a flat stable surface as shown. There are rubber legs on the bottom of the unit which will help stabilize it and protect the table from scratches. - Avoid placing the unit on metal surfaces as it may cause interference with frequencies or stations.
B. Wall Mount Setup - The main unit and speakers can be mounted onto a wall surface with the use of the supplied wall bracket and screws. - You can use the supplied paper templates to mark the screw hole positions on the wall first, and then drill holes and carefully screw the wall bracket to the wall in the exact desired position. STEP: 1 FIX THE WALL BRACKET TO THE EXACT DESIRED WALL POSITION USING THE SUPPLIED PAPER TEMPLATE AND SCREWS.
® VISION BEYOND SOUND ® Auvi Electronics N.A. & Auvi Electronics L.A. Retail Divisions of Auvi Technologies 5988 Mid Rivers Mall Drive St. Charles, MO 63304 www.auviworld.com For customer service inquiries in the U.S. and Canada, please email custservice@auviusa.com. For customer service inquiries in Latin and South America, please email custserviceLA@auviworld.com. © 2006 Auvi Technologies, LLC. All Rights Reserved. Auvi Electronics N.A., LLC and Auvi Electronics L.A.