
Use and Care Manual


22
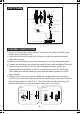
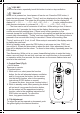
PART FIGURE
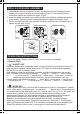
ASSEMBLY INSTRUCTION
Fig. 1 Fig. 2
Straight side
Hook
Opening
Inner tube
Hook hole
Front Grill
Center Piece
Circlip
Grill Clip
Plastic Nut
Control Part
Remote Control Hook
Round Base
Butterfly Screws For Fixed Base
Tighten
Loosen
Spinner
Rear Grill
Shaft
Motor
Fastening Knob
Tube
Female terminals
Blade
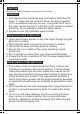
Note: All the pictures in this manual are for explanation purpose only. Any discrepancy between
the real object and the illustration in the drawing shall be subject to the actual product.
1. Take out the base tube, three butterfly screws for fixed base, and the round
base from the packing carton.
2. Insert the tube into the round base. Be sure to make the positioning screw
align with the base.
3. Screw the three butterfly screws into the holes on the tube and tighten them.
4. Loosen the fastening knob, adjust the height of inner tube and tighten the knob.
5. Take out the control part of the fan from the packing carton, loosen the
fastening screw at the back of the box, insert the inner tube into the bottom
hole, make sure that the fastening screw and the fastening knob are in the
same position.
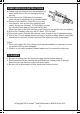
6. Usage of the remote control hook: Make the straight side of hook facing up.
Clip the hook to the inner tube along with the opening, the hook can be moved
up and down along the tube (Fig.1). The hook of the remote control may be
linked to the back of remote for storage when not in use. (Fig.2)