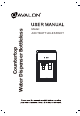
Countertop Water Dispenser Bottleless Model: A8CTBOTTLELESSWHT
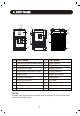
DIRECTORY 1 SAFETY PRECAUTIONS 2 GETTING STARTED TROUBLE SHOOTING 6 WATER PURIFIER 8 8 MACHINE INSTALLATION 10
A: PART NAME 123 12 9 4 11 10 13 14 15 16 5 6 7 19 8 NO. PART NAME 17 18 NO.
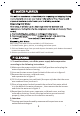
B: SAFETY PRECAUTIONS
This appliance can be used by children aged from 8 years and above if they have been given supervision or instruc on concerning use of the appliance in a safe way and if they understand the hazards involved. Cleaning and user maintenance shall not be made by children unless they are older than 8 and supervised. Keep the appliance and its cord out of reach of children aged less than 8 years.
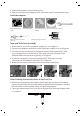
3. Unpack the product, install the drip tray. 4. Take out the quick joint adapter with valve and install it on the water pipe. Intall the adapter: Metal Adapter with Valve PE Tube (3m) Electronic Valve Connector and Tube Extra Filter Flushing Tape and Tools (not included) Adapter Elbow Connector and Tube Moun ng Bracket Tape and Tools (not included) 1. Disconnect the current cold water supply line, as in figure 1. 2. Connect the adapter with valve to the cold water supply line, as in figure 2. 3.
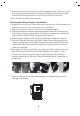
3. Hold this filter with A4 System filter flushing adapter over a sink and turn on the valve near the water source. Let water to flow out of the filter and A4 System filter flushing adapter for 5 minutes to flush the new filter. 4. Shut off the valve at the water source. Finishing the Water Cooler Installa on 1. Remove the end of the PE Tube from the A4 System filter flushing adapter by pressing on the blue ring and pulling out the PE Tube. 2. Twist out the filter from the A4 system filter flushing adapter. 3.
9. Turn back on the valve from the water source. 10. Turn on the blue valve to the le of the filter. 11. Flowchart of water genera on Tap water PE pipe Water inlet 12. A er installa on of water line and filter, plug the power cord into a grounded power supply and begin to use machine normally.
Nightlight isn't working. Make sure the power cord is properly connected to a working outlet. Make sure nightlight power switch on back of dispenser is ON. Dispenser is noisy. Make sure the dispenser is posi oned on a level surface. Small water flow. Low water pressure. Check the water inlet. The filter exceeded it's usage me. Please contact the manufacturer to replace the filter Water leakage. If the appliance is making a soud, there should be leakage. Please check the PCB on the palte.
E: WATER PURIFIER push bu on push bu on A er setup, hot water will be available in 15-20 minutes. 1. Posi on bo le, glass, pitcher, or cooking pot below spout. 2. Slide red bu on away from you and depress hot water push bu on downward to start hot water flow. 3. Release push bu on once desired fill level is achieved. F:CLEANING 1. To avoid accidents, cut off the power supply before opera on according to the following instruc ons.
2) The dispenser heats water to a temperature of approximately 185 F. It can cause severe burns. Please operate it carefully. 3. Sani zing This machine should be sani zed with a disinfectant and then cleaned with water every three months. (See cleaning and draining instruc ons.) 4. To Remove Mineral Deposits Mix 4 L of water with 200 g of citric acid crystals, pu ng the mixture into the machine making sure the water can flow out of the hot water tap. Switch on the power and heat it for about 10 minutes.
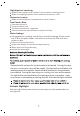
G: MACHINE INSTALLATION 1. Loosen the screw of the right bottom angle just as the picture shown. 2. 3. 4. WARNING! To avoid a hazard due to instability of the appliance, it must be fixed in accordance with the instruc ons. If you encounter any issues or have any concerns, please email us at support@avalonproducts.com or call 1800-256-0695 . Please see our website to learn more about our products www.avalonproducts.