
Owner`s manual

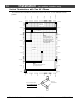


Installation (for qualified installers only) 17
Travis Industries 4122104 93508117
Finalizing the Installation
! Turn the gas control valve to “OFF” prior to conducting any service.
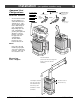
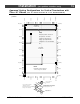
1 Install the control box following the instructions below.
a
b
c
Remove the wire cover by loosening
these screws and sliding it to the left.
Replace wire cover so it conceals
the wires from the control box.
Place the control box in
place and secure with the
two screws.
Phillips
Screwdriver
NOTE: a tab on the back of
the control box inserts into
this slot.
1/4" Nutdriver
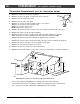
2 Open the door (see page 19). Install the log set and coals (see page 20).
! We recommend you purge the gas line at this time (with the door open). This allows gas to be
detected once it enters the firebox, ensuring gas does not build up.
3 Close and secure the door (see page 19).
4 Turn on gas to the heater. Leak test all gas joints prior to starting the appliance. Start the pilot. Start
the main burner. Leak test all gas joints again.
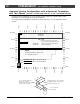
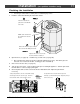
5 Check the pilot flame to make sure it looks like the illustration below. Adjust the pilot flame if
necessary.
Standard
Screwdriver
The pilot flame must contact the thermocouple and
thermopile (see the illustration below). Adjust the pilot up or
down as necessary.
To adjust the pilot flame, turn this screw (NOTE: if totally
unscrewed gas will come out of this port). Clockwise
lowers the flame while counter-clockwise raises it.