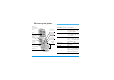
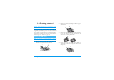
Discover your phone Back of the phone: camera lens and external screen Screen mMMS and SMS key ( Pick up key Volume side keys cCancel key Microphone How to... Switch phone On /Off Press and hold ). Enter PIN code Enter your PIN code using the keypad and press , or # to confirm. bBeDJ and Ringer list key Make a call Enter the phone number on the keypad and press ( to dial.
Set the ringer volume Press and hold either side key when in idle mode and when the phone is opened. Quickly return to idle when browsing menus Press and hold press ). A short press on the side key will mute the ringer when you receive a call. Open the MMS menu Press m in idle mode. Open the SMS menu Long press mode. Set conversation volume Press either side key during the call. Change the language used Press and hold 0. Change the ringer In idle mode, long press b to access the ringers list.
position in the list. With the navigation keys, you can then select or adjust all the functions of your phone as described in the relevant chapter of this user guide. Events Some events may modify the idle screen (missed call, new message, etc.). Press,to access the corresponding menu or press c to go back to the idle screen. Philips continuously strives to improve its products. Therefore, Philips reserves the rights to revise this user guide or withdraw it at any time without prior notice.
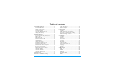
Table of contents 1. Getting started ............................................1 2. 3. 4. Insert the SIM card ...........................................1 Switch on the phone ........................................2 Set date and time ..............................................2 Copy the SIM phonebook ...............................2 Charge the battery ...........................................2 Main features ................................................4 Access and view the phonebook ..........
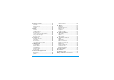
8. Taking pictures ......................................... 39 How to... .......................................................... 39 Pictures shots .................................................. 39 Settings ............................................................. 42 9. BeDJ ................................................................. 44 How to... .......................................................... 44 Getting started ............................................... 44 Record a mix ....
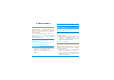
1 • Getting started 2. Read the safety instructions in the "Precautions" section before use. To use your phone, you must insert a valid SIM card supplied by your GSM operator or retailer. The SIM card contains your subscription, your mobile number, and memory in which you can store phone numbers and messages (see “Contacts” page 12). Remove the battery by lifting it with the grip as shown below. 1 2 3. Remove the SIM card from its holder and slide it in its slot until it stops.
5. Replace the battery cover by sliding it into its slot, until it stops. Remove the protective film covering the screen before using the phone. Set date and time As prompted by the phone at first switch on, set the date by pressing the appropriate numeric keys (press c to erase a number), then set the time. For complete date and time options, see page 22. Copy the SIM phonebook Switch on the phone 1. 2. To switch on the phone, press the )key. Enter the PIN code if required (i.e.
You may lose all your personal settings if you remove the battery when the phone is switched on. 1. Once the battery and battery cover are clipped on the phone, plug the connector of the charger (supplied with the phone, in the box) into the socket at bottom of the phone on one end, then plug it into a main AC power socket with easy access on the other end. 2.
2 • Main features Access and view the phonebook In idle mode, press-. Depending on the selected phonebook (in SIM or in phone), the content that appears on the screen may vary: see “Contacts” page 12 for details. To view the phonebook during a call, press ,, select Names List, press , and scroll through the entries by pressing - or +. Press c twice to return to the in-call screen. In the phonebook, press #, enter the first letters of the name you are searching, and press , to jump directly to that name.
3. To hang up, press )or close the phone. Change the ringer The phone will not ring if in Silent mode (see below). If you have selected Any Key Answer (see page 61), you can accept a call by pressing any key (except )). Select Settings > Sounds > Ringtone, press , and move+or -to select a ringer in the list. Press , to confirm your choice.
Adjust the earpiece volume During a call, move the side key up or down to increase/decrease the volume. If you select Mute, then Record dialogue, only the caller’s voice is recorded. Clear the call list Mute/Unmute the microphone You can mute the microphone so that your caller cannot hear you. During a call, press ,, select Mute and press ,again. To unmute the microphone, press,, select Unmute and confirm by pressing,.
3 • Menu tree The table below describes the complete menu tree of your mobile phone, and the page reference you should refer to for more information concerning each feature or setting.
Broadcast SMS p33 Reception / Topics / District codes JAVA p54 SMS chat p33 Extras p57 MMS p33 New MMS / Inbox / Drafts / Templates / Outbox / Settings Calculator p57 Contacts p12 International clock p57 Local settings / Foreign International clock display Names list p4 Alarm clock p58 Settings p12 Delete all / Contacts select / Group settings / Copy to phone Organiser p58 settings / Sound recording p59 Games & Applications p54 Call information p60 Chinese features p55 Brick game p54 8 Menu
Call settings p60 Active flip / Call forward / Mailboxes / Auto redial / Any key answer / Call waiting / Caller ID / IP Prefix Call list p61 Call list / Reset Call counters p62 GSM counters / GPRS counters TV Slideshow p52 Camera p39 Operator services p64 Infrared p48 Service numbers The numbers available in this menu are operator and subscription-dependent, please check with your operator.
4 • Text or number entry Text can be entered in editing screens in two different ways: by using T9 ® predictive Text input, or basic text input. Two other modes for numbers and punctuation marks are also available. Icons appearing on the screen show the active text mode. T9 ® Text input T9 ® predictive Text Input is an intelligent editing mode for messages, including a comprehensive dictionary. Tegic Euro. Pat. It allows you to quickly enter text. Press App.
Basic text input If you wish to access the basic text input, press *. This method requires multiple key presses to reach the desired character: the letter "h" is the second letter on the 4 key, so you must press it twice to enter "h". Example: how to enter the word "home": 4, 4 (GHI) 6, 6, 6 (MNO), 6 (MNO), 3, 3 (DEF). Press , when Press the message is completed. Letters, numbers and symbols are located on each key as follows: Short press 1 space .
5 • Contacts The Contacts menu allows you to select one of the two available phonebooks: the one on your SIM card (number of entries depending on capacity) or the one in your phone (up to 499 names). When entering new names in the menu Contacts, they will only be added to the phonebook you have selected. phonebooks and if you delete it in the phone, it remains unchanged in the SIM.
(Phone, Fax or Data) and press , to store this name in your phonebook. If not, we advise that you enter your mobile number as well as any other relevant information. A number is limited to 40 digits, depending on your SIM card. Entering international prefix, country & area codes allows you to dial a number from any location. Although all its fields can be empty, the Own numbers item cannot be deleted. In the phone phonebook 1. 2. 3. Press - when in idle mode and select .
1. 2. 3. Select Contacts > Settings > Groups setting. Rename the group to be identified ("Friends", "Kids", etc.) and select the Melody and the Picture to be associated to this group. Long press c to go back to idle, then press-to access the phonebook. Select a contact you wish to link to this group, then choose Select group and select the group of your choice.
field for this contact. Select one of them and press , to access a second set of options, which are: Make default Copy to SIM card Contacts The first number you enter becomes the default number: it appears in first position in the list and is automatically dialled when pressing the pick-up key. This option allows you to make another number default. Show To display the details of the selected field. Change type To change or to define the field type of the selected number.
6 • Settings melodies you saved. Scroll through the list and wait to hear the selected melody being played. The Settings menu allows you to customise your phone and change the settings related to each available option (sounds, time and date, security, etc.). The Profiles menu allows you to change several settings at once (see page 23). You will not hear the melody if the volume ringer is set to Off or if the Silent mode was activated (see above).
• • • • when an event programmed in your Organiser is due, when there’s a Missed call, when the Battery alert requires charging, to manage the duration of your calls with a Minute alert (the beep cannot be heard by the caller). This menu only allows you to set the alert sounds On or Off, NOT the alerts themselves. E.g. setting the Organiser alert Off will not prevent your phone from displaying the Reminder screen (if you programmed one), but the corresponding sound will not be played.
choices will open the menu (e.g. Send message or E-mail), or launch the function (such as Calculator or Record). Only JPEG type pictures can be used as wallpapers. This feature is not available when the International clock option is On (see page 57). Contrast Contrast Allows you to choose from several levels of contrast. Short cuts If the selected key is already set, you can reprogram it by pressing , twice and selecting Change. This will bring you to the list of available functions. 3.
To use the voice command, press and hold , when in idle mode, then say the recorded voice tag. Security Voice dial Public names Allows you to set a voice tag by recording a word that will call the Voice Dial corresponding name when pronounced. Proceed as described in the previous section, select the contact of your choice in the list, then press ,. When the phonebook in phone is selected, choose the number of your choice in the list that is displayed.
Call barring Allows you to limit the use of your phone to specific calls by letting you bar Call barring both outgoing and incoming calls. This function is network dependent and requires a specific call barring password supplied by your service provider. Call barring can be applied both to Incoming calls (All calls or When roaming) and to Outgoing calls (All calls, International calls and Intl. Exc. Home). from your operator or retailer.
GPRS attach GPRS attach This menu allows you to define the attach mode of your mobile phone to the GPRS service. Your phone will always register to the GPRS service. This option allows faster GPRS connection. However it will increase energy consumption. Always on For data calls Your phone will automatically register to the GPRS service only when required. This option reduces energy consumption, however it will increase the connection delay.
GSM Settings GPRS settings To change the GSM settings: • Login, • Password, • Phone number needed to establish the connection and provided by your operator (ISDN or Analogue), • Inactivity time, a value of over 30 seconds after which the phone disconnects automatically (if a connection was in progress) To change the GPRS settings (same fields as the GSM settings).
3. Set date Set date Allows you to set the date by pressing the appropriate numeric keys. You can also set the date by moving +or-. Date format Date format Allows you to select one of the available date formats, either Western or Thai or Chinese. Set time Set time Allows you to set the time by pressing the appropriate keys. You can also increase or decrease the time minute by minute by pressing+or-.
the key tones (the other items are set according to the settings you configured). When your meeting is over, selecting Personal will reactivate all your usual settings. Details of each profile settings are displayed when selecting a profile. production. As you can change them, the personal settings in your phone may differ from the table. Each box of the table refers to the settings as stored in the Personal menu (whether you have changed the settings or not).
7 • Messages SMS SMS This menu allows you to send short messages, with sounds, animations or pictures, as well as manage the ones you receive. Sending SMS isn’t available from the idle mode when the SMS Chat feature is On (see page 33). In this case, you can only access the Answer option. Send SMS This menu allows you to send an SMS to a contact of your choice, whether Send SMS saved in your phonebook or not (in this case, simply select in the contacts list and enter a number).
picture, only the picture will be taken into account and vice-versa. Edit SMS Some pre-defined items are supplied as standard with your mobile phone. Personal pictures and sounds that you have stored in the relevant menus cannot be sent when they are copyright protected. If a picture or a sound was attached to the message you edit, you must first detach it and store it in the Picture album or in the Sound Album. Then reattach it to your message (see page 25).
No. extracted To extract a number included in the message itself, if this number is included in double quotes (several numbers can be included and extracted), Store melody To save the melody that was sent together with the SMS. SMS settings This menu allows you to customise your SMS via the following options: Validity period This feature is subscription dependent. Reply path SMS settings SMS centre To select your default SMS centre.
Auto save SMS Allows you to set On or Off this option, which will automatically save messages sent in the Archive menu. Archive This menu allows you to consult all read messages you saved and to Delete all SMS Archive at once. When a message is displayed, press , to access the following options: Delete, Edit SMS, Reply, Forward to, IP Call back, Call handsfree.
Advanced This menu features advanced settings that you shouldn’t have to change. If the fields of these menus are empty, or if you encounter connection problems, contact your ISP. The SMPT authenticat. menu should be Off in most European countries: your e-mails will NOT be sent if set to On. Contact your provider for complete information. Network access To select the type of network used when launching a connection, and to configure the corresponding settings.
Send mail This menu allows you to send e-mails to one or several recipients at a time, Send mail including with an attachment such as a jpeg picture. Once received, your messages can be forwarded and the attachments visualised with the appropriate software. Add Media If you exit the Send e-mail menu before sending your e-mail or if you cancel the sending while it takes place, the e-mail content is deleted without being stored.
1. 2. Select Open mailbox: your phone automatically connects to the e-mail server and downloads the list of e-mail headers if any (five at a time). If Next (or Previous) appears at the end (or beginning) of the list, other e-mail headers are pending: select one of the available options and press , to retrieve them. An e-mail without any attachment may be automatically displayed in the details screen. 3. Select a header, and press ,to display the Details.
You must have stored a picture before being able to view it via the Picture album menu. See “Picture album” page 50 for more details. If there isn’t enough memory to store the new picture, you must delete other items (name, event or picture) to release enough memory to be able to save the new picture. A picture may not be accepted by your mobile phone if it is too large or if it doesn’t have the right file format.
Broadcast SMS District codes The Broadcast SMS feature is network dependent. This menu allows reception of SMS Broadcast SMS transmitted to all network. It give following options: you to manage the broadcast regularly subscribers on the you access to the Reception To set the reception of cell broadcast messages On or Off. Topics To define the type of messages you want to receive.
From idle mode, you can directly access the MMS menu by a long press on m key. If "Memory full" appears, you must delete messages (e.g. template, draft, received message, etc.). New MMS Add contacts To select a name in the Contacts list, or to insert a number or e-mail address. Then select one of the numbers or address of that name if several. Select a contact and press , to Edit it or Remove it from the list, or add more contacts.
MMS options Preview MMS To preview the slide show you have created. Slide duration To change the value of slide duration set in Settings > Application settings (see page 37), and to set a delay between each slide. The following options are available: Add slide To create a new slide and add it to your slide show. Press < or > to browse slides once you have created several. You can also press>when the last page of the message you are currently designing is selected.
When you receive an MMS an alert message appears on the screen to inform you. See page “Settings” page 37 to learn about Automatic or Manual retrieval modes. If the sender of the message has asked for a Read report, a prompt will ask you to press , to send it or to press c to cancel. Once the MMS is downloaded, select it in the Inbox list and press>to play it. Press ,to access the following Player options: Play To switch back to automatic mode: the MMS is then played as a continuous slide show.
Notifications are automatically deleted once you have received the full MMS. Do NOT delete notifications before you have retrieved the MMS, or you will never be able to do so. The following settings are available: Retrieval mode Messages you have saved can only be sent from the Draft or Outbox folders. You can NOT recover an item (whether message, notification or report) that you have deleted. Press c to cancel deletion.
Delivery report This option can be set On or Off and informs you (via an SMS) the status of delivery, e.g. if your MMS was received or rejected. Auto save This option can be set On or Off and allows you to automatically save the messages sent from the Outbox menu. Slide duration Allows you to select the duration between each slide of the MMS. Network settings Network account is used to choose a connection profile from the ones you have set (see “Access settings” page 21).
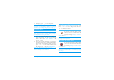
8 • Taking pictures Your mobile phone features a digital camera that allows you to take pictures, store them in your phone, use them as wallpaper or send them to your friends. How to... Activate/deactivate the camera Press the camera side key to activate the camera OR press, and select Camera. Long pressc to deactivate or close the clamshell. Zoom in/out Press+ or -. Change the vision mode Press * to toggle between Night and Normal mode.
also press,to access any of them (see “Settings” page 42). Camera mode The default picture size of the standard format is VGA 640 x 480 pixels. Turn the mobile phone to a 90° angle and hold it horizontally to obtain a full screen preview. The Clip mode allows you to record a voice message right after you shot the picture. See “Foto Talk: use the Clip mode” page 41 for details. Effects Allows you to choose one of the available effects (see page 43).
2. The number that appears shows its row. Press: Use the self-timer c To ignore the picture you have just taken and go back to preview mode. 1. Camera key To save it in the Picture album. 2. , To access the list of available options: Send (by MMS, Email or Infrared), Save it in the Picture Album, Modify it, or Take a new picture. The number of pictures you can save varies according to the settings: the higher the resolution, the bigger the file size.
3. Press , to access the following options: Send by MMS To Send your clip via MMS. Play clip To Play it. Save clip To Save the clip you have created: the picture in Picture album and the recorded sound in Sound album. Change clip To Change the clip you made. Fotocall: see who’s calling The Fotocall mode allows you to make a picture and to link it to a group. When a name in that group calls, the corresponding picture appears. See “Fotocall: see & hear who’s calling” page 13 for details.
Sounds settings Reset settings To set the Alert and Shoot sounds. The first one occurs 3 seconds before the shot, the second one when the picture is shot. Select Default or one of the available sounds, then press,to activate it. To reset all values to the default ones. Frames To choose a frame and apply to the picture you take (this automatically sets the picture to 128 x 160 pixels).
9 • BeDJ BeDJ allows you to create your own sound by using a styles, or any SP-MIDI or MIDI ring tones saved in your phone. You can then send your own mix to friends and relatives, use it as a ringer or an alarm, etc. How to... Switch BeDJ On/ Off Pressb or select Multimedia > BeDJ to switch on. Press and hold c to switch off. Activate/ deactivate a track Press a key from 1 to 9. Record the mix (start and stop) Press 0. Activate the Tempo field 44 Press c to deactivate all tracks at once.
Change track melodies & instruments Before activating tracks, press and hold keys 1 to 9 to change the default melodies and instruments: Melody The melody used in the selected track is the one highlighted in the list. Move + or - to select another one, then press ,or > to access the instruments list used in this melody. Instruments The current instrument used in the selected melody is the first one highlighted in the list. Move - or + to select another one, then press ,to go back to the main screen.
Recording options When you stop recording a mix, a window opens and displays the following options: Remix To record a new mix by using the same tracks. Replay Mix To play the mix you just recorded. Store Mix To name and store your mix. Send by MMS To send your mix as part of a multimedia message. The ringers list includes the MIDI files you might have downloaded via e-mail, IrDA, etc. From existing files 1. 2. 3. Send by IrDA To send your mix via IrDA. Send by Email To send your mix via Email.
4. 5. 6. one of them, then press , to apply it to key 1. Repeat these two steps to apply tracks of your choice to keys 2 to 9 of the phone. When ready, record your mix (see page 45). Press , twice to go back to normal mode. Have fun and mix: you can apply any of the 16 tracks of any ringer of your choice to 1 to 9 key of your phone! This makes thousands of possibilities that allow you to completely personalise your own mix.
10 • Infrared Your mobile phone integrates the infrared technology (also called IrDA), that allows you to send or receive data to and from other IrDA-compliant devices through a wireless link (e.g. another mobile phone, a PC or PDA, a printer etc.). Files that are copyright protected cannot be sent. When connecting with a PC, make sure you have activated its infrared option.
Receiving is cancelled if your phone isn’t contacted by another device before the time out is reached, if the infrared link is broken, if the size of the file sent is too large or if you cancel the process. Save the data received Press , to access the following options: Save Show Discard Infrared To save the data, then go back to idle. The items you have received will be saved under their default name, which you can change by selecting them in the relevant menus.
11 • Multimedia Sound album This menu allows you to manage and listen to the sounds stored in your Sound Album mobile phone, your Own melodies, Standard melodies or Records. When entering one of the available sub-menus, select a sound and press , to access the following options: Delete To Delete the selected sound. Sounds in the Standard melodies folder cannot be deleted. Send by... To send the selected sound via E-mail (see page 28), via IrDA (see page 48) or MMS (see page 33).
Modify picture Add text To add text to the selected picture. Press the navigation key to move the text on the screen. Save To save the picture with all the changes you have applied. Delete Pictures in the Standard Pictures folder cannot be deleted. If there isn’t enough space to store a new picture, you must delete some other pictures to release memory. Short press to move it 1 pixel at a time, long press for 5 pixels. Press c to go back to the text editor, or , to validate and go to the next option.
TV Slideshow This feature allows you to display your pictures listed in the Picture album TV Slideshow (automatically in a slideshow, or manually, one-by-one) on a TV screen via the TV Link accessory (see page 77) or on the main (internal) screen of your phone. TV Link may not supplied with your product. In this case, you must purchase it separately. See “Philips authentic accessories” page 77 for details. Manual Select TV Slideshow, then Manual, and press ,.
Demo mode Press , to launch the Demo movie. Demo mode If you turned the phone on without having inserted a SIM card, this menu is available in the first menu level. Memory status This menu allows you to display the percentage of memory available in your Memory status phone. Several features share the mobile capacity: pictures and sound album, messages you Multimedia have stored in the phone, phonebook and organiser entries, games, etc. Your mobile phone is supplied with many sounds and pictures.
12 • Games & Applications Brick game This menu can be subscription dependent. As such its icon and content may vary. This menu gives you access to the brick game, which object is to destroy the Brick Game bricks by hitting them with the ball. Destroying all bricks give you access to the next level. Keys used are the following: 4 and 6 To move the racket left or right. * and # To start the game by throwing the ball left or right. 0 To pause the game up to 2 min.
DNS address Allows you to enter the DNS address of the external data network you want to connect to. Network account Allows you to select one of the data profiles you have defined in Settings > Access settings (see page 21). Auto-Launch Allows you to set the automatic launch of JAVA On or Off. When On, a JAVA application will be automatically launched right after it was installed. Java applications This menu allows you to launch a Java application.
Back to the Horoscope menu, select Today or Other day depending on the horoscope you want to consult (in the second case, enter the relevant date before pressing ,). 56 Chinese festival calendar This menu informs you of the next major Chinese festivals, from a given Chinese festival date. Select From now or select From a date and enter the date from which you want to know what Chinese festivals will occur. In both cases, press , to display the six next festivals.
13 • Extras Calculator Calculator This menu provides the following functions: Addition Press>or the * key. Substraction Press
Foreign settings Foreign time zone Move+ or-to select the time zone of your choice. Foreign daylight saving Allows you to set the daylight saving option On or Off for a foreign time zone. See page 22 for details. Alarm clock This menu allows you to set the clock alarms (up to 3 alarms). To set an alarm: 1. Select an alarm and press + or - to set the option On or Off. 2. When set to On, enter the time and press ,. 3. Then select the frequency: Once, Every day, On weekdays. 4.
1. 2. 3. Select , then the type of event to create (Holiday, Meeting, To Do). Enter the starting and ending date & time of the event and name it (e.g. "Meeting with Smith"). Set a reminder and a frequency: alerts will be triggered at the chosen time. The reminder only applies to Meeting and To Do events. It will be updated when changing time zones (see “Time and date” page 22). Delete old events This menu allows you to delete past events.
14 • Call information Call settings Call settings This menu allows you to set all the call options (call forward, waiting, etc.) and gives you access to the menus described hereafter. transfer, which takes place when one/several calls are in progress. Unconditional Will divert all the incoming calls. Warning! When selecting this option, you will not receive any calls at all until you deactivate it.
Auto redial To set the auto redial On or Off. When On if the person you are calling is busy, your phone automatically redials this number until a successful connection is made or until the maximum number of attempts is reached (10). The phone beeps at the beginning of each attempt and emits a special beep if the connection is successful. The time between redials increases with each attempt. Any key answer To accept a call by pressing any key, except ), used to reject a call.
Call list Reset Select an item and press , to consult the date, time, number, call status of any selected call and to know if it was sent or received. Press , again to access the options: Call or Call handsfree or IP Call this correspondent, Send SMS, Send MMS, Delete the selected call or Store the associated number (if not already in the phonebook). To reset the whole list at once. If a number listed is also in your Contacts, the corresponding name is displayed.
Total cost To display the accumulated cost and to set the counter to zero (may be protected by PIN/PIN2 codes). • Show will show how much has been spent, having established the charge rate. • Reset allows to reset the current Total cost to 0. • Show balance allows to check the remaining credit (compared with previously set limit). • Cancel cost limit allows to cancel the cost limit. • Cost limit lets you to enter the cost limit used in the Show balance menu.
15 • Operator services Most items of this menu are subscription dependent and specific to operators. Consequently, the menus shown following may or may not be available. Contact your network operator for details. The services provided may involve making a phone call or sending a SMS for which you may be charged. WAP WAP This menu allows you to access services supplied with your network, such as news, sports, weather, etc.
The Manage bookmarks menu allows you to Delete or Edit the selected bookmark. Select profile Enter address This menu allows you to enter a WAP site address, to which you connect directly when selecting it (a quick way to access WAP addresses without saving them as bookmarks). All the addresses you enter in this menu and connect to at least once, will appear in a list. Select one of the items and press , to reconnect to the corresponding page, without having to re-enter its complete address.
Connection Select connection allows you to select one of the data profiles you have defined in Settings > Access settings (see page 21). Bearer allows you to select the type of network used by the selected profile when launching a connection (see page 21). Proxy address and Proxy port allow you to define a gateway address and port number to be used when launching a WAP connection using the selected profile. Press and hold 0 to enter ".
DTMF tones You can send DTMF tones (or “touch tones”) to some phone services at any time during a call by pressing any of the keys 0 to 9, * and #. You can also attach a DTMF sequence to a phone number before dialling it (or storing it in the Contacts). The phone number and the DTMF part must be separated by a wait character. To obtain a pause or wait character, press and hold #. The display shows w for wait and p for pause. For example, to hear messages (e.g.
While in communication and one call being on hold, you may receive a third call. You can either end one of the calls before being able to answer the third one or introduce the calling party into a conference (see below). This service is limited to two current communications (one active and one on hold). Conference. Repeat the process until five members are connected.
Icons & symbols Roaming - Displayed when your phone is registered to a network other than your own (especially when you’re abroad). In idle mode, several symbols can be displayed simultaneously either on external screen or main screen. SMS full - Memory for messages is full. Delete old messages to receive new ones. If the network symbol isn’t displayed, the network is not currently available. You may be in a bad reception area, moving to a different location may help.
Precautions Radio waves Your cellular mobile phone is a low power radio transmitter and receiver. When it is operating, it sends and receives radio waves. The radio waves carry your voice or data signal to a base station that is connected to the telephone network. The network controls the power at which the phone transmits. • Your phone transmits/receives radio waves in the GSM frequency (900 /1800MHz). • The GSM network controls transmission power (0.01 to 2 watts).
telephone complies with all applicable safety standards and the Radio Equipment and Telecommunications Terminal Equipment Directive 1999/5/EC. Always switch off your phone Inadequately protected or sensitive electronic equipment may be affected by radio energy. This interference can lead to accidents.
Performance improvement In order to improve the performance of your phone, reduce radio energy emission, reduce battery consumption and ensure safe operation adhere to the following guidelines: For the optimal and satisfactory operation of the phone you are recommended to use the phone in the normal operating position (when not using in hands-free mode or with a hands-free accessory). • Do not expose your phone to extreme temperatures. • Treat the phone with care.
Do not use your phone while driving Environmental care It lowers concentration, which can be dangerous. Adhere to the following guidelines: Give your full attention to driving. Pull off the road and park before using the phone. Respect the local regulations in countries where you drive and use your GSM phone. If you want to use your phone in a vehicle, install the hands-free car kit which is designed for that purpose, still ensuring you give full attention to driving.
Troubleshooting The phone does not switch on Remove and reinstall the battery (see page 1). Make sure you plugged the jack of the charger into the correct connector (see “Charge the battery” page 2). Then charge the phone until the battery icon has stopped scrolling. Finally, unplug from the charger and try to switch the mobile on. The display shows BLOCKED when you switch on Somebody tried to use your phone but didn’t know the PIN code nor the unblocking code (PUK). Contact your service provider.
Your phone doesn’t return to the idle screen Press and hold c or switch off the phone, check that the SIM card and the battery are installed correctly and switch it on again. Your phone doesn’t display the phone numbers of incoming calls This feature is network and subscription dependent. If the network doesn’t send the caller’s number, the phone will display Call 1 or Withheld instead. Contact your operator for detailed information on this subject.
When attempting to use a feature in the menu, the mobile displays NOT ALLOWED Some features are network dependent. They are only available, therefore, if the network or your subscription supports them. Contact your operator for detailed information on this subject. The display shows INSERT YOUR SIM CARD Check that the SIM card has been inserted in the right position (see page 1). If the problem remains, your SIM card might be damaged. Contact your operator.
Philips authentic accessories Some accessories, such as a standard battery and a charger are included as standard in the package of your mobile phone. Other accessories might be sold in the commercial package (according to the operator or the retailer), or sold separately. As a consequence, the package content may vary. To maximise the performance of your Philips phone and not to void the warranty, always purchase Philips Authentic Accessories that are specially designed for use with your phone.
Data connect kit Easy data connection to your Philips mobile phone. The USB cable enables high speed connection between your phone and your computer. Just connect 78 your phone to the cable for an automatic organiser and phonebook synchronization within a few seconds. The software allows you to send faxes and SMS, download pictures and melodies.