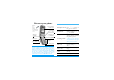
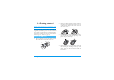
Discover your phone Back of the phone: camera lens and 4 000 colours external screen Side keys (volume) ( Pick up key C camera key 65 000 colours main screen Navigation and , keys How to... Switch phone On/Off Press ) to switch on, long press to switch off. Enter PIN code Enter your PIN code using the keypad and press , or # to confirm. Hang up and ) on/off keys c key Press and hold either side key when in idle mode and when the phone is opened.
Reject a call Press ) or press and hold either side key (in this case, the phone but be closed). Access a function in the menu ,, moveto select a function, then press , to enter the Access the main menu Press , in idle mode. Access the Contacts Press- in idle mode. Quickly open the MMS menu Press < in idle mode. Use the Contacts Browse the list by moving+or -and press ( to call the selected name.
of your choice is selected, or c to cancel. Another sub-carousel or list will then appear. Pressing+ or-will alternate between two options, such as Activate/Deactivate, On/Off, Increase/Decrease a value, etc. Browse carousels and lists until you reach the desired feature or option. When navigating in a list, a scroll bar located on the right hand side of the screen shows your actual position in the list.
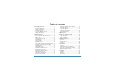
Table of contents Read your mobile phone number .................7 Clear the call list ...............................................7 Clear the SMS list .............................................7 Clear the phonebook ......................................8 Quickly scroll a list ...........................................8 Menu tree .......................................................9 1. Getting started ............................................1 2. Insert the SIM card .........................
Security ............................................................. 26 Network .......................................................... 27 Time and date ................................................. 29 Language ........................................................... 30 Profiles .............................................................. 30 8. Messages ....................................................... 32 SMS ....................................................................
1 • Getting started 2. Remove the SIM card from its holder and insert it under the metal clip holder, until it stops. Be careful that the clipped corner of the card is in the correct corner. 3. Place the battery in its slots as shown below: first place its right side against the right edge of the phone and press until it clips. 4. Replace the back cover of your phone: hook the front housing onto the hinges on the top of the phone, then press the bottom down until the latch catches.
For complete date and time options, see page 46. Copy the SIM phonebook If at first switch on, if you do not copy the SIM phonebook , see “Contacts select” page 19. 5. Remove the protective film covering the screens and the camera lens before using the phone. Switch on the phone To switch on the phone, press the ) key. Enter the PIN code if required (i.e. the 4 to 8-digit secret code of your SIM card). It is preconfigured and communicated to you by your operator or retailer.
2. LEFT hand socket at the base of the phone on one end, then plug it into a main AC power socket with easy access on the other end. The battery symbol indicates the state of charge: - during charging, the 4 charge indicators scroll; Each bar represents around 25% of charge and it takes around 1.45 hours to fully recharge your mobile phone. - when all 4 bars are steady the battery is fully charged: disconnect the charger.
2 • Main features Access and view the phonebook In idle mode, press-. Depending on the selected phonebook (in SIM or Contacts in phone, see “Contacts” page 1), the content that appears on the screen may vary. To view the phonebook during a call, press ,and select View Names List. Press c twice to return to the in-call screen. Press #, enter the first letters of the name you are searching, and press , to jump directly to that name. Make a call 1. 2. In idle mode, enter the phone number using the keypad.
2. 3. A default picture will automatically appear on the TV screen, while the TV slideshow menu will be displayed on the screen of your phone. Use the menu of your phone to set an automatic slideshow, or display the pictures manually by pressing + and -. TV Link only support JPEG pictures, up to VGA size (640 x 480 pixels). See “TV Slideshow” page 50 for details about this feature.
1. 2. When in idle mode, press the camera key once to activate the camera, and a second time to take a picture of your friend. Select Contacts > Settings > Groups setting. Rename a group and select the Ringer of your choice, then your friend’s picture. When making a group of only one person, you can also select Multimedia > Sound recording > New, record him/her saying something, then select the recording as the Ringer. 3.
Read your mobile phone number To read your own mobile phone number, presswhen in idle mode and select Own numbers > Show. Your number is displayed if present on your SIM card. If not, select New, then follow the instructions. If your own number has been stored in the phonebook, you can read it during a call. See “Access and view the phonebook” page 4. Adjust the earpiece volume During a call, move the navigation key + or to increase/decrease the volume.
You can also delete all the SMS messages from the SMS Archive menu. Deleting your SMS list is useful to free memory space in order to receive new messages Clear the phonebook This option only applies to the phonebook in your phone, NOT to the SIM phonebook. 8 To clear the content of your phonebook at once, press , and select Contacts > Settings > Delete all. Press , to reset the phonebook content.
3 • Menu tree The table below describe the complete menu tree (first to third levels) of your mobile phone, as well as the page reference you should refer to for more information concerning each feature or setting.
SMS chat p40 Games & Applications p52 MMS p40 New MMS / Receive an MMS / Manage folders / Settings Euro converter p52 Calculator p52 Multimedia p48 Picture album p48 List of available pictures Sound album p48 List of available sounds Alarm clock p52 Organiser p52 Brick game p54 Demo mode p51 JAVA p54 Memory status p51 Infrared p46 Sound recording p51 Camera p14 TV Slideshow p50 10 Menu tree
Call information p55 Operator services p58 Call settings p55 Active flip / Mailboxes / Auto redial / Any key answer / Call waiting / Caller ID Service numbers The numbers available in this menu are operator and subscription-dependent, please check with your operator. Call list p56 Call list / Reset Call counters p57 Contacts p1 WAP p58 Services + This menu is operator and subscriptiondependent, please check with your operator.
4 • Text or number entry Text can be entered in editing screens in two different ways: by using T9 ® predictive Text Input, or basic text input. Two other modes for numbers and punctuation marks, are also available. Icons appearing on the screen show the active text mode. How to use it? Alphabets and symbols represented by each key are as follows: 2 to 9 To key in letters. < or > To browse the list of candidate words. T9 ® Text input , or 1 To confirm entry.
Basic text input If you wish to access the basic text input, press * . This method requires multiple key presses to reach the desired character: the letter "h" is the second letter on the 4 key, so you must press it twice to enter "h". Example: how to enter the word "home": 4, 4 (GHI) 6 , 6, 6 (MNO), 6 (MNO), 3, 3 (DEF). Press , when Letters, numbers and symbols are located on each key as follows: Short press 1 space 1 @ _ # = < > ( ) &£$¥.
5 • Taking pictures Change the special effect Press the navigation key< (left) or >(right) to switch from a special effect (sepia, embossed, etc.) to another. Access the camera settings Press , when the camera is active. Press the C key to activate, OR press , and select the menu Camera. Long press cto deactivate. Take a picture Press C when the camera is active. Save the picture Press C right after the shot.
Pictures shots Preview mode settings Press C to display the camera preview screen: the lens of the camera is automatically focused and icons are displayed in the bottom (Zoom, Effects, Camera mode, Shot) and eventually, if set on, on top (Selftimer, Vision) of the screen. All options and key presses described in this section are applicable only when the camera mode is active, i.e. when the preview is displayed on the screen. You can also press , to access any of them (see “Settings” page 18).
Vision mode Two vision modes are available: Normal and Night mode (reflected by the moon icon in the top of the screen). According to ambiant light level, press * to toggle between modes.
4. The count-down starts at -10 seconds (this value cannot be changed). A beep is played 3 seconds before the picture is taken, then again when it’s actually shot. 3. (press c to cancel,, to stop the recording, or wait for the max. recording time of 30 seconds to be reached). Press , to access the following options: Press c to stop the timer and go back to preview mode or press 0 to just stop the timer. Send by MMS To Send your clip via MMS. 5. Play clip To Play it.
• answering it will quit the camera context and your phone will return to idle when you hang up, • rejecting it will also quit the camera context, and bring you back to the preview screen. To make a call, you must first go back to the idle screen. Sounds To set the Alert and Shoot sounds. The first one occurs 3 seconds before the shot, the second one when the picture is shot. Select Default or one of the available sounds, then press , to activate it.
6 • Contacts The Contacts menu allows you to select one of the two available phonebooks: the one on your SIM card (number of entries depending on capacity) or the one in your phone (up to 499 names), which is the default selected phonebook. When entering new names in the menu Contacts, they will only be added to the phonebook you have selected. 499 is the maximum number of names and events cards, provided that other features (memos, sounds, pictures, etc.
Add contacts in a phonebook numbers, 3 work numbers, an e-mail address and a text note). If needed, choose the group you want this contact to belong to. Contacts will be added to the selected phonebook. 3. In the SIM phonebook Own numbers 1. 2. Press - when in idle mode and select . Enter the name and the number of your choice, then the type of number allocated to the name (Phone, Fax or Data) and press , to store this name in your phonebook.
This feature allows you to personalize the groups available with their own name («Friends», «Office», etc.), a given picture (from the Picture album) and a given melody (from the Ringers list). You can then link one or several names to a group: when a name in that group calls, it will appear along with the corresponding picture, and the melody defined for that group will ring. 1. Select Contacts > Settings > Groups setting. Rename the group to be identified («Friends», «Kids», etc.
Copy to phone will copy the content of your SIM card into your phone. Selecting this option twice will duplicate all the names. Select one of the fields and press second set of options, which are: Make default The first number you enter becomes the default number: it appears in first position in the list and is automatically dialled when pressing the pick-up key. This option allows you to make another number default.
7 • Settings melodies you saved. Scroll through the list and wait to hear the selected melody being played. The Settings menu allows you to customise your phone and change the settings related to each available option (sounds, time and date, security, etc.). The Profiles menu allows you to change several settings at once (see page 30). You will not hear the melody if the volume ringer is set to Off or if the Silence mode was activated (see page 6).
• when an event programmed in your Organiser is due, • when there’s a Missed call, • when the Battery alert requires charging, • to manage the duration of your calls with a Minute alert (the beep cannot be heard by the caller). will also scroll texts, such a message selected in the Read SMS menu. This menu only allows you to set the alert sounds On or Off, NOT the alerts themselves. E.g.
Sub wallpaper Sub wallpaper Allows you to set the Wallpaper of the external screen On or Off. The behavior is then the same as the Wallpaper described above. If the selected key is already set, you can reprogram it: press , twice and select Change. This will bring you to the list of available functions. Short cuts To use the hotkeys, simply press and hold the key corresponding to the function you want to launch or to the number you want to dial while in idle mode.
To use the voice command, press and hold , when in idle mode, then say the recorded voice tag. mode, and allows you to spot the menus that can be access via the phone’s navigation key. Voice dial Menus can always be accessed this way, even when the option is set to Off. Allows you to set up a voice tag by recording a word that will call the Voice Dial corresponding name when pronounced. Proceed as described in the previous section, select the contact of your choice in the list, then press , .
Public names Allows you to view, edit and modify your Public Names list. via a PIN2 code. Call barring Allows you to limit the use of your phone to specific calls by letting you bar both outgoing and incoming calls. This function is network dependent and requires a specific call barring password supplied by your service provider. Call barring can be applied both to Incoming calls (All calls or When roaming) and to Ougoing calls (All calls, International calls and Intl. Exc. Home).
GPRS attach GPRS attach This menu allows you to define the attach mode of your mobile phone to the GPRS service. Your phone will always register to the GPRS service. This option allows faster GPRS connection. However it will increase energy consumption. Always on For data calls Your phone will automatically register to the GPRS service only when required. This option reduces energy consumption, however it will increase the connection delay.
GSM Settings GPRS settings To change the GSM settings: • Login, • Password, • Phone number needed to establish the connection and provided by your operator (ISDN or Analogic), • Inactivity time, a value of over 30 seconds after which the phone disconnects automatically (if a connection was in progress) To change the GPRS settings (same fields as the GSM settings).
set the time to 12:00, it will automatically switch to 13:00 when turning the option to Off. Set time Set time Allows you to set the time by pressing the appropriate keys. You can also increase or decrease the time minute by minute by pressing+or- . Language This menu allows you to select a language for all menu texts. Press + or - to select the language of your choice, then press , to confirm.
When connecting an accessory, the settings Headset and Activate car also become available. When disconnecting the accessory, the phone goes back to the Personal profile.
8 • Messages SMS SMS This menu allows you to send short messages, with sounds, animations or pictures, as well as manage the ones you receive. Sending SMS isn’t available from the idle mode when the SMS Chat feature is On (see page 40). In this case, you can only access the Answer option. Send SMS This menu allows you to send an SMS to a contact of your choice, whether Send SMS saved in your phonebook or not (in this case, simply select in the contacts list and enter a number).
picture, only the picture will be taken into account and vice-versa. Edit SMS Some pre-defined items are supplied as standard with your mobile phone. Personal pictures and sounds that you have stored in the relevant menus cannot be sent when they are copyright protected. If a picture or a sound was attached to the message you edit, you must first detach it and store it in the Picture album or in the Sound Album. Then reattach it to your message.
No. extracted To extract a number included in the message itself, if this number is included in double quotes (several numbers can be included and extracted), Store melody To save the melody that was sent together with the SMS. SMS settings This menu allows you to customise your SMS via the following options: Validity period This feature is subscription dependent. Reply path SMS settings SMS centre To select your default SMS centre.
Auto save SMS Allows you to set On or Off this option, which will automatically save messages sent in the Archive menu. SMS Archive This menu allows you to consult all read messages you saved and to Delete all SMS Archive archived messages at once. You save a message by activating the Auto save SMS option (see above), or by selecting a received message, pressing , twice and selecting Move to Archive. Login, Password and E-mail address which are up to you when creating an e-mail account.
Advanced This menu features advanced settings that you shouldn’t have to change. If the fields of these menus are empty, or if you encounter connection problems, contact your ISP. The SMPT authenticat. menu should be Off in most European countries: your e-mails will NOT be sent if set to On. Contact your provider for complete information. Network access To select the type of network used when launching a connection, and to configure the corresponding settings.
Send mail This menu allows you to send e-mails to one or several recipients at a time, Send mail including with an attachment such as a jpeg picture. Once received, your messages can be forwarded and the attachments visualised with the appropriate software. Add Media If you exit the Send e-mail menu before sending your e-mail or if you cancel the sending while it takes place, the e-mail content is deleted without being stored.
1. 2. Select Open mailbox: your phone automatically connects to the e-mail server and downloads the list of e-mail headers if any (five at a time). If Next (or Previous) appears at the end (or beginning) of the list, other e-mail headers are pending: select one of the available options and press , to retrieve them. An e-mail without any attachment may be automatically displayed in the details screen. 3. Select a header, and press , to display the Details.
You must have stored a picture before being able to view it via the Picture album menu. See “Picture album” page 48 for more details. If there isn’t enough memory to store the new picture, you must delete other items (name, event or picture) to release enough memory to be able to save the new picture. A picture may not be accepted by your mobile phone if it is too large or if it doesn’t have the right file format.
Broadcast SMS District codes The Broadcast SMS feature is network dependent. This menu allows reception of SMS Broadcast SMS transmitted to all network. It give following options: you to manage the broadcast regularly subscribers on the you access to the Reception To set the reception of cell broadcast messages On or Off. Topics To define the type of messages you want to receive.
If "Memory full" appears, you must delete messages (e.g., template, draft, received message, etc.). Although the picture preview when creating the MMS is (W)105 x (H)55 pixels, the maximum size of a picture you can send is (W)640 x (H)640 pixels. New MMS Copyright protected pictures cannot be sent. Add contacts Add Media Messages To select a name in the Contacts list, or to insert a number or e-mail address. Then select one of the numbers or address of that name if several.
Delete slide To delete the selected page (if there is more than one in the message). If the sending of a draft message fails, the message will be moved to the Outbox menu. Save MMS as draft To save your message as a draft, that you can edit, complete and send later on (see page 43). In all cases, a progress bar allows you to follow the sending of your message (press c to cancel). Save as template To save your message as a template, that you can use as a basis for other MMS (e.g.
Next /previous slide To move to the next or previous slide. You can also press < or > when viewing the MMS in manual mode. Detach picture To detach the picture of the current slide and save it in the Picture album. Lists all messages saved as drafts, or automatically saved if you quit the MMS menu before saving or sending your MMS. You can Play, Edit, Send and Delete drafts. Outbox Lists the messages you have Sent or created but Not sent yet.
Settings Your phone may have been pre-configured to directly access the services offered. If not, contact your operator to receive the information items described in the present section and enter them as given. With some operators, access parameters can be set «over the air». Read report This option can be set On or Off and informs you (via an SMS) when the status the MMS you have sent has changed, i.e. if it was read or deleted.
Network settings Messages Network account is used to choose a connection profile from the ones you have set (see “Access settings” page 28). Bearer allows you to select the type of network used when launching a connection: GSM, GPRS or GPRS first. Choose MMS Center to enter the MMS address of the server you will connect to. Gateway address and Gateway port will allow you to enter both IP and Port numbers of the server’s gateway.
9 • Infrared Your mobile phone integrates the infrared technology (also called IrDA), that allows you to send or receive data to and from other IrDA-compliant devices through a wireless link (e.g., another mobile phone, a PC or PDA, a printer etc.). You can use IrDA to quickly send a sound you just mixed to a friend’s mobile phone, or to receive pictures from their PDA. Files that are copyright-protected cannot be sent. When connecting with a PC, make sure you have activated its infrared option.
Receiving is cancelled if your phone isn’t contacted by another device before the time out is reached, if the infrared link is broken, if the size of the file sent is too large or if you cancel the process. Save the data received Press , to access the following options: Save Show To save the data, then go back to idle. The items you have received will be saved under their default name, which you can change by selecting them in the relevant menus.
10 • Multimedia As SMS/ MMS ringer To set the selected sound as Messages ringer (this option must be set On in Settings > Sounds, see page 23). Rename To Rename the selected sound. Sound album This menu allows you to manage and listen to the sounds stored in your Sound Album mobile phone, your Own melodies, Standard melodies or Records. When entering one of the available sub-menus, select a sound and press , to access the following options: Delete To Delete the selected sound.
Select a picture add press , to access the options described below, which the icons located on the left hand side of the screen allow you to perform. In each case, press c to go back one step, or , to validate and go to the next option. If you don’t rename the picture, the original file you selected from the album will be overwritten. You can save a picture at any time, even if you are not done modifying it. Add text To add text to the selected picture.
Set as subwall paper Manual To set the selected picture as Subwallpaper (this option must be set On in Settings > Display, see page 24). Select TV Slideshow, then Manual, and press and browse the complete list of pictures. Rotate To rotate the picture of 90° or 180°, press confirm your choice. Rename , to Press > to activate the graphical fullscreen display and send it to the TV, press < to go back to the list. Automatic 1. ,, enter a name and press 2.
Demo mode Press , to launch the Demo movie. Demo mode Press , to check the memory status. The display shows you the percentage of memory free and the phone’s total memory in KB. Press , again and access the detailed list of memory used by each feature. If you turned the phone on without having inserted a SIM card, this menu is available in the first menu level. If «List full» appears when saving a new item or to free memory space, you must delete an item to be able to create or add a new one.
11 • Games & Applications Euro converter -> Euro These menus allow you to convert a sum from or into Euros by entering the amount and pressing ,. The currency used for the conversion is determined by the country where you have subscribed. The Euro converter is available upon subscription and only in countries using the Euro. Calculator Calculator This menu provides the following functions: Addition Press * . Substraction Press * twice. Multiplication Press * 3 times.
Create a new event This menu allows to create events and store them in your organiser. When the Organiser organiser alert is On (see page 23), a beep alerts you when an event is due. 1. Select , then the type of event to create (Holiday, Meeting, ToDo), and enter its starting and ending date & time. 2. Name it (e.g. «Meeting with Smith»), then set a reminder and a frequency: alerts will be triggered at the chosen time. The reminder only applies to Meeting and ToDo events.
Brick game Network This menu can be subscription dependent. As such its icon and content may vary. Bearer This menu gives you access to the brick game, which object is to destroy the Brick Game bricks by hitting them with the ball. Destroying all bricks give you access to the next level. Keys used are the following: 4 and 6 To move the racket left or right. * and # To start the game by throwing the ball left or right. 0 To pause the game up to 2 min.
12 • Call information Call settings Call settings This menu allows you to set all the call options (call forward, waiting, etc.) and gives you access to the menus described hereafter. from the call transfer, which takes place when one/ several calls are in progress. Unconditional Warning! When selecting this option, you will not receive any calls at all until you deactivate it.
Auto redial To set the auto redial On or Off. When On if the person you are calling is busy, your phone automatically redials this number until a successful connection is made or until the maximum number of attempts is reached (10). The phone beeps at the beginning of each attempt and emits a special beep if the connection is successful. The time between redials increases with each attempt. Any key answer To accept a call by pressing any key, except ), used to reject a call.
Reset To reset the whole list at once. If a number listed is also in your Contacts, the corresponding name is displayed. Move+or- to select the number to redial and press ( . Press ) to hang up. Call counters This menu features the GSM counters submenu, which gives you access to the Call counters options described below and allows you to handle the cost and duration of your calls. The GSM Call Counters do not include WAP connections. Most options mentioned below are subscription dependent.
13 • Operator services Press c To return to the previous page. c Most items of this menu are subscription dependent and specific to operators. Consequently, the menus described below may or may not be available. Contact your network operator for details. Press and hold The services provided may involve making a phone call or sending a SMS for which you may be charged.
Select Add bookmark and start entering the new name for the edit screen to appear. Press , , then proceed the same way to enter the URL address. The Manage bookmarks menu allows you to Delete or Edit the selected bookmark. Select profile All connection settings described below apply to the selected profile. Enter address This menu allows you to enter a WAP site address, to which you connect directly when selecting it (a quick way to access WAP addresses without saving them as bookmarks).
Connection Select connection allows you to select one of the data profiles you have defined in Settings > Access settings (see page 28). Bearer allows you to select the type of network used by the selected profile when launching a connection (see page 28). Proxy address and Proxy port allow you to define a gateway address and port number to be used when launching a WAP connection using the selected profile. Press and hold 0 to enter ".
answering machine (password 8421) at phone number 12345678, you could call: 12345678w8421p3. Make a second call You can make a second call during an active call or during a call on hold. Dial a number or select a name in the phonebook, then press ( while already on the phone. The first call is put on hold and the number is displayed at the bottom of the screen. The second number is then dialled.
Conference call You activate the conference call by making several outgoing calls, or create it from a multiparty call context. You may have up to five members at the same time and end all calls at once with ) . Make a first call with someone, then a second one (see “Make a second call” above). Press,and select Conference. Repeat the process until five members are connected.
Icons & symbols In idle mode, several symbols can be displayed simultaneously on the screen. If the network symbol isn’t displayed, the network is not currently available. You may be in a bad reception area, moving to a different location may help. Silent - Your phone will not ring when receiving a call. Vibra - Your phone will vibrate when receiving a call. GPRS attach - Your mobile phone is connected to the GPRS network. SMS message - You have received a new message.
Troubleshooting The symbol is not displayed The network connection is lost. Either you are in a radio shadow (in a tunnel or between tall buildings) or you are outside the network coverage area. Try from another place, try to reconnect to the network (especially when abroad), check that the antenna is in place if your mobile has an external antenna, or contact your network operator for assistance/ information. The display responds more slowly at very low temperatures.
Your phone doesn’t display the phone numbers of incoming calls This feature is network and subscription dependent. If the network doesn’t send the caller’s number, the phone will display Call 1 or Withheld instead. Contact your operator for detailed information on this subject. You can’t send text messages Some networks don’t allow message exchanges with other networks. First check that you entered the number of your SMS center, or contact your operator for detailed information on this subject.
The display shows INSERT YOUR SIM CARD Check that the SIM card has been inserted in the right position (see page 1). If the problem remains, your SIM card might be damaged. Contact your operator. The autonomy of your phone seems lower that indicated in the user guide The autonomy is linked to your settings (e.g., ringer volume, backlight duration) and the features you use. To increase the autonomy, and whenever possible, you must deactivate features you do not use.
Precautions Radio waves Your cellular mobile phone is a low power radio transmitter and receiver. When it is operating, it sends and receives radio waves. The radio waves carry your voice or data signal to a base station that is connected to the telephone network. The network controls the power at which the phone transmits. • Your phone transmits/receives radio waves in the GSM frequency (900 /1800 / 1900 MHz). • The GSM network controls transmission power (0.01 to 2 watts).
In areas with a potentially explosive atmosphere (e.g. petrol stations and also areas where the air contains dust particles, such as metal powders). In a vehicle transporting flammable products (even if the vehicle is parked) or a vehicle powered by liquefied petroleum gas (LPG), check first that the vehicle complies with the applicable safety rules. In areas where you are requested to turn off radio transmitting devices, such as quarries or other areas where blasting operations are in progress.
• • Do not deform or open the battery. Do not allow metal objects (such as keys in your pocket) to short circuit the battery contacts. • Avoid exposure to excessive heat (>60°C or 140°F), moisture or caustic environments. You should only use Philips Authentic Accessories, as the use of any other accessories may damage your phone and will make all guarantees for your Philips phone null and void.
Philips authentic accessories Some accessories, such as a standard battery and a charger, are included as standard in the package of your mobile phone. Other accessories might be sold in the commercial package (according to the operator or the retailer), or sold separately. As a consequence, the package contents may vary. To maximise the performance of your Philips phone and not to void the warranty, always purchase Philips Authentic Accessories that are specially designed for use with your phone.
This software is based in part on the work of the Independent JPEG group. Data connect kit Easy data connection to your Philips mobile phone: the USB cable enable high speed connection between your phone and your computer. Just connect your phone to the cable for an automatic organiser and phonebook synchronization within a few seconds.