^ ------------------------ei_iTE GAS RANGE INSTRUCTION MANUAL Model Number: DG200W DG240W CAUTION: BEFORE USE, PLEASE READ AND FOLLOW ALL SAFETY RULES AND OPERATING INSTRUCTIONS. Avanti has a policy of continuous improvement on its products and reserves the right to change materials and specifications without notice. Avanti Products, A Division of The Mackle Co., Inc. P.O. Box 520604 - Miami, Florida 33152 www.avantiproducts.
WARNING • ALL RANGES CAN TIP • INJURY TO PERSON COULD RESULT • INSTALL ANTI-TIP DEVICE PACKED WITH RANGE • SEE INSTALLATION INSTRUCTIONS WARNING: IF THE INFORMATION IN THIS MANUAL FOLLOWED EXACTLY, A FIRE OR EXPLOSION MAY CAUSING PROPERTY DAMAGE, PERSONAL INJURY, OR DEATH. IS NOT RESULT In theiyicinity. of this; Or a Do npt;tiy tc);:ilght ^ Do not tQU^^ rany aiectridai switch; do not use any phone in your ♦ Immodiiitpilv nail voEir n?iR siinnilfir from a neiQHbor’s phone.
CONTENTS TABLE OF CONTENTS Parts & Features........................................................................................................... 4-5 Before Using Your Gas Range........................................................................................ 6 Precautions And Recommendations............................................................................ 7-8 How To Use Top Burners...........................................................................................
PARTS & FEATURES Figure 1 12 4 1. Cooktop 2. Control panel 3. Door handle 4. Oven light 5. Backguard 6. Leveling legs 7. Removable storage drawer 8. Rating plate 9. Oven vent 10. Glass oven door 11. Anti-tip bracket 12. Broil burner 13. Broiling pan 14. Oven shelves 15.
PARTS & FEATURES Figure 2 COOKING HOB 1. 2. 3. 4. Auxiliary burner (AUX) - 3500 BTU/hr Left semi-rapid burner (SR) - 6000 BTU/hr Right semi-rapid burner (SR) - 6000 BTU/hr Rapid burner (R) - 10000 BTU/hr f==m ■ • ■ , -. T. -:.Г: у ::л :: - VF7 Note: - The electric gas-lighting device Is incorporated into the knobs. 77.: 7;:: 77';;;7.;7- Щх ( 771X v69i '77'7:77-:: 7:7-'"!7:'77' 7: :■ ' ■. :■; Л " Л:7 ■■■: 7Ш7::77;-7 : CAUTION^ Lif .the; .....................
BEFORE USING YOUR GAS RANGE WARNING!! HAVE THIS RANGE INSTALLED BY A QUALIFIED INSTALLER. Improper installation, adjustment, alteration, services, or maintenance can cause injury or property damage. Consult a qualified installer, service agency, or the gas supplier. Before Using Your Gas Range / Remove the exterior and interior packing.
PRECAUTIONS & RECOMMENDATIONS IMPORTANT PRECAUTIONS AND RECOMMENDATIONS After having unpacked the appliance, check to ensure that it is not damaged and that the oven door closes correctly. In case of doubt, do not use it and consult your supplier or a professionafly qualified technician. Packing elements (i.e. plastic bags, polystyrene foam, nails, packing straps, etc.) should not be left around within easy reach of children, as these may cause serious injuries.
PRECAUTIONS & RECOMMENDATIONS GENERAL INFORMATION WARNING!! 1. This appliance shall not be used for space heating. This information is based on safety considerations, 2. All openings in the wall behind the appliance and in the floor under the appliance shall be sealed. 3. Keep appliance area clear and free from combustible materials, gasoline, and other flammable vapors. 4. Do not obstruct the flow of combustion and ventilation air. 5. Disconnect the electrical supply to the appliance before servicing. 6.
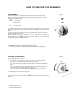
HOW TO USE THE TOP BURNERS Figure 4 GAS BURNERS Gas flow to the burners is adjusted by turning the knobs which control the valves. Turning the knob so that the indicator line points to the symbols printed on the panel achieves the following functions: Off = Closed valve Off = maximum rate LO oo •o = minimum rate The maximum aperture position permits rapid boiling of liquids, whereas the minimum aperture position allows simmer warming of food or maintaining boiling conditions of liquids.
HOW TO USE THE TOP BURNERS Figure 6 CHOICE OF BURNER {fig. 6) The symbols printed on the panel above the gas knobs indicate the correspondence bet\ween the knob and the burner. The most suitable burner is to be chosen according to the diameter and volume capac ity of the container to be warmed. It is important that the diameter of the pots or pans suitably match the heating poten tial of the burners in order not to jeopardise the efficiency of the burners, bringing about a waste of gas fuel.
HOW TO USE THE GAS OVEN GENERAL FEATURES The gas oven is provided with two burners: a) Oven burner, mounted on the lower part of the oven (12000 BTU/hr) b) Broil burner, mounted on the upper part of the oven (8500 BTU/hr). irAttentio'n ye^ihqtrd urjn^^ ■ijKeep^childrenia^ The door is; hot, use the handle. USING THE OVEN FOR THE FIRST TIME It is advised to follow these instructions: — Insert shelves and tray.
HOW TO USE THE GAS OVEN Figure 9 IGNITION OF THE OVEN BURNER The thermostat allows the automatic control of the temperature. The gas delivery to the oven burner is controlled by a two way thermostatic tap (oven and broil burners) with flame-failure device. To light the oven burner operate as follows: 1) Open the oven door to its full extent. WARNING: Risk of explosion! The oven door nrust be open during this opera tion.
HOW TO USE THE GAS OVEN Figure 11 IGNITION OF THE BROIL BURNER The broil burner generates the infra-red rays for broiling. To light the broil burner operate as follow: Off 1 ) Open the oven door to the full extent. WARNING: Risk of explosion! The oven door must be open during this operation. 2) Lightly press and turn the thermostat knob clockwise to the position (fig. 11). BROIL* 3) Press the knob right down to prime the electric ignition. Keep the knob pressed.
HOW TO USE THE GAS OVEN Figure 14 Figure 15 BROILING Very important: the broil burner must always be used with the oven door closed. - Position the shelf on the second level from the top (fig. 14). - Turn on the broil burner, as explained in the preceding paragraphs and let the broil burner preheat for about 5 minutes with the door dosed. - Place the food to be cooked above the broiling pan. - introduce the broiling pan in the oven (fig. 15).
CARE & MAINTENANCE Figure 18 GENERAL RECOMANDATION ✓ Important; Before any operation of cleaning and maintenance disconnect the appliance from the electrical supply. À WARNING tr Electrical Shock Hazard Plug into outlet, a grounded 3-prong / It is advisable to clean when the appliance is cold and especially for cleaning the enamelled parts. / Avoid leaving alkaline or acidic substances (lemon juice, vinegar, etc.) on the surfaces. / Avoid using cleaning products with a chlorine or acidic base.
CARE & MAINTENANCE Figure 20 BURNERS AND GRIDS Figure 21 These parts can be removed and cleaned \vith appropriate products. / After cleaning, the burners and their flame distributors must be well dried and correctly replaced. It is very important to check that the burner flame distributor and the cap has been correctly positioned - failure to do so can cause serious problems. ■ / In appliances with electric ignition keep the electrode dean so that the sparks always strike.
CARE & MAINTENANCE Figure 25a REMOVING THE OVEN DOOR Type A To facilitate oven cleaning, it is possible to remove the door. Please follow the instructions carefully: — Open the door completely. — Push down the lever “L" and, keeping it in this position, slowly close the door in order to block the hinge (fig. 25a). — Grip the door (as indicated in fig. 25b) and, while dosing it, release the two hinges as shown in fig. 25c. — Rest the door on a soft surface.
TROUBLE SHOOTING GUIDE PROBLEMS WITH YOUR APPLIANCE? You can solve many common appliance problems easily, saving you the cost of a possible service call. Try the suggestions below to see if you can solve the problem before calling the servicer. Surface control has not been completely turned to the ON position. Push in and turn control to the ON position until burner ignites, then turn control to desired flame setting. Burner ports are ciogged. Use a small gauge wire or needle to open ports.
SERVICE SERVICE FOR YOUR GAS RANGE We are proud of our customer service organization and the network of professional ser vice technicians that provide service on your Avanti appliances. With the purchase of yourAvanti appliance, you can have the confidence that if you ever need additional inforroation or assistance, the Avanti Products Customer Service team will be here for you. Just call us toll-free.
WARRANTY WARRANTY - GAS RANGE LENGTH OF WARRANTY WE WILL PAY FOR FULL ONE-YEAR WARRANTY FROM DATE OF PURCHASE ON ALL PARTS EXCEPT GLASS PARTS IN RENTAL OR COMMERCIAL USE, THE WARRANTY PERIOD IS 90 DAYS. REPLACEMENT PARTS AND REPAIR LABOR TO CORRECT DEFECTS IN MATERIALS OR WORKMANSHIP. SERVICE MUST BE PROVIDED BY AN AUTHORIZED SERVICE COMPANY. FULL 30-DAY WARRANTY FROM DATE OF PURCHASE ON GLASS PARTS AND FINISH OF PORCELAIN ENAMEL, PAINTED OR BRIGHT METAL FINISHED PARTS.