
ff138g0w manual 07252017


6
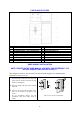
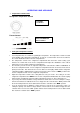
PARTS AND FEATURES
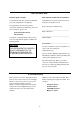
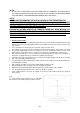
DOOR HANDLE INSTALLATION
NOTE: FIGURES IN THE USER MANUAL ARE ONLY FOR REFERENCE. THE
ACTUAL PRODUCT MAY DIFFER SLIGHTLY.
The refrigerator must be disconnected from the electrical supply before attempting the
installation of any accessory.
① Remove the flat head screws from the
accessory bag
; install them into the door
holes; secure to the door until they are tight
but do not overtighten.
② Align the handles with the screws installed
in step #1
③ Insert the screws through the holes at the
sides of the handles, and tighten until
secure.
Do not overtighten
(Please use flat
screwdriver with 3mm width head to
install).
(Photos may vary from actual unit)
1
Freezer Section
10
Freezer Door Gasket
2
Freezer Shelf
11
Freezer Door
3
Fresh Room (Dairy / Egg Compartment)
12
Freezer Door Bins (2)
4
Refrigerator Section
13
Refrigerator Door Bins (2)
5
Refrigerator Shelves (2)
14
Refrigerator Door
6
Refrigerator Temperature Control
15
Gallon Bottle Storage Bin (1)
7
Glass Crisper Cover
16
Refrigerator Door Gasket
8
Crisper (2)
17
Leveling Leg (Right)
9
Leveling Leg (Left)