MICROWAVE OVEN INSTRUCTION MANUAL MANUAL DE INSTRUCCIONES Models / Modelos: MO7081MW / MO7082MB Models / Modelos: MO7191TW / MO7192TB Model / Modelo: MO7003SST Model / Modelo: MO9000TW / MO9001TB Model / Modelo: MO9003SST Model / Modelo: MO1108SST BEFORE USE, PLEASE READ AND FOLLOW ALL SAFETY RULES AND OPERATING INSTRUCTIONS. La sección en español empieza en la página 23.
TABLE OF CONTENTS Help Us Help You 3 Parts and Features 4–6 Important Safety Instructions 7 Installation Instructions 8 Before Using Your Microwave Oven 8 Installation of Your Microwave Oven 8 Safety Precautions 8–9 Electrical Connection 10 Operating Your Microwave Oven 10 Control Panel and Operating Instructions: Models MO7081MW / MO7082MB 11 – 12 Control Panels Models: MO7191TW / MO7192TB / MO7003SST / MO9003SST / MO1108SST 13 – 15 Operation Procedure Models: MO7191TW / MO7192TB /
HELP US HELP YOU… Read this guide carefully. Write down the model and serial numbers. It is intended to help you operate and maintain your new microwave oven properly. You'll find them on a label located on the rear wall of the microwave oven. Keep it handy to answer your questions.
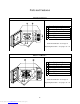
Parts and Features MO7081MW / MO7082MB 5 3 6 2 7 4 1 2 3 4 5 6 7 Door Safety Lock System Oven Window Oven Air Vent Turntable Roller Assembly Glass Tray Control Panel Door Release Button Control Panel Detail – See Page 11. 1 Operating Instructions – See page 12. MO7191TW / MO7192TB 7 6 5 2 1 2 3 4 5 6 7 Door Safety Lock System Oven Window Turntable Roller Assembly Door Release Button Control Panel Oven Air Vent Glass Tray 4 3 Control Panel Detail – See Page 13.
Parts and Features MO7003SST 1 2 3 4 5 6 Door Safety Lock System Oven Window Turntable Roller Assembly Control Panel Oven Air Vent Glass Tray Control Panel Detail – See Page 13. Operating Instructions – See pages 15 - 19 MO9000TW 1 2 3 4 5 6 7 8 Door Safety Lock System Oven Window Oven Air Vent Turntable Shaft Turntable Roller Ring Glass Tray Control Panel Door Release Button Control Panel Detail – See Page 14. Operating Instructions – See pages 15 - 19 5 Downloaded from www.Manualslib.
Parts and Features MO9003SST 1 2 3 4 5 6 7 Door Safety Lock System Oven Window Turntable Roller Ring Turntable Shaft Control Panel Oven Air Vent Glass Tray Control Panel Detail – See Page 14. Operating Instructions – See pages 15 - 19. MO1108SST 1 2 3 4 5 6 7 Door Safety Lock System Oven Window Turntable Roller Ring Turntable Shaft Control Panel Oven Air Vent Glass Tray Control Panel Detail – See Page 15. Operating Instructions – See pages 15 - 19. 6 Downloaded from www.Manualslib.
Important Safety Instructions WARNING To reduce the risk of fire, electrical shock, or injury when using your appliance, follow these basic precautions: Read all instructions before using the appliance. Precautions to avoid possible exposure to excessive microwave energy. This appliance must be grounded. Connect only to properly grounded outlet. See GROUNDING INSTRUCTIONS.
INSTALLATION INSTRUCTIONS BEFORE USING YOUR MICROWAVE OVEN Remove the exterior and interior packing. Check to be sure you have all of the following parts: Glass Tray Turntable Roller Assembly (Roller or Roller Ring) Instruction Manual Inspect the oven after unpacking for any visual damage such as: Misaligned Door Damaged Door Dents or Holes in Door Window and Screen Dents in Cavity If any of the above is visible, DO NOT use the oven.
General Use DO NOT attempt to tamper with or make any adjustments or repairs to door, control panel or any other part of the oven. Do NOT remove outer panel from oven. Repairs should only be done by qualified service personnel. DO NOT operate the oven empty. The microwave energy will reflect continuously throughout the oven if no food or water is present to absorb energy. If a fire occurs in the oven, touch the START/STOP pad and LEAVE THE DOOR CLOSED.
ELECTRICAL CONNECTION GROUNDING INSTRUCTIONS This appliance must be grounded. In the event of an electrical short circuit, grounding reduces the risk of electrical shock by providing an escape wire for the electric current. This appliance is equipped with a cord having a grounding wire with a grounding plug. The plug must be inserted into an outlet that is properly installed and grounded. Warning Improper use of the grounded plug can result in the risk of electrical shock.
MODELS: MO7081MW / MO7082MB - ONLY CONTROL PANEL OPERATION INSTRUCTIONS UNIT SPECIFICATIONS The control panel of your unit consists of two function selector knobs. POWER SELECTOR KNOB Use this knob to select the power level at which you want to cook. Power levels increase when turning the knob in a clockwise direction as well as decrease when turned in a counter clockwise direction. Power levels are represented in the table below: Power Setting LOW DEFROST M. LOW MED M.
OPERATING YOUR MICROWAVE (MODELS: MO7081MW / MO7082MB ONLY) Plug the power supply cord into a standard 3-pronged 15 Amp, 120V AC 60 Hz. After placing the food in a suitable container, open the oven door and put it on the glass tray. The glass tray and roller guide must always be in place during cooking. Shut the door. Make sure that it is firmly closed. The oven door can be opened at any time during operation by pushing the door release button. The oven will automatically shut off.
MODELS: MO7191TW / MO7192TB / MO7003SST / MO9000TW / MO9003SST / MO1108SST CONTROL PANEL Follow the applicable instructions for operation and control, which are given in “HOW TO SET THE OVEN CONTROLS” on page 17.
MO9000TW UNIT FEATURES Pre-Programmed Cooking Modes Baked Potato Popcorn Pizza Beverage Frozen Dinner Reheat Cook By Weight Defrost By Weight Speed Defrost Clock: 12 Hour Kitchen Timer UNIT SPECIFICATIONS Power Consumption: Output (Watts): Operation Frequency: Unit Dimensions (HxWxD): Oven Cavity Dimensions (HxWxD): Oven Capacity: Cooking Uniformity: Net Weight: 120V ~ 60Hz, 1350W 900W 2450MHz 12 x 19 x16 81/2 x 13 x 13 0.9 cu. Ft. Turntable Approx.
MO1108SST UNIT FEATURES Pre-Programmed Cooking Modes Baked Potato Popcorn Pizza Beverage Frozen Dinner Reheat Cook By Weight Defrost By Weight Speed Defrost Clock: 12 Hour Kitchen Timer UNIT SPECIFICATIONS Power Consumption: Output (Watts): Operation Frequency: Unit Dimensions (HxWxD): Oven Cavity Dimensions (HxWxD): Oven Capacity: Cooking Uniformity: Net Weight: 120V ~ 60Hz, 1450W 1000W 2450MHz 12 x 219/16 x713/16 910/16 x 143/16 x145/16 1.1 cu. Ft. Turntable Approx.
CONTROL PANEL FEATURE DISPLAY PRE-PROGRAMMED COOKING MODES POWER DEFROST BY WEIGHT SPEED DEFROST TIMER NUMBER PADS (0-9) CLOCK RESET START/STOP DESCRIPTION Electronic display shows Cooking Time, Cooking Power, Time Remaining in Cooking Cycle, and the Present Time. BAKED POTATO BEVERAGE/SOUP PIZZA SEAFOOD POPCORN FROZEN DINNER FRESH VEGETABLES REHEAT FROZEN VEGETABLES Allow you to reheat or cook food automatically without entering power level or time.
HOW TO SET THE OVEN CONTROLS ONE SIGNAL: Oven accepts the entry. TWO SIGNALS: Oven does not accept the entry, check and try again. AUDIBLE SIGNALS DURING OVEN SETTINGS SETTING THE CLOCK Touch CLOCK pad. This is a 12 hour clock. Touch CLOCK pad once more. This is a 24 hour clock. 3. Use the number pads to enter the correct time. If you selected 12 hour clock system, the digital clock allows you to set from 1:00 to 12:59.
SPEED DEFROST Touch SPEED DEFROST. Enter desired defrosting time by touching correct number pads. Digital timer sets minutes and seconds from left to right so a single digit can be set (5 for 5 seconds ) or up to 4 digits (2405 for 24 minutes 5 seconds). 3. Touch START/STOP. 1. 2. NOTE: After time has elapsed four signals sound and END appears in display. Touch RESET pad or open door to clear END before starting another cooking function. DEFROST BY WEIGHT Touch DEFROST BY WEIGHT pad. Enter weight.
BEVERAGE For 4 to 6 oz. coffee cups: 1. Touch BEVERAGE once. 2. Enter number of cups by touching number pads from 1 to 4. Cooking times are as follows: 1 cup. 1 min. 00 sec 2 cups. 2 min. 00 sec 3 cups. 2 min. 50 sec 4 cups. 3 min. 50 sec 3. Touch START/STOP. FROZEN DINNER For one or two small (5-7 oz.) frozen dinners: 1. Touch FROZEN DINNER once. 2. For 1 entree, just touch START/STOP. For 2 entrees, touch the number pad “2”. Cooking times for small-size entrees are as follows: 1 entree 4 min. 15 sec.
COOKING TECHNIQUES Your microwave makes cooking easier than conventional cooking, provided you keep these considerations in mind. Stirring Stir foods such as casseroles and vegetables while cooking to distribute heat evenly. Food at the outside of the dish absorbs more energy and heats more quickly, so stir from the outside to the center. The oven will turn off when you open the door to stir your food.
PROBLEMS WITH YOUR APPLIANCE? You can solve many common appliance problems easily, saving you the cost of a possible service call. Try the suggestions below to see if you can solve the problem before calling the servicer. TROUBLESHOOTING GUIDE PROBLEM Appliance does not operate. POSSIBLE CAUSE Not plugged in. The circuit breaker tripped or a blown fuse. The door is not closed properly. The circuit breaker tripped or a blown fuse. The appliance is unplugged.
Avanti Microwave Ovens LIMITED WARRANTY LIMITED ONE-YEAR WARRANTY Avanti Products will repair or replace, without charge, any part of your product, which proves to be defective in material or workmanship under normal use during the first year after the date of original purchase by a consumer. This warranty is good for the original purchaser during the warranty period and applies only in the continental United States.
INSTRUCCIONES EN ESPAÑOL PRECAUCION PARA REDUCIR EL RIESGO DE INCENDIO, DESCARGA ELECTRICA, O DAÑO CUANDO ESTE USANDO SU HORNO MICROONDAS, SIGA ESTAS INDICACIONES. LEA TODAS LAS INSTRUCCIONES ANTES DE USAR SU HORNO MICROONDAS. ALGUNOS PRODUCTOS TALES COMO HUEVOS ENTEROS Y ENVASES SELLADOS (POR EJEMPLO, FRASCOS DE VIDRIO) PUEDEN EXPLOTAR, POR LO QUE NO DEBEN SER CALENTADOS EN SU HORNO MICROONDAS. USE SU HORNO MICROONDAS SOLAMENTE PARA LO QUE SE INDICA EN ESTE MANUAL.
INDICACIONES PARA LA INSTALACION ANTES DE USAR SU HORNO MICROONDAS RETIRE LA ENVOLTURA EXTERIOR E INTERIOR VERIFIQUE QUE TENGA LAS SIGUIENTES PARTES: PLATO DE VIDRIO ARO GIRATORIO MANUAL DE USO VERIFICAR QUE EL HORNO MICROONDAS NO TENGA LOS SIGUIENTES DAÑOS: PUERTA MAL ALINEADA O DESCUADRADA PUERTA DAÑADA ABOLLADURAS O AGUJEROS EN LA PUERTA Y/O PANTALLA. ABOLLADURAS DENTRO DEL HORNO. SI SU HORNO MICROONDAS MUESTRA ALGUNA DE LAS CARACTERISTICAS ARRIBA MENCIONADAS, NO LO USE.
NO INTENTE SECAR ROPA, PERIODICOS, U OTRO TIPO DE MATERIALES EN EL HORNO. ESTOS PODRIAN INCENDIARSE. NO USE PRODUCTOS DE PAPEL RECICLADO, ESTOS CONTIENEN IMPUREZAS QUE PUEDEN CAUSAR CHISPAS Y FUEGOS CUANDO SON USADOS. NO GOLPEE EL PANEL DE CONTROL, PODRIA DAÑAR LOS CONTROLES. UTENSILIOS NO USE ENVASES DE METAL O PLATOS CON BORDES METALICOS, PODRIAN OCASIONAR CHISPAS. NO USE ALAMBRES METALICOS PARA CERRAR BOLSAS EN SU HORNO MICROONDAS.
MICROONDAS. NO USE ACEITE, A MENOS QUE EL FABRICANTE DEL PRODUCTO LO ESPECIFIQUE. NO INTENTE FREIR DENTRO DE SU HORNO MICROONDAS. LOS LIQUIDOS CALIENTES PUEDEN ERUPCIONAR SI NO TIENEN AIRE. NO CALIENTE LIQUIDOS EN SU HORNO MICROONDAS SIN HABERLOS MEZCLADO PRIMERO. CONEXION ELECTRICA ESTA UNIDAD DEBE SER CONECTADO A TIERRA. EN EL CASO QUE OCURRA UN CORTO CIRCUITO, LA CONEXION A TIERRA REDUCIRA EL RIESGO DE RECIBIR UNA DESCARGA ELECTRICA POR TENER UN ALAMBRE PARA EL ESCAPE DE LA CORRIENTE ELECTRICA.
MODO DE EMPLEO (MODELOS MO7081MW / MO7082MB) COMO PROGRAMAR EL CICLO DE COCCION: COLOQUE EL ENVASE CON LOS ALIMENTOS EN EL PLATO GIRATORIO Y CIERRE LA PUERTA. GIRE EL BOTON DE CONTROL DE TIEMPO HASTA EL TIEMPO DESEADO GIRE EL SELECTOR DE POTENCIA HASTA EL NIVEL APROPIADO BOTON SELECTOR DE POTENCIA ALTO-HIGH 100% DE LA POTENCIA TOTAL MEDIO-ALTO-M. HIGH 85% DE LA POTENCIA TOTAL MEDIANO-MED 66% DE LA POTENCIA TOTAL MEDIO-BAJO-M.
OPERACION CONECTE EL ENCHUFE A UN TOMACORRIENTE ESTANDAR DE 3 PUNTAS (120V AC 60 HZ,15 AMP). CUANDO EL HORNO SE CONECTA POR PRIMERA VEZ LA PANTALLA DEL PANEL DE CONTROL MOSTRARA EL MENSAJE “ENTER CLOCK TIME” (ENTRE LA HORA DEL RELOJ), SI NO DESEA QUE SE MUESTRE LA HORA DEL RELOJ PRESIONE LA TECLA RESET. LUEGO DE COLOCAR LA COMIDA EN UN ENVASE ADECUADO ABRA LA PUERTA DEL HORNO Y PONGALA SOBRE EL PLATO DE VIDRIO (ESTE Y EL ARO GIRATORIO DEBEN ESTAR SIEMPRE EN SU LUGAR CUANDO EL HORNO ESTE TRABAJANDO).
NUMBER PADS (0-9) (TECLADO NUMERICO) EL TECLADO DE NUMEROS SIRVE PARA INGRESAR TIEMPOS Y CANTIDADES. CLOCK (RELOJ) SE USA PARA INGRESAR LA HORA ACTUAL EN EL RELOJ. RESET (REINICIO) REINICIA TODAS LAS PROGRAMACIONES SI SE MARCA ANTES DE COMENZAR A COCINAR. START/STOP (COMENZAR/PARAR) SE USA PARA INICIAR, DETENER O FINALIZAR EL FUNCIONAMIENTO DEL HORNO.
PRENDIDAS DURANTE EL TODO EL CICLO. CARACTERISTICAS ESPECIALES DE SU HORNO MICROONDAS MINUTE TIMER (MEDIDOR DE TIEMPO POR MINUTOS) SE USA PARA TOMAR EL TIEMPO A COSAS QUE SE HACEN FUERA DEL HORNO. CUANDO EL TIEMPO PROGRAMADO HAYA TRANSCURRIDO EL HORNO EMITIRA CUATRO VECES EL SONIDO BEEP. LA LUZ DEL HORNO Y EL VENTILADOR DE REFRIGERACION ESTARAN ENCENDIDOS MIENTRAS EL MEDIDOR DE TIEMPO ESTE ACTIVO.
CONFIGURANDO UN PROGRAMA DE COCCION A. ONE STAGE-COOKING (COCCION EN UNA SOLA ETAPA) 1. USE LAS TECLAS NUMERICAS PARA PROGRAMAR EL TIEMPO DE COCCION. SE PUEDE PROGRAMAR TIEMPOS DE COCCION ENTRE 01 SEGUNDO(S) Y 99 MINUTOS CON 99 SEGUNDOS. 2. SI DESEA PROGRAMAR UN NIVEL DE POTENCIA DISTINTO DE 100% PRESIONE POWER 3. PRESIONE LAS TECLAS NUMERICAS PARA INGRESAR EL NIVEL DE POTENCIA (DE 1 A 9), USE SOLO UN DIGITO PARA PROGRAMAR EL NIVEL DE POTENCIA. 4. PRESIONE START/STOP PARA INICIAR LA COCCION.
PARA USAR CONJUNTAMENTE LAS FUNCIONES DE DESCONGELADO-RAPIDO Y COCCION EN UNA SOLA ETAPA, SIGA ESTAS INSTRUCCIONES: 1. SIGA LOS PASOS 1 Y 2 DE LA FUNCION DESCONGELADO-RAPIDO. 2. PRESIONE LA TECLA COOK E INGRESE EL TIEMPO DE COCCION Y NIVEL DE POTENCIA. 3. PRESIONE LA TECLA START/STOP. PARA USAR LA FUNCION DE DESCONGELADO-RAPIDO Y COCCION EN DOS ETAPAS, SIGA ESTAS INSTRUCCIONES: 1. SIGA LOS PASOS 1 Y 2 DE LA FUNCION DESCONGELADO-RAPIDO. 2.
EL MENSAJE LOCK (BLOQUEADO) APARECERA EN LA PANTALLA. PARA CANCELAR LA FUNCION MANTENGA PRESIONADA LA TECLA RESET POR 3 SEGUNDOS, EL MENSAJE LOCK (BLOQUEADO) DESAPARECERA DE LA PANTALLA. PROGRAMACION DE LA FUNCION COCCION RAPIDA ESTA FUNCION LE PERMITIRA COCINAR O RECALENTAR COMIDAS AUTOMATICAMENTE SIN NECESIDAD DE INGRESAR EL NIVEL DE POTENCIA O EL TIEMPO DE COCCION. PARA PORCIONES PEQUEÑAS, SIMPLEMENTE PRESIONE LA TECLA QUE APLIQUE PARA EL TIPO DE COMIDA Y SEGUIDAMENTE LA TECLA START/STOP.
CANTIDADES 1 PAPA 2 PAPAS 3 PAPAS 4 PAPAS TIEMPO DE COCCION 4 MIN. 30 SEC. 8 MIN. 00 SEC. 11 MIN. 40 SEC. 15 MIN. 20 SEC. 3. PRESIONE START/STOP PIZZAS RECALENTANDO UNA TAJADA DE PIZZA: 1. PRESIONE LA TECLA PIZZA UNA VEZ. LOS MENSAJES CODE (CODIGO) Y 0:55 (55 SEGUNDOS) APARECERAN EN LA PANTALLA. 2. PRESIONE START/STOP CALENTANDO UNA PIZZA CONGELADA COMPLETA 1. PRESIONE LA TECLA PIZZA DOS VECES. LOS MENSAJES CODE (CODIGO) Y 4:30 (4 MINUTO Y 30 SEGUNDOS) APARECERAN EN LA PANTALLA. 2.
COMIDAS CONGELADAS (FROZEN DINNER) PARA UNA O DOS COMIDAS CONGELADAS PEQUEÑAS (DE 5 A 7 ONZAS): 1. PRESIONE LA TECLA FROZEN DINNER UNA VEZ 2. PARA UNA PORCION, PRESIONE START/STOP. PARA 2 PORCIONES, PRESIONE EL “2” EN EL TECLADO NUMERICO. 3. LOS TIEMPOS DE COCCION PARA COMIDAS CONGELADAS PEQUEÑAS SON LOS SIGUIENTES: TIEMPO DE CANTIDADES COCCION 1 PORCION 4 MIN. 15 SEC. 2 PORCIONES 7 MIN. 30 SEC. 4. PRESIONE START/STOP PARA PORCIONES GRANDES (DE 8 A 10 ONZAS) 1. PRESIONE LA TECLA FROZEN DINNER DOS VECES. 2.
TECNICAS DE COCINA COCINAR EN SU HORNO MICROONDAS ES MAS FACIL QUE EN LA COCINA CONVENCIONAL, SIEMPRE QUE TENGA EN MENTE ESTAS CONSIDERACIONES: MEZCLE MUEVA ALIMENTOS TALES COMO GUISOS Y VEGETALES MIENTRAS LOS COCINE PARA DISTRIBUIR EL CALOR DE UNA MANERA PAREJA. LA COMIDA QUE SE ENCUENTRE EN LA PARTE EXTERNA DEL PLATO GIRATORIO ABSORBERA ENERGIA Y CALOR MAS RAPIDAMENTE, POR LO QUE DEBE CAMBIARLAS DE POSICION CON LAS QUE SE ENCUENTREN EN LA PARTE INTERNA.
CUIDADO Y MANTENIMIENTO LIMPIEZA DE SU HORNO MICROONDAS APAGUE Y DESCONECTE EL ENCHUFE DE PARED ANTES DE LIMPIAR SU HORNO. MANTENGA EL INTERIOR DE SU HORNO MICROONDAS LIMPIO. LOS ALIMENTOS SALPICAN O DERRAMAN PARTICULAS Y LIQUIDOS QUE SE ADHIEREN A LAS PAREDES DEL HORNO, ES RECOMENDABLE LIMPIARLAS CON UN PAÑO HUMEDO. PUEDE USAR UN DETERGENTE MUY SUAVE SI EL HORNO SE ENCUENTRA MUY SUCIO. NO RECOMENDAMOS EL USO DE DETERGENTES O ABRASIVOS FUERTES.
PROBLEMAS CON SU HORNO MICROONDAS? USTED PUEDE RESOLVER MUCHOS PROBLEMAS COMUNES DE SU HORNO MICROONDAS, AHORRANDOLE EL GASTO DE UNA POSIBLE VISITA DEL SERVICIO TECNICO. PRUEBE LAS SIGUIENTES SUGERENCIAS PARA VERIFICAR SI USTED PUEDE RESOLVER EL PROBLEMA ANTES DE LLAMAR AL SERVICIO TECNICO. GUIA PARA SOLUCIONAR PROBLEMAS PROBLEMA SU MICROONDA NO FUNCIONA LA LUZ NO PRENDE VIBRACIONES SOLUCION NO ESTA CONECTADO A LA CORRIENTE ELECTRICA.
REGISTRATION INFORMATION Thank you for purchasing this fine Avanti product. Please fill out this form and return it within 100 days of purchase and receive these important benefits to the following address: Avanti Products, A Division of The Mackle Co., Inc. P.O. Box 520604 - Miami, Florida 33152 USA Protect your product: We will keep the model number and date of purchase of your new Avanti product on file to help you refer to this information in the event of an insurance claim such as fire or theft.
PRINTED IN CHINA 40 Downloaded from www.Manualslib.