
User Guide
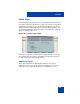
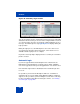
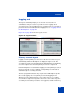

Table Of Contents
- Revision history
- Contents
- Welcome
- Regulatory and safety information
- Using your Avaya 1120E IP Deskphone
- Getting started
- Before you begin
- Connecting the components
- Removing the stand cover
- Connecting the AC power adapter (optional)
- Connecting the handset
- Connecting the headset (optional)
- Selecting the headset tuning parameter
- Connecting the LAN ethernet cable
- Installing additional cables
- Wall-mounting the IP Deskphone (optional)
- Entering text
- Entering text using the IP Deskphone dialpad
- Enabling and disabling the # Ends Dialing feature
- Configuring the dialpad to alphanumeric dialing
- Entering text using the USB keyboard
- Accessing the Avaya 1120E IP Deskphone
- Configuring the Avaya 1120E IP Deskphone
- Making a call
- Receiving a call
- The Address Book
- Call Inbox
- Call Outbox
- Instant Messaging
- While on an active call
- Additional features
- Using the Friends feature
- Feature keys
- Feature key programming
- Feature key autoprogramming
- Using Call Forward
- Configuring Do Not Disturb
- Configuring a Presence state
- Configuring Privacy settings
- Multiple Appearance Directory Number
- Audio Codecs
- PC Client softphone interworking with the IP Deskphone
- Automatic remote software updates
- Multiuser
- Advanced features
- Visual indicators
- Multi-Level Precedence and Preemption
- Quick reference
- Third party terms
- Terms you should know
- Index

Additional features
262
The Allow Addresses screen allows you to preauthorize requests to
automatically answer to a list of user-entered domains, and SIP
addresses.
Select Prefs, Feature Options, Answer-Mode Settings, and then press
Allow addresses to view the Allow Addresses screen.
The screen displays the following instructions:
Domain or SIP address
[Typing cursor]
The following options are available for the Allow Addresses page:
• Save—to save the entered domain and SIP address into the list and
displays the list.
• abc/123—to change between alphanumeric and numeric entry.
• Clear—to erase all entered characters.
• Back—to return to the previous screen.
The Allow Addresses screen displays the domains and SIP addresses in
a list. If the list is long, you can scroll down the screen until you have
reached the last entry.
The following context-sensitive soft keys are available for the Allow
Addresses page:
• Add—to add the entry content.
• Edit—to select the current entry and edit the entry.
• Delete—to delete the selected domain from the list.
• Back—to return to the Answer-Mode Settings screen.
Automatic remote software updates
Note: Your system administrator must enable Remote check for
update for this feature to work.