
User Guide
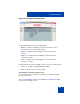

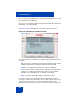
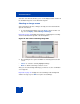
Table Of Contents
- Revision history
- Contents
- Welcome
- Regulatory and safety information
- Using your Avaya 1120E IP Deskphone
- Getting started
- Before you begin
- Connecting the components
- Removing the stand cover
- Connecting the AC power adapter (optional)
- Connecting the handset
- Connecting the headset (optional)
- Selecting the headset tuning parameter
- Connecting the LAN ethernet cable
- Installing additional cables
- Wall-mounting the IP Deskphone (optional)
- Entering text
- Entering text using the IP Deskphone dialpad
- Enabling and disabling the # Ends Dialing feature
- Configuring the dialpad to alphanumeric dialing
- Entering text using the USB keyboard
- Accessing the Avaya 1120E IP Deskphone
- Configuring the Avaya 1120E IP Deskphone
- Making a call
- Receiving a call
- The Address Book
- Call Inbox
- Call Outbox
- Instant Messaging
- While on an active call
- Additional features
- Using the Friends feature
- Feature keys
- Feature key programming
- Feature key autoprogramming
- Using Call Forward
- Configuring Do Not Disturb
- Configuring a Presence state
- Configuring Privacy settings
- Multiple Appearance Directory Number
- Audio Codecs
- PC Client softphone interworking with the IP Deskphone
- Automatic remote software updates
- Multiuser
- Advanced features
- Visual indicators
- Multi-Level Precedence and Preemption
- Quick reference
- Third party terms
- Terms you should know
- Index
Advanced features
306
The screen lets you launch the user-defined password definition screen if
it is enabled in the configuration.
The text on screen displays Enter user password to activate screensaver
followed by a user input prompt.
Figure 61 on page 306 displays the screensaver password screen.
Figure 61: Screensaver password screen
The options, which are available for the Enable (with password) mode are
as follows:
• Ok—Screensaver enabled message appears if the password is valid.
Invalid password message appears if the password is invalid.
• 123/abc—to toggle input mode between numeric or alphabet.
• Set—context-sensitive soft key appears only if the feature allows the
setting of user-defined passwords. This key invokes a password
definition screen that allows you to configure a password.
• Back—to dismiss the Enable (with password) mode menu.
If the option to use a user-defined password is allowed, the interface
(screen) to configure the password, is accessed through the Set context-
sensitive soft key on that screen. If a user-defined password is not
allowed, then the Set context-sensitive soft key is not visible, and you can