
User Guide
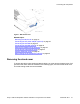
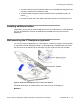


1. Connect one end of the PC Ethernet cable to your IP Deskphone using the RJ-45
connector marked with the network symbol.
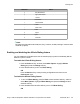
2. Thread the cable through the channel marked with the workstation symbol, as
follows:
3. Connect the other end of the cable to the LAN connector on the back of your PC.
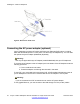
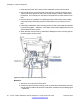
Installing additional cables
If applicable, you can plug an optional USB device such as a USB mouse or a USB keyboard
into your IP Deskphone. Connect the USB cable to the USB port on the back of the IP
Deskphone.
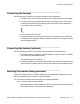
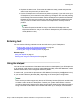
Wall-mounting the IP Deskphone (optional)
You can mount your IP Deskphone on a wall either by: (method A) using the mounting holes
on the bottom of the IP Deskphone stand or (method B) using a traditional-style wall-mount
box with an RJ-45 connector and 15 centimeter (cm) (6-inch) RJ-45 cord (not provided).
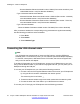
Figure 9: Rotate the IP Deskphone into the wall mount position
Complete these steps, as needed, before you wall-mount your IP Deskphone:
Method A:
Connecting the components
Avaya 1120E IP Deskphone with SIP Software on Avaya Aura
®
User Guide November 2013 45