
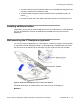
User Guide


1. Press the wall-mount lever, and pull the IP Deskphone away from the stand.
2. Use the stand cover to mark the wall-mount holes by pressing the bottom of the
stand cover firmly against the wall in the location where you wish to install the IP
Deskphone. Four small pins on the bottom of the stand cover make marks on the
wall.
3. Use the marks as a guideline for installing the wall-mount screws (not provided).
Install the screws so that they protrude 3 millimeters (mm) (1/8 inch) from the
wall.
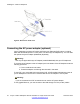
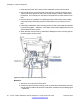
4. Install the IP Deskphone stand mounting holes over the screw heads as indicated
in the following figure — Method A. You need to remove the IP Deskphone from the
wall to adjust the lower screws.
5. When the lower screws are snug, install the IP Deskphone on the mounting screws,
and then tighten the top screws.
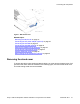
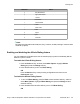
Figure 10: Cable routing tracks and mounting holes
Method B:
1. Attach the 15-cm (6-inch) CAT5e cable.
2. Position the stand over the mounting rivets, and slide the IP Deskphone down the
wall so that the rivets fit into the slots on the stand, indicated in the preceding figure
— Method B.
Installing the 1120E IP Deskphone
46 Avaya 1120E IP Deskphone with SIP Software on Avaya Aura
®
User Guide November 2013
Comments? infodev@avaya.com