
User Guide


Chapter 4: Installing the 1165E IP
Deskphone
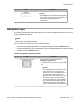
This chapter describes how to install and connect your 1165E IP Deskphone.
After you familiarize yourself with the Avaya 1165E IP Deskphone features, you can start to use the IP
Deskphone.
Before you begin
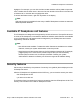
Caution:
Do not plug your IP Deskphone into a regular telephone jack. This can result in severe
damage to the IP Deskphone. Consult your system administrator to ensure that you plug
your telephone into a 10/100/1000 BaseT Ethernet jack.
Caution:
Your IP Deskphone is designed for use in an indoor environment only.
Caution:
Do not plug your Avaya 1165E IP Deskphone into an Integrated Service Digital Network
(ISDN) connection. Severe damage to the Avaya 1165E IP Deskphone can result.
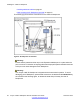
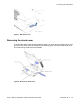
Connecting the components
Install your IP Deskphone by completing the following procedures in the order listed:
• Removing the stand cover on page 39
• Connecting the AC power adapter (optional) on page 40
• Connecting the handset on page 40
• Connecting the headset (optional) on page 40
• Connecting the LAN ethernet cable on page 41
Avaya 1165E IP Deskphone with SIP Software User Guide November 2013 37