
User Guide


Using your Avaya 1220 IP Deskphone
47
3. Set up the headset according to the headset instructions.
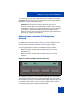
Connecting AC power (optional)
Your Avaya 1220 IP Deskphone supports AC power and Power over
Ethernet (PoE). For AC power, use only the Avaya-approved Global
Power Supply (N0146475) and the country-specific IEC cable that you
can order separately. To use PoE, your connected LAN must support
PoE.
1. Connect the DC barrel connector to the power jack on the back of the
Avaya 1220 IP Deskphone.
2. Thread the cable through the channel in the foot stand (if installed) to
secure the cable.
3. Plug the country-specific IEC cable into the Global Power Supply,
and then plug the Global Power Supply into the nearest AC power
outlet.
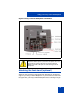
Connecting the LAN Ethernet cable
Connect your Avaya 1220 IP Deskphone to your LAN using a CAT5e
Ethernet cable to enable full functionality of your Avaya 1220 IP
Deskphone. If your Ethernet port is equipped with Power over Ethernet
(PoE), your Avaya 1220 IP Deskphone can be powered through the LAN
port. Do not extend the LAN Ethernet cable outside the building.
1. Plug one end of the supplied LAN Ethernet cable into the LAN
Ethernet port on the back of your Avaya 1220 IP Deskphone as
shown in Figure 8 on page 45.
2. Thread the cable through the channel in the foot stand (if installed).
3. Connect the other end of the cable to your LAN Ethernet connection.
The LAN LED on the back of the Avaya 1220 IP Deskphone lights
when a LAN connection is established.
Note: When your LAN cable gets unplugged on an active IP
Deskphone, your IP Deskphone LCD displays an alert message “LAN
cable unplugged”.