IP Office 2410/5410 Phone User Guide 15-601076 Issue 06a - (16 July 2009)
© 2009 AVAYA All Rights Reserved. Notice While reasonable efforts were made to ensure that the information in this document was complete and accurate at the time of printing, Avaya Inc. can assume no liability for any errors. Changes and corrections to the information in this document may be incorporated in future releases. Documentation Disclaimer Avaya Inc.
Contents 7.1 7.2 7.3 7.4 Contents 1. The Telephone 1.1 Call Appearance ..................................................................... Keys 9 ..................................................................... 10 1.2 Call Appearance Key Icons 1.3 Logging On..................................................................... 10 1.4 Logging Off..................................................................... 11 1.5 No User .....................................................................
Chapter 1.
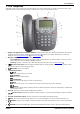
The Telephone: 1. The Telephone This guide covers the use of the 2410 and 5410 phones on IP Office. Both phones are similar, however the 5410 is only supported on the IP Office whereas the 2410 is supported on a range of Avaya phone systems. 1. Display, Call Appearance and Feature Buttons: Call Appearance keys allow you to handle multiple calls and the display shows call information. Details on system features (allocated by your system administrator) can also be displayed.
active. Note that while the speakerphone is active the handset is muted. 12. EXIT: Returns you to the main call handling screen. 13. Softkeys : Used to navigate to or initiate certain features, such as Speed Dial or Call Log, as well as control certain actions within the features. These keys correspond to the text prompts in the display screen immediately above them.
The Telephone: 1.1 Call Appearance Keys Normally, the first page of the main call handling screen contains three keys set as 'Call Appearance' keys. These are allocated to you by your system administrator and are indicated as a=, b= and c=. An underscored call appearance key (e.g. a=) indicates that the line is active.
1.2 Call Appearance Key Icons The icons displayed against the Call Appearance/Feature Keys allow you to determine the status (for example, on HOLD) of each call. Icons also indicate whether a feature has been activated for a particular button. · Incoming Call: A symbol next to a Call Appearance key indicates an incoming call. · Connected: A symbol next to a Call Appearance key indicates that it is the currently connected call. The caller's phone number (if available) is also shown.
The Telephone: Logging On 1.4 Logging Off If you have been allocated a login code, you can log your phone off to prevent unauthorized use during an absence, or for privacy purposes. If you are logging off from another extension, the system will log you back in at your home extension, unless the forcelogin option is set. Caution · Call Log entries and certain Speed Dial settings will remain on the extension even once you are logged out. To log off the phone where you had logged on dial *36. 1.
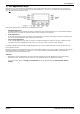
1.6 The Display B Phone Locked: Internal calls only. D Call Forwarding On: See Call Forwarding 56 . G In Group: You can enable/disable group membership. H Held Call: Shows the number of held calls. See Hold. N Do Not Disturb On: See Do Not Disturb 58 . NoUser No User: The extension is not currently logged on. see No User 11 O Out of Hours: This is displayed if one or more Hunt Groups is in "Out-of-Hours" mode. P Parked Calls: Shows the number of parked calls.
Chapter 2.
2. Call Handling 2.1 Answering a Call When a call arrives at your phone, you hear a ringing tone and a blinking bell icon ( ) appears next to the associated Call Appearance key. To answer an incoming call: Do one of the following: · If you are not active on another call, answer the call using your handset, headset or speakerphone (see Speakerphone 17 ). or · If you are active on a call, place the active call on hold (see Hold the Call Appearance key.
Call Handling: Answering a Call 2.2 Making a Call You can make calls from the phone using a variety of methods as follows: To manually make a call: 1. Lift the handset and dial the required number on the key pad. Remember to include the required access code (for example; 9 for an outside line) and listen to the progress of the call. 2. Adjust the speakerphone volume as necessary. To change the volume, press 3. and If the call is not answered, press . The eight volume levels are displayed.
2.4 Headset Working When a headset is to be used on your phone, it must be plugged in to the headset socket on the base of your phone. To activate the headset and switch off the handset, press HEADSET. The lamp beside the button is illuminated when Headset Working is activated. To answer an incoming call: 1. Press HEADSET. If you are already on a call: 1. Place the first call on hold 2. Press next to the flashing bell icon ( ). To clear a headset call: · Press HEADSET. or · Press DROP.
Call Handling: Headset Working 2.5 Speakerphone The built-in two-way speakerphone allows you to make and answer calls without lifting your handset. Speakerphones may not operate satisfactorily in every environment; such as in noisy locations. Note that while the speakerphone is in use the handset is muted. · IP Office 4.1 and higher support a Group Listen feature. This allows a call to be heard through the phones speaker while one user talks using the handset.
2.6 Speed Dial The Speed Dial feature allows you to have the phone automatically dial calls to phone numbers stored in your personal directory. For more information about the Speed Dial facility, see Using Speed Dials 24 . To make a call to a personal directory entry using the Speed Dial feature: 1. From the Home screen, press any Soft Key. 2. Press SpDial soft key. The Speed Dial screen is displayed. 3. Press the button next to the entry you want to call. and to search through the entries.
Call Handling: Redial 2.8 Mute During an active call, the Mute feature prevents the party (with whom you are speaking) from hearing you. This feature is most commonly used in conjunction with the Speaker phone. However, it can be used to hold an off-line conversation at any time during a call. To prevent the other person on the line from hearing you: 1. Press MUTE. The indicator next to the Mute button lights when Mute is active. 2. To reinstate two-way conversation, press MUTE again. 2.
2.10 Transfer This feature allows you to transfer a call from your phone to another extension or outside number. 1. With a call in progress, press TRANSFER. 2. When you hear dial tone, dial the number to which the call is to be transferred. Then do one of the following: · To transfer the call without announcing it (an unsupervised transfer), press transfer is complete. TRANSFER again.
Call Handling: Transfer 2.11 Conference The Conference feature allows you to conference other parties (including yourself) into a call. Notes · The number of parties allowed in a conference is controlled by your phone system. · Two Call Appearance keys are required for the conference feature. To add another party to a call: 1. Press CONFERENCE The first call is placed on hold temporarily. 2. Dial the number of the person you want to add to the call. 3. Wait for an answer.
Chapter 3.
3. Using Speed Dials The phone can store up to 48 personal speed dials. To access the list of these speed dials, press any press SpDial. · The speed dial list is sorted alphabetically. · To move between pages, press · Press the appropriate letter key to move direct to the first page with a matching name. · To call the number, press · To perform other actions, press and or softkey then . next to an entry. . To access the details of a particular speed dial, press Edit.
Using Speed Dials: 3.1 Adding a New Speed Dial To add a new speed dial: 1. Press any 2. Press 3. Press Add. If a message stating that the speed dial list is full appears, you must first delete an existing entry before adding any new entry. See Deleting a Speed Dial 26 . Softkey. SpDial. To switch between Name and Number entry, press change accordingly. 4. next to the item you want to edit. The options also With Name selected, begin entering text using the phone keypad.
3.2 Dialling a Speed Dial Number You can use the speed dial directory to make a call with the handset on hook or off hook. To dial a speed dial number: 1. To display the speed dial directory, press 2. To display different pages of speed dials, press SpDial. If SpDial is not shown, press any and softkey. . or Key the first letter of the required name to jump to the page with a matching entry. 3. When the required entry is displayed, press or next to the entry.. 3.
Using Speed Dials: Deleting a Speed Dial 3.4 Editing a Speed Dial To edit a speed dial: 1. Press SpDial. If SpDial is not shown, press any 2. Press Edit. 3. Select the speed dial entry you want to edit. To display different pages of speed dials, press page with a matching entry. . and or or key the first letter of the required name to jump to the 4. When the required entry is displayed, press . 5. Edit the speed dial using the same methods as for adding a new speed dial.
Chapter 4.
4. Using the Call Log The phone maintains a call log. To access, press any softkey, then press Log. This log can store up to 48 entries. These can be a combination of incoming answered calls, incoming unanswered (missed) calls and outgoing calls. You can select which types of calls are included in the log. You can also use call log entries to make return calls or convert the entry into a speed dial for future use.
Using the Call Log: 4.1 Setting Which Calls are Logged Caution · If you change the call log settings, any call details already in the call log that no longer match the selection are deleted. To set which calls are logged: 1. To exit any other mode, press 2. Press Option. 3. Press displays. Log Setup. A menu showing Answered, Un-Answered and Outgoing, with their current settings 4. To toggle a particular setting between Yes and No, press next to it.
4.2 Viewing the Call Log To view the call log: 1. Press 2. By default, Missed calls are displayed first. You can select from InAns or Outgo. More and select All to display all three options. Alternatively, press To return to Missed or InAns or Outg, press Back and make your selection. 3. To display different pages of log entries, press 4. Log. If Log is not shown, press any and . .
Using the Call Log: Making Calls from the Call Log 4.4 Saving a Call Log Entry to Your Speed Dial List To save a Call Log Entry to your Speed Dial List: 1. Press 2. As default, Missed calls are displayed first. You can select from InAns or Outgo. More and select All to display all three options. Alternatively, press To return to Missed or InAns or Outg, press Back and make your selection. 3. To display different pages of log entries, press 4. When you locate the entry you want to call, press 5.
Chapter 5.
5. Using Visual Voice Visual Voice gives you access to your mailbox using softkeys and, by using the associated feature keys, a more userfriendly option control. Note · Visual Voice is only available if Voicemail Pro or Embedded are installed in IP Office. Visual Voice is accessed by pressing Voice and then selecting from the displayed options: · Listen - You can have direct access to your voicemail. · Message - You can leave a message directly in a mailbox you specify.
Using Visual Voice: 5.1 Listen to Voicemail To listen to your Voicemails or your Group Voicemails: 1. Press Voice. 2. Press (25). Listen (for your messages) or 3. When prompted, key in the password. If your extension has been configured as a trusted source, the password will not be required. Note - If you do not have the required password, contact your administrator.
5.2 Send a Voicemail To send a message to another person or Group: 1. Press Voice. 2. Press Message and dial the extension of the person or Group. 3. Press Message again. The soft-key Record is displayed. 4. Press Record. The Stop soft-key is displayed. 5. Record your message and when finished, press Stop. After recording your message, the following soft-key options are displayed: · Listen - Listen to the message you just recorded. · Record - Re-record your message.
Using Visual Voice: Voicemail Transfer 5.4 Changing Your Greeting You can listen to, change and save your personal greeting. Note · Visual Voice only modifies your Personal Greeting for All Calls. To change your mailbox greeting: 1. Press Voice. 2. Press Greeting. The following options are then displayed on the soft-keys. · Record - starts recording. · Listen - to hear your current greeting. · Submit - saves the new greeting. · Delete - deletes your current greeting.
5.6 Email Alerts The Email option is displayed if: · You have Voicemail pro installed and · Voicemail Email has been configured for you. To view or change the current email alert status: 1. Press 2. Email. You will be prompted for your current voicemail password. Press The current voicemail email alert status is shown along with Change and Done soft-keys. 3. Select either: Voice. Done - To exit leaving the current alert status active or Change - To change the status.
Chapter 6.
6. Changing Options 6.1 Changing Ring Options The IP Office uses 'distinctive ringing' for different types of calls - a repeated single ring for internal calls, a repeated double ring for external calls and a single ring followed by two short rings for ringback calls. These options are fixed by the IP Office. The phone's own menus allow its ringer sound to be personalized so you can recognize it from other ringing phones. To change the ringer sound: You can choose from among eight different ring sounds.
Changing Options: Changing Ring Options 6.2 Adjusting the Display Contrast You can adjust the contrast level on the phone display. You can choose from among fifteen levels of contrast. To adjust the display contrast: 1. Press EXIT to exit any other mode, then press any 2. Press Option. 3. Press Contrast. A menu with the current contrast setting is displayed. 4. To adjust the level of contrast, press 5. When the contrast is set as required, either: and below the display. .
6.5 Using Self Test Self Test can be used to display information about the phone and to check operation of the lamps and display. The information may be required by your system administrator. To perform a self test: 1. To exit any other mode, press EXIT and then press any below the display. 2. Press 3. Press Self Test. A screen of information is displayed. Caution In the top row, the center of the display should show REL:2.00 or higher. If not the phone’s software needs to be upgraded.
Changing Options: Language 6.7 Automatic Gain Control (AGC) Automatic Gain Control (AGC) raises the volume when a caller is speaking quietly and lowers the volume when the caller is loud. To access Automatic Gain Control: 1. To exit any other mode, press 2. Press 3. Press 4. To toggle a particular setting between Yes and No, press Alternatively; EXIT and then press any Option. or until a menu listing the current handset, headset and speaker AGC options is displayed.
Chapter 7.
7. Function Keys Both the , function keys and soft keys can be used to access a range of system features. The display adjacent to the key shows the feature name. Some of these features are default features supported by the phone (e.g. SpDial, Log, Option and Label on the soft keys) and are always available. Others are system features that can only be programmed by the system administrator for function keys. The main screen has two pages. This means that the six and . features.
Function Keys: 7.1 Function Key Programming If any one of the keys on the phone is programmed with an Admin or Admin 1 feature key, it allows you to program further features against other function keys. Both Admin and Admin1 are allocated to your function keys by your system administrator and would appear on a menu screen that is similar to the following: The two tables below list the user programmable features available from Admin and Admin1.
In addition to the above, there is a key labeled Expl? This key enables you to change the display from the shorthand version displayed at default to a longhand version. See Shorthand Programming Mode 51 and Longhand Programming 52 respectively. Admin1: The programmable functions available via an Admin1 key.
Function Keys: Function Key Programming 7.2 Shorthand Programming Mode 1. Press 2. The Admin or Admin1 menu appears, similar to the following: Admin Pages Admin or Admin 1. See Function Key Programming 49 . With the exception of Expl?, the names shown are the features that you can assign to soft keys. When Admin has been selected, you can display the full name of the feature by pressing Expl? . See Longhand Programming 52 .
7.3 Longhand Programming Mode 1. Press 2. To switch to longhand programming mode, press Expl? 3. Press Next 4. If the function requires some data to be entered, [ ] is shown at the bottom of the display. Enter the data using the normal telephone keypad. 5. The upper part of the display reverts to showing the functions currently assigned to each 6. To move between the pages of display keys, press 7. To select the display key against which to program the new function, press or .
Function Keys: Longhand Programming Mode 7.4 Changing Function Key Labels You can replace the default label shown for any function key with you own custom label of up to 13 characters. To change the function key labels: 1. To exit any other mode, press 2. Press EXIT and then press any below the display. Label: · Edit allows you replace the current labels, see the steps below. · Inspect displays the default labels. · Restore replaces any custom labels with the default labels.
Chapter 8.
8. System Features As well as your phones specific features, you can access a number of system features by dialling short codes. These instructions are for the system's default configuration. They assume that you are using the default feature codes. It also assumes that you have full access to all features and the public phone network. 8.1 Ring Back If your system administrator has allocated you the Ring Back When Free feature and you call an extension that does not answer or is busy, you can: 1.
System Features: Call Forwarding 8.3 Divert You can divert your calls to another extension using Follow Me. Unlike Forward, Follow me can only be used to divert calls to another internal extension on the same IP Office. Note · If you do not answer calls at the temporary extension, they are forwarded to your own voicemail or call forwarding number. To use Follow-Me-Here from another extension: In this case, N is your home extension · Dial *12*N# from the extension you are temporarily using.
8.4 Do Not Disturb You may choose to receive no calls at all or only those from particular callers on your exceptions list: · To switch Do Not Disturb on (with or without exceptions), dial *08. An N is displayed. To switch it off, dial *09. · To add a number to the exception list, dial *10*N#. · To delete a number from the exception list, dial *11*N#. Note · Your callers, other than your exceptions, either hear busy tone or are re-directed to your voicemail.
System Features: Parking Calls 8.6 Private Call The Private Call feature is used to prevent any intrusions during the call. Private call can be activated either before or during a call and will set the phone status to 'cannot be intruded' until you switch the Private Call feature off. If you place an intrusive call to an extension with Private Call on, you will hear the Number Unobtainable tone. Note · Private call is not a default feature. If you require this option, contact your administrator. 8.
8.8 Default Short Codes The following are the normal default short codes available to all users. Your system administrator may add additional codes for other features and for speed dials. The N, where shown, should be replaced by the appropriate number. For example, with *07*N#, replace N with the extension to which you want your calls forwarded when you have forwarding switched on.
Index L Index A Adding New Speed Dial 25 Adjusting Display Contrast 43 AGC 45 All Logged Calls Erasing 33 Answer Call 14 Automatic Gain Control 45 C Call Answer 14 Clearing 15 Make 15 Making 32 Parking 58 Call Appearance Key Icons 10 Call Appearance Keys 9 Call Forwarding 56 Call Log 32 Viewing 32 Call Log Entry Converting 27 Deleting 33 Saving 33 Call Log Setup 43 Changing Function Key Labels 53 Your Greeting 39 Your Mailbox Password 39 Clearing Call 15 Conference 21 Converting Call Log Entry 27 D Defa
W Which Calls Setting 31 Y Your Greeting Changing 39 Your Mailbox Password Changing 39 Your Speed Dial List 33 2410/5410 Phone IP Office Page 62 15-601076 Issue 06a (16 July 2009)
2410/5410 Phone IP Office Page 63 15-601076 Issue 06a (16 July 2009)
Performance figures and data quoted in this document are typical, and must be specifically confirmed in writing by Avaya before they become applicable to any particular order or contract. The company reserves the right to make alterations or amendments to the detailed specifications at its discretion. The publication of information in this document does not imply freedom from patent or other protective rights of Avaya or others.