Avaya Agent Deskphone 16CC User Guide 16-602096 Issue 1 January 2008
Contents Contents Notices.............................................................................................................5 Top Display Line Combinations for Agents.................................................7 Introduction to the Avaya Agent Deskphone 16CC....................................9 Avaya Agent Deskphone 16CC Phone Buttons and Features.........................................9 About LEDs..............................................................................................
Contents Making an outgoing call on a bridged line......................................................................17 Contacts........................................................................................................18 Searching for a contact...................................................................................................18 Viewing Contacts details.................................................................................................18 Adding a new contact...
Contents 4 Avaya Agent Deskphone 16CC User Guide
Notices Notices © 2008 Avaya Inc. All Rights Reserved. Notice While reasonable efforts were made to ensure that the information in this document was complete and accurate at the time of printing, Avaya Inc. can assume no liability for any errors. Changes and corrections to the information in this document may be incorporated in future releases. Note: Using a cell, mobile, or GSM phone, or a two-way radio in close proximity to an Avaya IP telephone might cause interference.
Avaya Agent Deskphone 16CC User Guide
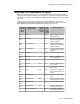
Top Display Line Combinations for Agents Top Display Line Combinations for Agents What you see on the top line of the screen depends on what you are doing at the time (your agent work mode) and whether you are idle or have an active, held, or incoming call. Top line space is limited, and sometimes it's hard to determine whether you have a pending call or not. Use this chart as a guide to possible top line display combinations.
1st Field (Agent State) shows 2nd Field (Work Mode) shows Aux or Aux with RC 3rd Field (DAC Pending) shows 4th Field (Time of Day) shows DAC Time You are not available to receive DAC or ACD calls, but a DAC is pending. Time You are performing after call work and not available to receive DAC or ACD calls. Time You are performing after call work and not available to receive DAC or ACD calls, but a DAC is pending. Time You are switching into Aux mode and have no incoming or pending calls.
Introduction to the Avaya Agent Deskphone 16CC Introduction to the Avaya Agent Deskphone 16CC The 16CC telephone is a multiline SIP telephone for use with Avaya Call Center 5.0. The 16CC telephone puts convenient features and capabilities at your fingertips, including a Phone screen to view and manage your calls, a Contacts list, a Call Log, designated feature buttons to change your agent work mode or status, a menu of options and settings to customize your phone, and access to your voice mail.
Avaya Agent Deskphone 16CC Phone Buttons and Features Avaya Agent Deskphone 16CC Telephone Button/Feature Descriptions Name Description Message Waiting Indicator An illuminated red light in the upper-right corner of your phone indicates you have voicemail messages waiting. This light flashes when you receive an incoming call. Phone Display There are four lines in the phone display.
Introduction to the Avaya Agent Deskphone 16CC Name Description Mute Press the Mute button to mute a call in progress. To take a call off mute, press Mute again. 16 Call/Line Appearance Buttons or Feature Buttons There are 16 buttons that can be programmed as either call/line appearance buttons or feature buttons. Press a call/line appearance button to make or answer a call or resume a call on hold. Press a labeled feature button to enable or disable that feature.
Scrolling and Navigation Scrolling and Navigation When navigating through the options and features on your telephone display, use the navigation arrows to scroll and buttons to select lines or options. Use the up and down navigation arrows to scroll up or down through lists. A navigation icon appears in the phone display to indicate that you can scroll to more options or information.
About Agent Work Modes and Agent States 1. 2. 3. 4. Enter your username/extension. Press Enter or OK. Enter your password. Press Login or OK. Agent login If the telephone prompts you for your Username, you must first log in to the phone extension, as covered in Logging in to your telephone extension. Log in as an agent from the Phone screen. 1. 2. 3. 4. 5. Press the Login softkey. Enter your Agent ID. Press the Enter softkey or the OK button. Enter your Agent Password, if applicable.
Changing Agent Work Mode or State • Available - This state is automatically assigned when you are not on an active call for both Auto-In and Manual-In modes. Depending on how your call center system is administered, "pending" states might be assigned to you automatically, for example, to indicate a call center call is waiting or when the call you are on requires after call work.
Answering a Call Calling a person from the Contacts list 1. Press the Contacts button. 2. Select the person or number you want to call. 3. Press the Call softkey or the OK button. Calling a person from the call log 1. Press the Call Log button. 2. Select the person or number you want to call. 3. Press the Call softkey or the OK button. Answering a Call How you answer a call depends on whether you are logged in as an agent or not logged in as an agent.
Setting up a conference call Sending an incoming call to voice mail Press the To Vmail softkey to send an incoming call directly to voicemail. If your telephone does not display a To Vmail softkey, your administrator has not made this feature available. Ignoring an incoming call Press the Ignore softkey to turn off the ringer for an incoming call. Muting a Call When the call is muted, the Mute button light is on and the top line displays the Mute icon. 1.
Bridged Calls Adding a person on hold to a conference call 1. 2. 3. 4. 5. From the Phone screen, select your active call. Press Conference. Select the call on hold that you want to add to the conference. Press Resume to take the call off hold. Press Join or Conference to add the person to the conference call. Putting a conference call on hold 1. Press Hold during a conference call. Note: When you put a conference call on hold, the other parties can still talk to each other. 2.
Searching for a contact using. If you have any questions about how the name or extension displays to the person you are calling, contact your system administrator. 1. Select the bridged line you want to use. 2. Dial the telephone number, or call the person from the Contacts list, or call the person from the Call Log list. Contacts You can save up to 100 names and telephone numbers.
Contacts Adding a new contact 1. 2. 3. 4. Press the Contacts button. Press the More softkey. Press the New softkey. Enter the first name using the dialpad. To enter characters using the dialpad: a. Press the number key that corresponds to the letter or number you want to enter until the letter or number is displayed. b. Pause before entering the next character if the characters are on the same key. c. Enter remaining letters or numbers. d. Press Bksp to delete the last character.
Viewing the call log Call Log When you have one or more missed calls, the Call Log button lights. When you are not logged in as an agent, the top display line shows a Missed Call Icon with the number of unanswered calls received since you last accessed the Call Log, or since you last logged in to the phone, whichever is more recent. See Turning call logging on or off for information about setting call logging for bridged call appearances, or turning call logging off entirely.
Getting Your Messages from the call log. However, if you are viewing the All Calls list, pressing the Del All softkey deletes all calls from the call log. 1. 2. 3. 4. Press the Call Log button. Press the More softkey. Press the DelAll softkey. Press the DelAll softkey to confirm, or press Cancel if you do not want to delete the log. Turning call logging on or off You can turn call logging on or off.
Accessing the Features Menu Accessing the Features Menu 1. From the Phone screen, scroll right to access the first feature on the Features Menu. Note: To return to the main Phone screen, press the Phone/Exit button or the Exit softkey. 2. Scroll down to see the features that have been administered for your extension. Note: The green LED next to the Feature button indicates if the feature is currently on or off. If the light is on, the feature is on.
Avaya Menu Turning off call forwarding 1. From the Phone screen, scroll right to access the Features menu. 2. Scroll down to and select Call Forwarding. 3. Press the OK button to turn call fowarding off. If call forwarding is assigned to a feature button, just press that button to turn call forwarding off. Avaya Menu You can use the Avaya Menu to adjust and customize options and settings for your telephone, get information about your phone and network settings, and log out.
Options/Settings Turning show incoming call on or off You can automatically display incoming calls on their respective call appearance line(s). You can turn the Show Incoming Call option on or off. 1. 2. 3. 4. 5. Press the A button. Select Options/Settings. Select Call Settings. If not already displayed, scroll to Show Incoming Call. Press the Change softkey, the OK button, or the right or left navigation arrow to turn Show Incoming Call on or off. 6. Press Save to store the setting.
Avaya Menu Turning error tones on or off 1. 2. 3. 4. 5. Press the A button. Select Options/Settings. Scroll to and select Screen/Sounds.... Scroll to Error Tones. Press the Change softkey, the OK button, or the right or left navigation arrow to turn the error tone on or off. 6. Press the Save softkey to store the setting. Personalizing the ring pattern 1. 2. 3. 4. 5. Press the A button. Select Options/Settings. Scroll down to and select Screen/Sounds.... Scroll down to Personal Ringing.
Options/Settings Setting the time format You can change the way the time displays on your screen, as either 12 or 24 hours. 1. 2. 3. 4. 5. Press the A button. Select Options/Settings. Scroll to and select Language/Region. Scroll to Time Format. Press the Change softkey or the right or left navigation arrow to change the format in which time displays. 6. Press the Save softkey to store the setting. Viewing Network Information 1. Press the A button. 2. Scroll to Network Info.... 3.
Index Index A Advanced Options changing language................................25 setting automatic gain control................25 Advanced Telephone Features about......................................................21 Agent login..................................................13 Agent logout................................................13 Agent skills..................................................14 Agent work mode/state...............................13 Answering a call..........................
Index Incoming Calls answering..............................................15 forwarding..............................................22 sending to coverage..............................22 transferring.............................................16 L Language changing................................................25 LEDs about......................................................11 Logging in to your telephone......................12 Logging in to your telephone extension......