
Application Note


AL; Reviewed:
SPOC 8/24/2006
Solution & Interoperability Test Lab Application Notes
©2006 Avaya Inc. All Rights Reserved.
8 of 23
JNPR-M7i-J4300
Step Description
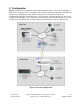
6.
Configure the Ethernet and T1 interfaces.
• Configure the Ethernet interface to use the scheduler.
• Assign an IP address to the interface.
interop@J4300# edit int fe-0/0/1
interop@J4300# set per-unit-scheduler
interop@J4300# set unit 0 family inet address 172.28.20.254/24
interop@J4300# exit
• Configure the logical interface for the WAN connection to use the scheduler.
• Assign an IP address to the interface.
• Specify the RTP traffic to be compressed. The sample configuration defines
RTP traffic with port UDP range 2048 to 3029 to be compressed. This port
range needs to match UDP Port Min and UDP Port Max configured in Avaya
Communication Manager in Section 5, Step 8.
interop@J4300# edit int ls-0/0/0
interop@J4300# set per-unit-scheduler
interop@J4300# set unit 0 compression rtp port min 2048 max 3029
interop@J4300# set unit 0 family inet 192.168.1.2/30
interop@J4300# exit
• Configure the T1 interface to use the scheduler.
• Configure the T1 interface timing, encapsulation, and timeslots.
• Configure the T1 interface to use logical interface ls-0/0/0.0 defined above. An
IP address is not necessary because an IP address is already defined for the
logical interface.
interop@J4300# edit int t1-2/0/0
interop@J4300# set per-unit-scheduler
interop@J4300# set clocking external
interop@J4300# set encapsulation ppp
interop@J4300# set t1-options timeslots 1-24
interop@J4300# set unit 0 compression-device ls-0/0/0.0
interop@J4300# exit
7.
Configure the routing options for the router. The sample configuration uses static routes.
interop@J4300# edit routing-options static
interop@J4300# route 172.28.10.0/24 next-hop 192.168.1.1
interop@J4300# exit