Avaya 3456 UC Client User Guide Avaya Communication Server 1000 Release 7.5 Document Status: Standard Document Number: NN43080-100 Document Version: 02.
© 2010 Avaya Inc. All Rights Reserved. Notices While reasonable efforts have been made to ensure that the information in this document is complete and accurate at the time of printing, Avaya assumes no liability for any errors. Avaya reserves the right to make changes and corrections to the information in this document without the obligation to notify any person or organization of such changes.
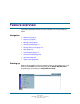
Contents Welcome 5 Your new Avaya 3456 UC Client 5 Requirements 6 Online help 6 Avaya preferred configurations 6 Related publications 6 Feature overview Starting up 7 Signing in 8 Screen layout 8 Making a call 9 Receiving calls 11 Placing calls on hold 11 Hold and resume 12 Mute 13 Call Transfers 13 Blind Transfer 14 Announced Transfer 16 Quick Transfer List 18 Contacts 22 Creating Contacts 22 Viewing Contacts 24 Dialing Contacts 25 Conference Calls 26 Managing Conference Calls 28 Disbanding Conferences
-4Contents Video Conferencing 34 Managing Conference Calls 35 Troubleshooting Configuration changes do not work 38 Call Detail Reporting 38 Avaya 3456 UC Client User Guide NN43080-100 02.01 Standard 7.
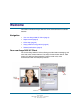
Welcome This section introduces Avaya 3456 UC Client and describes the available features. Navigation • Your new Avaya 3456 UC Client (page 5) • Requirements (page 6) • Online help (page 6) • Avaya preferred configurations (page 6) • Related publications (page 6) Your new Avaya 3456 UC Client The current Avaya 3456 UC Client offering provides instant messaging, and voice and video communications.
-6Welcome Requirements The following basic hardware specification is required to operate the Avaya 3456 UC Client: • Intel Pentium III 1.3 GHz or equivalent • Windows 2000/XP/Vista • 512 MB RAM • 50 MB hard disk space • 16 Bit, full-duplex sound card • IP connection Depending on the configuration of your workstation or laptop, you may also need to obtain a microphone and speakers, or a USB headset with microphone.
Feature overview This section describes features that are available on the Avaya 3456 UC Client.
-8Feature overview Signing in The Avaya 3456 UC Client should sign in to your SIP account automatically if your account has been correctly configured. In some circumstances (depending on how the system administrator has configured the softphone), you may be asked to authenticate to a login server during application start up. If you are unsure how to login, see your system administrator. Screen layout Before continuing, it would be worth spending some time on the interface layout.
-9Feature overview Making a call Calls can be made from the Avaya 3456 UC Client in a number of different ways. Users can make calls by double-clicking on any name in the contact list, by typing a number in using the keyboard and pressing Enter, or by opening Avaya 3456 UC Client User Guide NN43080-100 02.01 Standard 7.
- 10 Feature overview the dial pad and using the mouse to click on the numbers required. The following instructions will show you how to open the dial pad and dial a number using the mouse. 1 Click the dial pad button 2 Using the mouse, click on the dial pad numbers that you would like to dial. The number appears on the display screen. 3 Click the dial button . End the call by clicking on Avaya 3456 UC Client User Guide NN43080-100 02.01 Standard 7.
- 11 Feature overview Receiving calls When a call is received by the UC Client, a number of things will occur. First, the phone will ring (if sound is enabled on your system); second, the caller’s number or ID is displayed on the 3456 display screen. Thirdly, if the Avaya 3456 UC Client is running in the background, i.e.
- 12 Feature overview When a call is on hold, it is possible to make a second call by pressing the Start another call button . Hold and resume To place a call on hold, press the Hold button during the call. To resume the call, just press the Hold button again. Hold and Open Another Call 1 During a call, press the Start another Call button opens in the interface window. . A new dial tab 2 Dial the new recipient’s number. 3 Click the 4 To switch between calls, click on the tabs.
- 13 Feature overview Call waiting When you are on a call and another call comes in, the phone will ring and the second call will appear in a tab on the phone screen. To answer the call and place the current call on hold, click on the new caller tab. The new call will be answered the moment you click on the tab, so there is no need to click the green answer button.
- 14 Feature overview • Quick transfer – Pass the call straight to a number in your quick transfer list (more on this later in this section), or to your chosen Default quick transfer destination. Each of these transfer methods, as well as the creation of a Quick Transfer list, is examined during the course of this section. Blind Transfer A blind transfer is probably the easiest method of transfer available on the Avaya 3456 UC Client interface and is performed in the following way.
- 15 Feature overview 4 When prompted, enter the destination number using either the dial pad or the numeric keys on your keyboard. 5 Click the Transfer button. 6 The call is passed to the transfer destination and your phone hangs up. Avaya 3456 UC Client User Guide NN43080-100 02.01 Standard 7.
- 16 Feature overview Announced Transfer An announced transfer is often seen as the preferred method of call transfer, because it enables you to find out whether the destination recipient is available and ready for the transfer or not. To perform an announced transfer: 1 Answer the call by pressing the button.
- 17 Feature overview 4 A new tab opens and the caller is placed on hold. Enter the transfer destination’s number 5 Click the 6 When the recipient answers, announce the caller and then press the Transfer button. button. Note:If the recipient does not answer, y ou can return to the call originator by clicking the button to disconnect the second call (ensure that the second call tab is selected, otherwise y ou will disconnect the caller). Avaya 3456 UC Client User Guide NN43080-100 02.01 Standard 7.
- 18 Feature overview 7 The call is transferred to the destination and your phone hangs up. Quick Transfer List A Quick transfer list can be created to provide users with fast access to common transfer destinations – for example, a PA may require fast access to a select group of managers that they commonly field calls for. Once created, a quick transfer list can be accessed during an active call and the caller can be transferred quickly to any of the numbers.
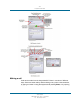
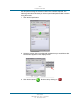
- 19 Feature overview To create a quick transfer list: 1 From the main interface screen, open the File menu and select Preferences. 2 Click on the Quick Transfer button Avaya 3456 UC Client User Guide NN43080-100 02.01 Standard 7.
- 20 Feature overview 3 Click the Add button. Avaya 3456 UC Client User Guide NN43080-100 02.01 Standard 7.
- 21 Feature overview 4 Enter the full name and phone number of the quick transfer contact. Note: To set this contact as the Default quick transfer contact (the number tha calls will be forwarded to if you click on the Default Transfer button), tick the check-box. The default contact will appear with a tick next to it in the list of quick transfer numbers. 5 Click OK button. 6 The new contact is displayed in the quick transfers list. Click the OK button to finish.
- 22 Feature overview 4 The call is transferred and the phone hangs up. Contacts The lower half of the Avaya 3456 UC Client interface is dedicated to Contacts and call History. The following sections deal briefly with the principles of adding, viewing and calling contacts. Creating Contacts Contact information can be imported from a variety of sources, including CSV files and Outlook Exchange servers, however, th is guide deals exclusively with creating new contact profiles.
- 23 Feature overview 2 Enter the name details of the contact and select a Group (e.g., Work, Friends, etc). 3 In the lower half of the screen, select a contact type (e.g., Home, Office, Softphone, etc) from the contact Method drop-down menus, and enter the contact’s phone number(s) in the corresponding Number/Address field(s). Avaya 3456 UC Client User Guide NN43080-100 02.01 Standard 7.
- 24 Feature overview 4 If you entered more than one contact number, open the top-right dropdown menu and select the preferred default contact method that will be used when you double-click on the contact’s name in the address book. Note: If you enter a softphone number, you have the option of viewing the contact’s availability. Tick the Show this contact’s availability check-box to enable this feature.
- 25 Feature overview Dialing Contacts To dial a contact straight from your Address Book, either double-click on the contact’s name or, in cases where more than one number exists for the contact, single-click and then select the required location number from the profile bubble. Contacts can also be called by right-clicking on the contact in the Address Book and selecting Call Contact. Contact information stored in Microsoft Outlook 2003 can also be utilized by the Avaya 3456 UC Client.
- 26 Feature overview Conference Calls There are two ways in which a conference call can be established on the Avaya 3456 UC Client: • Click the Vedio button to open the video panel. • Place a call to the first participant. Your video automatically appears on their screen, but they have to enable their streaming so that you can see them. • Click the Start button to open another tab and place the first call on hold. Dial the next participant. Repeat this step until all participants are on the call.
- 27 Feature overview • Start or receive a call, open other calls using the Start Another Call button (see ‘Hold and Open a Second Call’) and then, once connected, click on the Conference All button. All active calls will be joined to one conference. Avaya 3456 UC Client User Guide NN43080-100 02.01 Standard 7.
- 28 Feature overview Managing Conference Calls Removing Participants A participant can be removed from the conference call and placed into a separate call in the following way: 1 Open the drop-down menu found at the end of the participant’s details on the phone screen. 2 Choose between End Call(to end all communication with the caller) and Separate Call from Conference (to remove the caller from the conference but keep the caller on Hold in a separate tab).
- 29 Feature overview Disbanding Conferences To end a conference call, but keep all callers on separate ‘held’ lines in their own tab, open the Options menu, located benath the call display screen, and select Disband Conference. Each caller can be taken off Hold by clicking on the corresponding tab. Suspending a Conference Conferences can be suspended by clicking on the Hold button. Participants will have a hold icon next to their name on the display screen when a conference is suspended.
- 30 Feature overview Voicemail The Avaya 3456 UC Client can be configured to regularly check your Avaya Communication Server 1000 (Avaya CS 1000) voicemail box. Voicemail Settings Your voicemail account can be accessed by dialling the voicemail attendant’s extensions (101 by default), but unless configured to do so, the application will not automatically check for and notify you of new messages.
- 31 Feature overview 3 Click on the Voicemail tab. 4 Trick the Check for Voicemail check-box. 5 Enter the number you would normally dial to access the voicemail attendant in the Number to dial for checking mail text box (by default, the voicemail attendant’s extension is 101, check with your system administrator if you are unsure). Avaya 3456 UC Client User Guide NN43080-100 02.01 Standard 7.
- 32 Feature overview 6 Click the OK button. 7 Click Apply. 8 Click Close. The Avaya 3456 UC Client is now configured to check the Avaya CS 1000 server for voicemail messages. When a message arrives, an envelope icon will appear on the interface.
- 33 Feature overview Making a Video Call To make a video call: 1 Click the Video button to open the video panel. 2 Enter the number of the person you would like to call and then click the Video Call button. Alternatively, right click on a contact in the Address Book and select Video Call. Avaya 3456 UC Client User Guide NN43080-100 02.01 Standard 7.
- 34 Feature overview Receiving a Video Call When you receive a video call, the video panel will open automatically when you answer the call and you will be able to see the caller via their own video. To start sending your video, click Start Video. Note: The caller and recipient can start or stop their video stream at any time during a call. Video Conferencing Note: The Avaya 3456 UC Client supports up to six video conference attendees.
- 35 Feature overview 4 Click the Conference All button to join all participants into one conference call. Managing Conference Calls Most conference controls, such as participant removal, suspend, and disband, are managed from the main phone interface during a video conference. Users can stop their own video output by clicking on the Stop my Video button found on the video panel.
- 36 Feature overview Disbanding Conferences To end a conference call, but keep all callers on separate ‘held’ lines in their own tab, open the Options menu, located beneath the call display screen, and select Disband Conference. Each caller can be taken off hold by clicking on the correspond tab. Avaya 3456 UC Client User Guide NN43080-100 02.01 Standard 7.
- 37 Feature overview Suspending a Conference Conferences can be suspended by clicking on the Hold button . Participants will have a hold icon next to their name when a conference is suspended. Avaya 3456 UC Client User Guide NN43080-100 02.01 Standard 7.
Troubleshooting This chapter describes various troubleshooting tips. Navigation • Configuration changes do not work (page 38) • Call Detail Reporting (page 38) Configuration changes do not work When making configuration or preference changes, you must first select the account to which to apply the changes. By default, the first account in the list is selected.