Part No.
Copyright © 2000 Nortel Networks. All rights reserved. Printed in the USA. January 2000. The information in this document is subject to change without notice. The statements, configurations, technical data, and recommendations in this document are believed to be accurate and reliable, but are presented without express or implied warranty. Users must take full responsibility for their applications of any products specified in this document.
European Requirements Only EN 55 022 Statement This is to certify that the Nortel Networks Passport 5430 Multiservice Access Switchis shielded against the generation of radio interference in accordance with the application of Council Directive 89/336/EEC, Article 4a. Conformity is declared by the application of EN 55 022 Class A (CISPR 22). Warning: This is a Class A product.
Japan/Nippon Requirements Only Voluntary Control Council for Interference (VCCI) Statement Taiwan Requirements Bureau of Standards, Metrology and Inspection (BSMI) Statement iv
Canada Requirements Only Canadian Department of Communications Radio Interference Regulations This digital apparatus (Passport 5430) does not exceed the Class A limits for radio-noise emissions from digital apparatus as set out in the Radio Interference Regulations of the Canadian Department of Communications.
Notice: For equipment using loopstart lines, please note that the Ringer Equivalence Number (REN) assigned to each terminal device provides an indication of the maximum number of terminals allowed to be connected to a telephone interface. The termination on an interface may consist of any combination of devices subject only to the requirement that the sum of the Ringer Equivalence Numbers of all the devices does not exceed 5.
Avis: Veuillez prendre note que pour tout appareillage supportant des lignes de type “loopstart,” l'indice d'équivalence de la sonnerie (IES) assigné à chaque dispositif terminal indique le nombre maximal de terminaux qui peuvent être raccordés à une interface. La terminaison d'une interface téléphonique peut consister en une combinaison de quelques dispositifs, à la seule condition que la somme d'indices d'équivalence de la sonnerie de tous les dispositifs n'excède pas 5.
• • When you request ISDN “U” Interface Service, you must provide the telephone company with -- The Facility Interface Code: 02IS5 -- The Service Order Code(s) (SOC): 6.0F -- The required Universal Service Order Code (USOC) jack: RJ49C When you request ISDN “S/T” Interface Service, you must provide the telephone company with -- The Service Order Code(s) (SOC): 6.0P -- The make, model number, and FCC Registration number of the NT1 Note: ISDN S/T cannot be directly connected to the network.
4. 5. If you experience trouble with the unit, please contact the Nortel Networks Technical Solutions Center in your area for service or repairs. Repairs should be performed only by service personnel authorized by Nortel Networks. United States 1-800-2LANWAN Valbonne, France 33-4-92-96-69-68 Sydney, Australia 61-2-9927-8800 Tokyo, Japan 81-3-5740-1700 You are required to notify the telephone company when you disconnect the unit from the network. Nortel Networks NA Inc.
applicable license fees for such software. 2. Restrictions on use; reservation of rights. The Software and user manuals are protected under copyright laws. Nortel Networks and/or its licensors retain all title and ownership in both the Software and user manuals, including any revisions made by Nortel Networks or its licensors. The copyright notice must be reproduced and included with any copy of any portion of the Software or user manuals.
combinations that the Licensee may select, c) that the operation of the Software will be uninterrupted or error free, or d) that all defects in the operation of the Software will be corrected. Nortel Networks is not obligated to remedy any Software defect that cannot be reproduced with the latest Software release.
6. Use of Software in the European Community. This provision applies to all Software acquired for use within the European Community. If Licensee uses the Software within a country in the European Community, the Software Directive enacted by the Council of European Communities Directive dated 14 May, 1991, will apply to the examination of the Software to facilitate interoperability.
LICENSEE ACKNOWLEDGES THAT LICENSEE HAS READ THIS AGREEMENT, UNDERSTANDS IT, AND AGREES TO BE BOUND BY ITS TERMS AND CONDITIONS. LICENSEE FURTHER AGREES THAT THIS AGREEMENT IS THE ENTIRE AND EXCLUSIVE AGREEMENT BETWEEN NORTEL NETWORKS AND LICENSEE, WHICH SUPERSEDES ALL PRIOR ORAL AND WRITTEN AGREEMENTS AND COMMUNICATIONS BETWEEN THE PARTIES PERTAINING TO THE SUBJECT MATTER OF THIS AGREEMENT.
Contents Preface 1 Before You Begin1 Text Conventions1 Acronyms2 Hard-Copy Technical Manuals2 How to Get Help3 About the Power Supply 4 Checking Status Indicators6 AC Input Electrical Requirements8 Adding or Replacing a Power Supply 9 Adding a Second Power Supply10 Replacing a Power Supply12 Removing and Installing a Power Supply Filler Panel14 Removing a Power Supply Filler Panel14 Installing a Power Supply Filler Panel16 Connecting to the Power Source 17 Connecting to the AC Power Source17 xv
Preface In this guide, the Passport 5430 Multiservice Access Switch is referred to as the Passport 5430. Before You Begin This guide is intended for qualified service personnel who need to add or replace a Passport 5430 power supply. A qualified service person should have appropriate technical training and experience and be aware of the hazards involved in installing and replacing power supplies.
Acronyms EIA Electronic Industries Association LED light-emitting diode Hard-Copy Technical Manuals You can print selected technical manuals and release notes free, directly from the Internet. Go to support.baynetworks.com/library/tpubs/. Find the product for which you need documentation. Then locate the specific category and model or version for your hardware or software product.
• The “Technical Manuals” section lists available printed documentation sets. How to Get Help If you purchased a service contract for your Nortel Networks product from a distributor or authorized reseller, contact the technical support staff for that distributor or reseller for assistance.
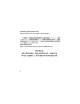
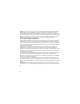
About the Power Supply The Passport 5430 contains one or two AC-input power supplies. Figure 1 shows the location of the power supplies in the Passport 5430. Power switch DC OK DC OK PS2 PS1 Power supplies FBR0031A Figure 1.
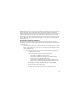
The Passport 5430 ships with a single AC power supply. You can install a second power supply for redundancy and high-availability operation. Figure 2 shows an AC input power supply. DC OK 100-240V~ 50-60Hz 25A FBR0050A Figure 2. Passport 5430 Power Supply The operating system generates an event message in response to any change in the status of a power module. These messages identify the power supply by its slot.
Checking Status Indicators Figure 3 shows the location of the power supply LEDs on the system processor card.
Table 1 describes the power supply LEDs. Table 1. AC Power Module LEDs LED State Meaning PS1 Off Power off On (green) Power supply is operating. Rapid flashing (green) Power supply failed. Off Power off On (green) Redundant power supply (optional) is operating. Rapid flashing (green) Redundant power supply failed.
AC Input Electrical Requirements The installation site must meet the following electrical requirements for AC power (Table 2): Table 2. Electrical Requirements Input Voltage Range Maximum Input Current 90-264 volts alternating current (VAC) 1.0 amperes (A) Table 3 lists the wall receptacle requirements for AC power. Table 3.
Adding or Replacing a Power Supply This chapter describes how to add or replace a Passport 5430 power supply, as follows: Topic Page Adding a Second Power Supply 10 Replacing a Power Supply 12 Removing and Installing a Power Supply Filler Panel 14 9
Adding a Second Power Supply To add a second power supply: 1. Put on an antistatic wrist strap. Caution: Electrostatic discharge can damage hardware. You must wear the antistatic wrist strap on your arm whenever you handle printed circuit boards. Refer to the instructions enclosed wtih your antistatic wrist strap to attach it. 2. Remove the power supply filler panel. For instructions, see “Removing and Installing a Power Supply Filler Panel” on page 14. 3.
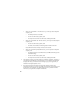
DC OK 100-240V~ 50-60Hz 25A PS1 PS2 DC OK 100-240V~ 50-60Hz 25A Captive screw FBR0009A Figure 4. 4. Removing or Installing a Power Supply Using a flat-tip screwdriver, tighten the captive screw until the power supply is seated firmly.
When you insert an operational second power supply into the Passport 5430 with the power on, the PS2 LED on the system processor module turns on. At the same time, the Passport 5430 automatically redistributes the load between the two power supplies. 5. Connect to the AC power source. For instructions, see “Connecting to the AC Power Source” on page 17. 6. Turn on the power supply power switch.
2. Put on an antistatic wrist strap. Caution: Electrostatic discharge can damage hardware. You must wear the antistatic wrist strap on your arm whenever you handle printed circuit boards. Refer to the instructions enclosed with your antistatic wrist strap to attach it. 3. Disconnect the power cable from the power connector on the power supply. 4. Using a flat-tip screwdriver, loosen the captive screw that fastens the power supply to the chassis until the power supply disengages (Figure 4). 5.
7. Using a flat-tip screwdriver, tighten the captive screw until the power supply is seated firmly. 8. Connect to the AC power source. For instructions, see “Connecting to the AC Power Source” on page 17. 9. Turn on the power supply power switch. Removing and Installing a Power Supply Filler Panel Nortel Networks ships the Passport 5430 with a filler panel in the power supply slot reserved for the second power supply.
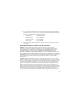
DC OK 100-240V~ 50-60Hz 25A PS1 PS2 FBR0059A Figure 5.
2. Pull the power supply filler panel away from the Passport 5430. Caution: To maintain proper cooling, never operate the Pass- port 5430 with an empty power supply slot. Save the filler panel to cover the slot in case you need to operate the Passport 5430 with a power supply removed. Installing a Power Supply Filler Panel If you remove a power supply from the Passport 5430 without replacing it, you must install a power supply filler panel to maintain the proper cooling airflow.
Connecting to the Power Source This chapter describes how to connect the Passport 5430 to the AC power source. Connecting to the AC Power Source To connect the power cable to the Passport 5430: 1. Connect the a power cable to the power connector on each of the power supplies (Figure 6).
Power switch DC OK DC OK PS2 PS1 Power supplies FBR0031A Figure 6. Connecting the Power Cable to the Passport 5430 2. Connect the remote end of the power cable to a grounded outlet. 3. Turn the Passport 5430 on.