
User's Manual


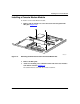


Installing the Console Modem
114313 Rev. A 1-9
3.
Secure the two captive screws that hold the cover to the component tray.
4. Reconnect any cabling you removed.
5. Plug in the power cord and, if applicable, the redundant power supply
cable.
Refer to F
igure 1-1.
6. Attach the label that came in the upgrade kit to the ARN back panel.
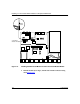
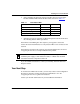
Connecting Cables
Before reconnecting the ARN to the network, connect an RJ-11 modem cable to
the new V.34 interface (F
igure 1-10).
Figure 1-10. V.34 Console Modem Connector
Refer to the Cable Guide for Routers and BNX Platforms for the cables available
from Bay Networks.
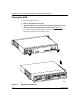
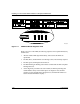
Ensuring a Successful Installation
After reconnecting the ARN to the network, you can ensure a successful upgrade
by checking the diagnostic LEDs on the front panel of the base module
(F
igure 1-11).
ARN0037A
Console Modem
Modem
RLSD
DTR
TX
RX