Avaya Solution & Interoperability Test Lab Application Notes for Algo 8028 SIP Doorphone with Avaya Aura® Session Manager and Avaya Aura® Communication Manager - Issue 1.0 Abstract These Application Notes describe the steps required to integrate the Algo 8028 SIP Doorphone with Avaya Aura® Session Manager and Avaya Aura® Communication Manager configured as an Evolution Server. The 8028 SIP Doorphone provides hands-free intercom capability and entrance security with door unlock control.
1. Introduction These Application Notes describe the steps required to integrate the Algo 8028 SIP Doorphone with Avaya Aura® Session Manager and Avaya Aura® Communication Manager configured as an Evolution Server. The 8028 SIP Doorphone provides hands-free intercom capability and entrance security with door unlock control. It is a SIP compliant device that registers with Session Manager. The 8028 Doorphone includes a Control Unit and Door Station.
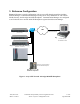
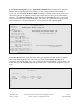
. Reference Configuration Figure 1 illustrates a sample configuration with an Avaya SIP-based network that includes Session Manager, Communication Manager running on an Avaya S8800 Server with a G650 Media Gateway, and the Algo 8028 SIP Doorphone. Communication Manager was configured as an Evolution Server and the 8028 SIP Doorphone registered with Session Manager. LAN Avaya Aura® Session Manager SIP device registered with Session Manager (10.32.24.
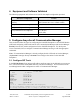
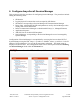
. Equipment and Software Validated The following equipment and software were used for the sample configuration provided: Hardware Component Version Avaya S8800 Server and G650 Media Gateway Avaya Aura® Communication Manager 6.0.1 SP 3 (R016x.00.1.510.1 w/Patch 19009) Avaya Aura® Session Manager 6.1 (6.1.2.0-612004) Avaya Aura® System Manager 6.1 (6.1.0.07345-6.1.5.106) Avaya 9600 Series IP Telephones 3.1 (H.323) 2.6.4 (SIP) Algo 8028 SIP Doorphone 1.4 5.
In the IP Network Region form, the Authoritative Domain field is configured to match the domain name configured on Session Manager. In this configuration, the domain name is avaya.com. By default, IP-IP Direct Audio (shuffling) is enabled to allow audio traffic to be sent directly between IP endpoints without using media resources in the Avaya G650 Media Gateway. The IP Network Region form also specifies the IP Codec Set to be used for calls routed over the SIP trunk to Session Manager.
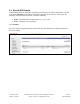
Prior to configuring a SIP trunk group for communication with Session Manager, a SIP signaling group must be configured. Configure the signaling group form as follows: Set the Group Type field to sip. Set the IMS Enabled field to n. The Transport Method field was set to tcp. In a production network, TLS transport may also be used.
Configure the Trunk Group form as shown below. This trunk group is used for calls to the SIP Phones. Set the Group Type field to sip, set the Service Type field to tie, specify the signaling group associated with this trunk group in the Signaling Group field, and specify the Number of Members supported by this SIP trunk group. Configure the other fields in bold and accept the default values for the remaining fields.
5.2. Configure Station Use the add station command to add station for the 8028 SIP Doorphone. Use 9640SIP for the Station Type. The Name field is optional. Use the default values for the other fields. The SIP station can also be configured automatically by Session Manager as described in Section 6.7.
6. Configure Avaya Aura® Session Manager This section provides the procedures for configuring Session Manager. The procedures include adding the following items: SIP domain Logical/physical Locations that can be occupied by SIP Entities SIP Entities corresponding to Session Manager and Communication Manager Entity Links, which define the SIP trunk parameters used by Session Manager when routing calls to/from SIP Entities Define Communication Manager as Administrable Entity (i.e.
6.1. Specify SIP Domain Add the SIP domain for which the communications infrastructure will be authoritative. Do this by selecting Domains on the left and clicking the New button (not shown) on the right. The following screen will then be shown. Fill in the following: Name: The authoritative domain name (e.g., avaya.com) Notes: Descriptive text (optional). Click Commit. Since the sample configuration does not deal with any other domains, no additional domains need to be added.
6.2. Add Locations Locations can be used to identify logical and/or physical locations where SIP Entities reside for purposes of bandwidth management. To add a location, select Locations on the left and click on the New button (not shown) on the right. The following screen will then be shown. Fill in the following: Under General: Name: Notes: A descriptive name. Descriptive text (optional). Under Location Pattern: IP Address Pattern: Notes: A pattern used to logically identify the location.
6.3. Add SIP Entities In the sample configuration, a SIP Entity is added for Session Manager and the C-LAN in the G650 Media Gateway. 6.3.1. Session Manager A SIP Entity must be added for Session Manager. To add a SIP Entity, select SIP Entities on the left and click on the New button (not shown) on the right. The following screen is displayed. Fill in the following: Under General: Name: FQDN or IP Address: Type: Location: Time Zone: A descriptive name.
JAO; Reviewed: SPOC 11/3/2011 Solution & Interoperability Test Lab Application Notes ©2011 Avaya Inc. All Rights Reserved.
6.3.2. Communication Manager A SIP Entity must be added for the Communication Manager. To add a SIP Entity, select SIP Entities on the left and click on the New button (not shown) on the right. The following screen is displayed. Fill in the following: Under General: Name: FQDN or IP Address: Type: Location: Time Zone: A descriptive name. IP address of the signaling interface (e.g., C-LAN board) on the telephony system. Select CM. Select the location defined previously.
6.4. Add Entity Link The SIP trunk from Session Manager to Communication Manager is described by an Entity link. To add an Entity Link, select Entity Links on the left and click on the New button (not shown) on the right. Fill in the following fields in the new row that is displayed: Name: SIP Entity 1: Protocol: Port: SIP Entity 2: Port: Trusted: A descriptive name (e.g., devcon13 Link). Select the Session Manager. Select the appropriate protocol.
6.5. Define Communication Manager as Managed Element Before adding SIP users, Communication Manager must be added to System Manager as a managed element. This action allows System Manager to access Communication Manager over its administration interface. Using this administration interface, System Manager will notify Communication Manager when new SIP users are added.
In the Attributes tab: Login / Password: Is SSH Connection: Port: Enter the login and password used for administration access. Enable SSH access. Enter the port number for SSH administration access (5022). Defaults can be used for the remaining fields. Click Commit to save the settings. JAO; Reviewed: SPOC 11/3/2011 Solution & Interoperability Test Lab Application Notes ©2011 Avaya Inc. All Rights Reserved.
6.6. Add Application Sequence To define an application for Communication Manager, navigate to Elements Session Manager Application Configuration Applications on the left and select New button (not shown) on the right. Fill in the following fields: Name: SIP Entity: CM System for SIP Entity Enter name for application. Select the Communication Manager SIP entity. Select the Communication Manager managed element. Click Commit to save the Application definition.
Next, navigate to Elements Session Manager Application Configuration Application Sequences to define the Application Sequence for Communication Manager as shown below. Provide a Name (e.g., DEVCON App Sequence) for the Application Sequence and under Available Applications, click on the plus ( ) sign by DEVCON-APP to add it under the Application in this sequence section. Verify a new entry is added to the Applications in this Sequence table and the Mandatory column is as shown below.
6.7. Add SIP User Add a SIP user for the 8028 SIP Doorphone. The following configuration will automatically create the SIP station on Communication Manager Evolution Server. To add new SIP users, navigate to Users User Management Manage Users from the left and select New button (not shown) on the right. Enter values for the following required attributes for a new SIP user in the Identity tab of the new user form.
Enter values for the following required attributes for a new SIP user in the Communication Profile tab of the new user form. Communication Profile Password: Confirm Password: Enter the password which will be used by the 8028 SIP Doorphone to register with Session Manager. Re-enter the password from above. Scroll down to the Communication Address section and select New to define a Communication Address for the new SIP user.
In the Session Manager Profile section, specify the Session Manager entity from Section 6.3.1 for Primary Session Manager and assign the Application Sequence defined in Section 6.6 to the new SIP user as part of defining the SIP Communication Profile. The Application Sequence can be used for both the originating and terminating sequence. Set the Home Location field to the Location configured in Section 6.2.
In the Endpoint Profile section, fill in the following fields: System: Profile Type Use Existing Stations: Extension: Template: Port: Delete Endpoint on Unassign of Endpoint: Select the managed element corresponding to Communication Manager. Select Endpoint. If field is not selected, the station will automatically be added in Communication Manager. Enter extension number of SIP user. Select template for type of SIP phone. Enter IP.
6.8. Add Session Manager To complete the configuration, adding the Session Manager will provide the linkage between System Manager and Session Manager. Expand the Session Manager menu on the left and select Session Manager Administration.
7. Configure Algo 8028 SIP Doorphone The configuration of the 8028 SIP Doorphone was performed by using a web interface tool, which is accessed by entering the 8028 IP address into a browser. The 8028 supports DHCP as the default method to assign an IP address to the unit. Alternatively, if DHCP is not available, a pre-assigned IP address may be used to access the unit. The default IP address is 192.168.1.111. A valid password will be required. Refer to [3] for more information, including installation.
In the Config tab, set the SIP Domain/Proxy field to the Session Manager IP address. This should be the IP address to which the 8028 SIP Doorphone will send SIP messages. Specify the Extension and Auth ID, along with the Password, configured in Section 6.7. The Dialing Extension (e.g., 77301) should specify the telephone number that will be dialed when the call button on the Door Station is pressed. Finally, configure the 8028 with the appropriate IP network parameters.
8. Verification Steps The following steps can be used to verify and/or troubleshoot installations in the field. 1. Verify that the 8028 SIP Doorphone has successfully registered with Session Manager. The SIP Registration field in the Status tab should indicate successful registration as shown below. 2. Verify that when the call button on the Door Station is pressed, the specified telephone on Communication Manager rings, and upon answering the call, two-way audio path is established. 3.
9. Conclusion These Application Notes describe the administration steps required to integrate the Algo 8028 SIP Doorphone with Avaya Aura® Communication Manager and Avaya Aura® Session Manager. The 8028 SIP Doorphone successfully registered with Session Manager and incoming and outgoing calls were successful. In addition, unlocking a door using DTMF tones was successful. All test cases passed. 10. Additional References This section references documentation relevant to these Application Notes.
©2011 Avaya Inc. All Rights Reserved. Avaya and the Avaya Logo are trademarks of Avaya Inc. All trademarks identified by ® and ™ are registered trademarks or trademarks, respectively, of Avaya Inc. All other trademarks are the property of their respective owners. The information provided in these Application Notes is subject to change without notice.