Avaya B149 Conference Phone User Guide ENGLISH 16-603923 Issue 1 March 2011
Avaya B149 Conference Phone User Guide © 2011 Avaya Inc. All Rights Reserved. Notice While reasonable efforts have been made to ensure that the information in this document is complete and accurate at the time of printing, Avaya assumes no liability for any errors. Avaya reserves the right to make changes and corrections to the information in this document without the obligation to notify any person or organization of such changes.
Avaya B149 Conference Phone User Guide the Software at any given time. A “Unit” means the unit on which Avaya, at its sole discretion, bases the pricing of its licenses and can be, without limitation, an agent, port or user, an e-mail or voice mail account in the name of a person or corporate function (e.g., webmaster or helpdesk), or a directory entry in the administrative database utilized by the Software that permits one user to interface with the Software.
Avaya B149 Conference Phone User Guide The patented audio technology OmniSound® 2.0 provides impressive audio quality for your distance meetings. Full-duplex audio via the hypersensitive microphone and powerful speakers enables speech in both directions. This natural loudspeaker sound quality is critical for effective, collaborative meetings that keep everyone engaged and contributing. OmniSound 2.
Avaya B149 Conference Phone User Guide Table of contents Description 2 General................................................... 2 Maintenance........................................... 2 keypad................................................... 4 Navigation and selection in menus............ 5 Connections 6 Unpacking.............................................. 6 Connecting and installing......................... 6 Select region and language.......................
Avaya B149 Conference Phone User Guide Description General The Avaya B149 conference phone offers a host of innovative features: • OmniSound® audio technology. • Conference guide for easy set-up of multiparty calls. • Record your meetings with an SD memory card so that you can listen to them later on. • Expansion microphones can be added to increase the voice pickup range. (Optional.) Maintenance Clean the equipment with a soft, dry cloth. Never use liquids.
Avaya B149 Conference Phone User Guide Description Speaker Microphone Display screen Keypad LEDs SD memory card port LEDs Flashing blue Incoming call Steady blue light Call in progress Flashing red Hold, microphone and speaker turned off Steady red light Mute, microphone turned off Analog line connection Expansion microphone port Expansion microphone port Security lock port Power supply port 3
Avaya B149 Conference Phone User Guide Description keypad UP ARROW Navigation in menus Display of call list MENU, Settings menu DOWN ARROW Navigation in menus Display of call list C No/end/back Start/stop recording OK Yes/confirm choice Answer/connect calls and Flash Increase volume During a call: Press to call a new person Decrease volume Hang up/end call CONFERENCE Automatic dialling of conference groups Mute One press of this button will always connect all parties to a conference call HOLD A
Avaya B149 Conference Phone User Guide Description Navigation and selection in menus Press MENU. Select the option you want from the menu using the arrow buttons. Confirm by pressing OK to select the marked option. Cancel the setting or go back one level in the menu by pressing C. Quit the menu by pressing MENU again. Note that after you have made changes to a setting, you must press OK to activate the setting.
Avaya B149 Conference Phone User Guide Connections Unpacking Check that all parts are included in the package. If any parts are missing, please contact your retailer. • • • • • The Avaya B149 conference phone Power adapter with universal socket compatibility 7.5 metre cable for electric power and line connection Intermediate plugs for analog connection Quick reference guides in different languages Connecting and installing Connect to an analog line as illustrated.
Avaya B149 Conference Phone User Guide Answering and making calls Answering calls A ring tone is heard and the blue LEDs start flashing. Press to answer. The LEDs show a steady blue light. The duration of the call is shown on the display screen. Ending calls End the call by pressing . Making calls Dial the number. Press . The number is called and the LEDs show a steady blue light. The duration of the call is shown on the display screen. Or: Press . Dial the number.
Avaya B149 Conference Phone User Guide Answering and making calls Making three-way calls The simplest way to set up a multi-party call is to use the conference guide (see page 10). You can connect another party to an on-going call as follows. During a call, the button acts as Flash/R-pulse, which means it transmits commands to the PBX. If you experience problems making multi-party calls: Please contact your telephone administrator. Turn to page 12 for more details. Press (F).
Avaya B149 Conference Phone User Guide During a call Adjusting the speaker volume Adjust the speaker volume using the buttons and . Placing calls on temporary hold Mute Press (Mute) to turn off the microphone. The LEDs change from blue to red. The other party cannot hear what you are saying. Press (Mute) to reconnect the call. Hold Press HOLD to put the call on hold. The LEDs change from blue to flashing red. Both the microphone and the speaker are turned off and the call is on hold.
Avaya B149 Conference Phone User Guide Conference guide The conference guide allows you to create 20 conference groups with up to six people in each. You can now call the participants in a meeting by simply pressing a few buttons. You may need to adjust some settings in your Avaya B149 to make it compatible with your PBX. Please turn to page 12 in this User Guide for more details. Entering text with the keypad Please turn to page 4 for instructions on using the keypad to enter text.
Avaya B149 Conference Phone User Guide conference guide Making multi-party calls Press the (Conference) button. Select QUICK GUIDE with the arrow buttons. Press OK to confirm. The Quick Guide asks you to dial the first number. Dial the first person’s telephone number. Press OK to confirm. Press OK when the first person has answered. Press OK to call another person and repeat the above steps. Press C when you have called all the persons you want for your meeting.
Avaya B149 Conference Phone User Guide conference guide Deleting conference groups Select MENU > CONF GUIDE > ERASE GROUP. Mark the group you want to delete and press OK. Confirm that you really want to delete the group by pressing OK or cancel the deletion of a group by pressing C. Delete all conference groups Select MENU > CONF GUIDE > ERASE ALL. Confirm that you really want to delete all groups by pressing OK or cancel the deletion of all groups by pressing C.
Avaya B149 Conference Phone User Guide Phonebook The Avaya B149 has a phonebook that holds up to 50 entries. See page 7 for making calls via the phonebook. Entering text with the keypad Please turn to page 4 for instructions on using the keypad to enter text. Searching for contacts Press (Phonebook). Another way to search for a contact in the address book is to hold down a number button for two seconds (see page 8). You can also search for a contact via the PHONEBOOK menu.
Avaya B149 Conference Phone User Guide phonebook Deleting contacts Select MENU > PHONE BOOK > ERASE CONTACT. Mark the contact you want to delete and press OK. Confirm that you really want to delete the contact by pressing OK or cancel the deletion of a contact by pressing C. Deleting all conference groups Select MENU > PHONE BOOK > ERASE ALL. Confirm that you really want to delete all contacts by pressing OK or cancel the deletion of a contact by pressing C.
Avaya B149 Conference Phone User Guide Recording It is possible to record a phone conference on an SD (Secure Digital) memory card so you can listen to it later on. A flashing symbol appears on the display screen during recording. A beep is heard every 20 seconds so that other parties in the call know it is being recorded. The beep can be turned off (see page 17). The recorded call is saved on the memory card. The document is named after the time at which the recording began (e.g. 14-35-01.
Avaya B149 Conference Phone User Guide recording Listening to a recording You can listen to a recorded phone conference on your Avaya B149 or a computer using an SD memory card reader. Recordings are saved in .wav format and can be played back on your choice of media player. Listening to recordings on the Avaya B149: Select MENU > RECORDING > PLAYBACK FILE. Mark the folder you want (date) and press OK to confirm. A list of all recordings for the specified date is displayed.
Avaya B149 Conference Phone User Guide recording Managing recordings Editing the name of a recording The recording is named by default with the time at which the recording started. Select MENU > RECORDING > RENAME FILE. Mark the folder you want and press OK to confirm. Mark the recording to be edited and press OK. Make the change and press OK to confirm. Delete a number or a letter in a name by pressing C.
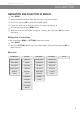
Avaya B149 Conference Phone User Guide Settings Selecting languages Select MENU > SETTINGS > LANGUAGE. Select the language you want and press OK to confirm. Select region The first time the Avaya B149 is started, you will be required to select the region in which you are located. The Avaya B149 then automatically configures to the telecom network for that region. Your selected entries can be changed later via this menu. Select MENU > SETTINGS > REGION.
Avaya B149 Conference Phone User Guide SETTINGS Adjusting ring level volume Select MENU > SETTINGS > RING LEVEL. Select your choice and press OK to confirm. There are six volume levels plus a silent mode. You will hear the ring tone for each level you select. If you select silent mode, an LED on the phone flashes when an incoming call is received. Adjusting the flash/R pulse duration The Flash/R pulse (Register recall) is used to request a new line from the PBX.
Avaya B149 Conference Phone User Guide Settings Adjusting sound (equalizer) The sound reproduction can be adjusted to the required pitch (SOFT, NEUTRAL and BRIGHT). Select MENU > SETTINGS > EQUALIZER. Select your choice and press OK to confirm. Changing text on the display screen The text on the display screen can be changed when the Avaya B149 is on hook. Select MENU > SETTINGS > SCREEN TEXT. Delete existing text using C and enter your new text. Press OK to confirm.
Avaya B149 Conference Phone User Guide Technical specifications Size Diameter 240 mm, height 77 mm Weight 1 kg Color Charcoal black Display screen Illuminated graphics (LCD), 128x64 Keypad Alphanumerical 0–9, *, off hook/F, on hook, mute, hold, volume up, volume down, 5 buttons for menu navigation, phone book, conference guide Anti-theft protection Kensington security slot Memory Support for SD memory cards up to 2 GB Connectivity Analog telephone connectivity Modular 6/6 modular (RJ11) to a
110203-61-001 rev 1A