Avaya B179 SIP Conference Phone Installation and Administration Guide 16-603915 Version 2.
Avaya B179 SIP Conference Phone Installation and Administration Guide About this document © 2015 Avaya Inc. All Rights Reserved. Notice While reasonable efforts have been made to ensure that the information in this document is complete and accurate at the time of printing, Avaya assumes no liability for any errors. Avaya reserves the right to make changes and corrections to the information in this document without the obligation to notify any person or organization of such changes.
Avaya B179 SIP Conference Phone Installation and Administration Guide Avaya provided that the performance capacity of the Server(s) does not exceed the performance capacity specified for the Software.
Avaya B179 SIP Conference Phone Installation and Administration Guide About this document This document includes setup, registration of accounts and configuration of Avaya B179 Conference Phone in Communication Manager, Session Manager, and CS-1000 Server environments. For information about setting up B179 in IP Office, see Installing and Administering the IP Office B179 SIP Conference Phone.
Avaya B179 SIP Conference Phone Installation and Administration Guide Content Related resources ........................................................................................ 4 Description 3 Display screen................................................................................................ 4 Navigation and selection in menus....................................................... 5 Using the web interface.............................................................................
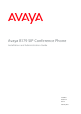
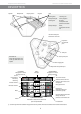
Avaya B179 SIP Conference Phone Installation and Administration Guide Description Speaker Microphone Display screen Keypad LEDs Flashing blue Incoming call Steady blue light Call in progress Flashing red On hold, microphone and speakers turned off Steady red light Mute, microphone turned off Network cable port SD memory card port Expansion microphone port AUX port Maintenance Security lock port Clean the equipment with a soft, dry cloth. Never use liquids.
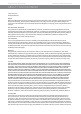
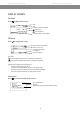
Avaya B179 SIP Conference Phone Installation and Administration Guide Display screen On Hook Press to display this screen. Date Time Display text (can be changed) Registered Not registered Account name (can be changed) Off Hook Press to display this screen.
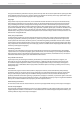
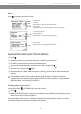
Avaya B179 SIP Conference Phone Installation and Administration Guide Menu Press to switch to and from a menu. Current menu Submenu Marked option – open by pressing OK button Scrolling list (indication of where the marked option is in the list or menu) List of setting options: Existing settings Marked option – select by pressing OK button List of names: Marked name – select by pressing OK button Navigation and selection in menus Press .
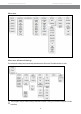
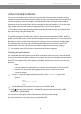
Avaya B179 SIP Conference Phone Installation and Administration Guide Menu tree Menu tree, advanced settings The advanced settings are protected by administrator’s PIN code. The default value is 1234. The simplest way to make settings and edit contacts is using a PC and the Avaya B179 web interface.
Avaya B179 SIP Conference Phone Installation and Administration Guide Using the web interface You can use the web browser of a PC connected to the same network to manage contacts, conference groups and settings in the Avaya B179. Users can import and export contacts and conference groups, name user profiles, and change PIN codes by using the web interface. All settings on the Avaya B179 can also be managed via the web interface.
Avaya B179 SIP Conference Phone Installation and Administration Guide Installation The printed Installation Guide provides brief and simplified installation instructions. Connecting Connect the Avaya B179 to the network as illustrated below. Plug the Avaya B179 into the mains using the power adapter as illustrated below. The Avaya B179 can be driven directly from the network (Power over Ethernet, Class III) if the network supports this.
Avaya B179 SIP Conference Phone Installation and Administration Guide Obtaining a network address Connecting to a network with DHCP After the B179 Conference Phone connects to a DHCP network, the phone requests for the network parameters. To enable DHCP: In the web UI, go to Settings > Network. Set the DHCP option to Enabled. In the phone UI, Press and select Settings > Advanced (requires the Admin password) > Network > IP > DHCP. Set the DHCP option to On.
Avaya B179 SIP Conference Phone Installation and Administration Guide Connecting to a network with static IP addresses You need the IP address, host name, domain, netmask, gateway, DNS 1, and DNS 2. The host name can be set freely. The domain and secondary DNS can be left blank. Press and select SETTINGS > ADVANCED (6,2). Enter the PIN code. The default code is 1234. Select NETWORK (2) Select IP. Select STATIC IP. Enter values for the IP ADDRESS.
Avaya B179 SIP Conference Phone Installation and Administration Guide Checking IP address Press and select the sub menu STATUS > NETWORK (8,2). Check the conference phone’s network address under the heading IP ADDRESS. Use this address to log into the web server in the conference phone. Login Log into the web server in Avaya B179 by entering the phone’s network address in your computer’s web browser. Select Admin as Profile and enter your PIN. The default PIN for Admin is 1234.
Avaya B179 SIP Conference Phone Installation and Administration Guide Software upgrade and basic settings The following settings should be done during installation. See Device management, if you are responsible for installing or upgrading many phones. Note that all settings on the Basic tab also affect the user profile Default. Other user profiles can be changed individually. The settings on the Basic tab, except the name and PIN for Admin, can be modified by any user.
Avaya B179 SIP Conference Phone Installation and Administration Guide Compare the latest version with the current version (shown on the web page). If you want to upgrade, select the desired version in the list box and click on Upgrade. The browser window and the display on the Avaya B179 shows that the upgrade has begun. The download and installation can take several minutes. Do not interrupt the upgrade and do not disconnect plugs to the Avaya B179 during the upgrade.
Avaya B179 SIP Conference Phone Installation and Administration Guide Changing the language Select Settings > Basic. Select the desired language in the list box after Language and save the setting.
Avaya B179 SIP Conference Phone Installation and Administration Guide French Dutch Cyrillic Polish Turkish Greek Simplified Chinese Japanese Korean Note, selecting a language only affects the phone language, not the language on the web interface.
Avaya B179 SIP Conference Phone Installation and Administration Guide Changing the PIN You must change the PIN code for Admin from the default setting to protect the settings. Make a note of the new PIN code and keep it in a safe place. The administrator’s PIN code can only be reset by a full factory reset! Select Settings > Basic and click the Edit button on the Admin line. Enter a new PIN. The PIN code may consist a maximum of 8 digits. Click on the Set and Save buttons.
Avaya B179 SIP Conference Phone Installation and Administration Guide Settings You can use the web interface for the settings that can be done directly on the B179 Phone. See “NAVIGATION AND SELECTION IN MENUS” for using the menu system. For safety reasons, recordings can only be managed directly on the Avaya B179. All other settings can be changed via the web interface. The web interface also allows you to import and export contacts and conference groups, rename user profiles and change PIN codes.
Avaya B179 SIP Conference Phone Installation and Administration Guide To change the basic settings of a user profile, you must log in with that profile. Profiles – edit name and PIN You must change the PIN code from the default setting to protect the settings. Select Settings > Basic and click the Edit button on the account you want to change. Enter a new PIN code. The PIN code may consist of 8 digits. You can also choose to change the name of a user profile.
Avaya B179 SIP Conference Phone Installation and Administration Guide Recording tone A short beep is heard every 20 seconds so that all the parties in the call know it is being recorded. This feature can be turned off. Select On or Off and click on the Save button. On phone: > RECORDING TONE > SETTINGS (5,5). Settings when connecting external equipment (Aux) The Avaya B179 can be connected to a wireless headset or an external PA system.
Avaya B179 SIP Conference Phone Installation and Administration Guide Language String length allowed English 11 Swedish 9 Danish 10 Norwegian 11 Finnish 12 Italian 13 German 11 Spanish 14 Portuguese (Br) 13 Portuguese (Eu) 14 French 11 Dutch 11 Cryllic 14 Polish 16 Turkish 11 Greek 14 Simplified Chinese 4 Japanese 9 Korean 6 19
Avaya B179 SIP Conference Phone Installation and Administration Guide SIP Select Settings > SIP.
Avaya B179 SIP Conference Phone Installation and Administration Guide The conference phone supports three accounts. The secondary and fallback accounts are automatically used if the phone fails to register to the main account. If the phone fails to register to the secondary and the fallback accounts, it tries to use the main account again. Main account, Secondary account, and Fallback account Enable account It is possible to store account information for future use, but temporarily disable it.
Avaya B179 SIP Conference Phone Installation and Administration Guide possible to replace the IP address in the SIP requests with the address shown on the other side of the firewall. Note that in some cases NAT traversal is not necessary. Some public service providers of IP telephony keep track of the actual IP address used to register a phone, and the one used in the SIP requests from the same phone, and then replaces the addresses in the SIP messages.
Avaya B179 SIP Conference Phone Installation and Administration Guide Advanced Enable SIP Replaces Default is Yes. Setting this option to No, will instruct the PBX not to use the SIP replace header. Some PBXes try to take over the bridging functionality from Avaya B179 using this command, which causes the calls to interrupt. Enable Blind Transfer Default is Yes. Setting this option to No, will disable the transfer function ( > TRANSFER) during a call.
Avaya B179 SIP Conference Phone Installation and Administration Guide Internet communication. TCP keeps track of all individual packets of data, ensuring that they reach the receiver and are put together properly. TCP is not the default protocol for SIP, because it is slower and uses more bandwidth than UDP. With UDP and TCP, SIP packets travel in plain text. TLS (Transport Layer Security) is a cryptographic protocol that provides security and data integrity for communications over TCP/IP networks.
Avaya B179 SIP Conference Phone Installation and Administration Guide Require client certificate When set to On, the Avaya B179 rejects incoming secure SIP connections (TLS or SIPS) if the client does not have a valid certificate. Verify server When the Avaya B179 is acting as a client (outgoing connections) using secure SIP (TLS or SIPS) it will always receive a certificate from the peer. If Verify server is set to On, the Avaya B179 closes the connection if the server certificate is not valid.
Avaya B179 SIP Conference Phone Installation and Administration Guide Network Select Settings > Network.
Avaya B179 SIP Conference Phone Installation and Administration Guide DHCP Dynamic Host Configuration Protocol is used by network devices (clients) to obtain the parameters necessary for operation in the IP network. This protocol reduces system administration workload, allowing devices to be added to the network with little or no manual configuration. DHCP should be set to On if no other information is given. When set to On, all information on this page will be set automatically.
Avaya B179 SIP Conference Phone On phone: Installation and Administration Guide > SETTINGS > ADVANCED > (PIN) > NETWORK > ETHERNET > VLAN (6,2,2,2,1). 802.1x IEEE 802.1X is an IEEE Standard for port-based Network Access Control and is part of the IEEE 802.1 group of networking protocols. It provides an authentication mechanism to devices wishing to attach to a LAN or WLAN. Enable 802.1x By enabling this option, Avaya B179 asks an authentication server for permission when connected to the LAN.
Avaya B179 SIP Conference Phone Installation and Administration Guide Media Select Settings > Media. The media settings determine how audio is sent between the devices. The devices negotiate via SIP before a call is connected. All devices must support the same media types, codecs and security settings.
Avaya B179 SIP Conference Phone Installation and Administration Guide Codec Codecs are used to convert an analog voice signal to a digitally encoded version and vice versa. Codecs vary in the sound quality they deliver and the bandwidth required. The Avaya B179 supports the most common codecs and each codec can be given a precedence depending on your requirements for high quality audio or low bandwidth use. The priority can be set to from 4 (high) to 1 (low) or 0 (disabled) G722 G.
Avaya B179 SIP Conference Phone Installation and Administration Guide SRTP If set to disabled, the media is sent using RTP. Note that despite this setting, the Avaya B179 will still use a secure channel if the opposite device demands it. If set to optional or mandatory, a padlock will be shown in the bottom right-hand corner of the screen. If the other devices support SRTP, the padlock will be locked. Otherwise, an open padlock will be displayed.
Avaya B179 SIP Conference Phone Installation and Administration Guide RFC 2833 is a method of carrying DTMF signals in RTP packets using a separate RTP payload format. With this method a PSTN gateway reproduces the DTMF tones sent from the end device. With SIP Info the DTMF signals are sent as SIP requests. The SIP switch creates the tones if the call is transferred to the PSTN. Use RFC 2833 or SIP Info as preferred methods.
Avaya B179 SIP Conference Phone Installation and Administration Guide LDAP Select Settings > LDAP. Avaya B179 has support for an external phone book, which means it can communicate with a directory server using LDAP (Lightweight Directory Access Protocol). The built in search function dynamically filters the content from the LDAP database, based on the search characters the user enter. To make the LDAP phone book available, the administrator has to activate and configure the LDAP feature.
Avaya B179 SIP Conference Phone Installation and Administration Guide Username Leave this field blank if the LDAP server does not require a username. Password Leave this field blank if the LDAP server does not require username and password. Max hits The maximum number of hits to return for each LDAP search. Display name Specifies how the search hits shall be presented on the display in Avaya B179. Example: %cn - shows the cn attribute.
Avaya B179 SIP Conference Phone Installation and Administration Guide LLDP Select Settings > LLDP Link Layer Discovery Protocol (LLDP) is a data link layer protocol. LLDP defines a standard for Ethernet network devices to broadcast and receive information about other devices in the same network. The information is sent as LLDP Data Units (LLDPDU). Each LLDPDU is a sequence of Time-Length-Value (TLV) strings.
Avaya B179 SIP Conference Phone Installation and Administration Guide The B179 Conference Phone supports LLDP on primary Ethernet interfaces.
Avaya B179 SIP Conference Phone Installation and Administration Guide Category TLV Name (Type) String length TLV Info String (Value) TIA LLDP MED Network Policy (Voice) 8 TIA OUI = 00-12-BB (hex); Network Policy Subtype = 2; Application Type = 1 (Voice) U = 0 (network policy is defined) T = TAGGING X = 0 (reserved bit) VLAN ID = VLAN_IN_USE TIA LLDP MED Inventory Software Revision 5 - 36 TIA OUI = 00-12-BB (hex); Software Revision Subtype = 7; Software Revision = value TIA LLDP MED Inventor
Avaya B179 SIP Conference Phone Installation and Administration Guide Web interface Select Settings > Web interface. The web server in the Avaya B179 supports secure connections using HTTPS. Enable HTTPS Set Enable HTTPS to On if you need a secure communication between the PC used for setup and the phone. Certificate To use HTTPS you must upload a .PEM certificate to the phone. Note: To convert .DER or .PFX formats to .
Avaya B179 SIP Conference Phone Installation and Administration Guide Time & Region Select Settings > Time & Region. Time Enable NTP NTP (Network Time Protocol) is a protocol for distributing the Coordinated Universal Time (UTC) by means of synchronizing the clocks of computer systems over packet-switched, variable-latency data networks. Time This field shows the actual time if NTP is enabled. Otherwise enter the correct time (hh:mm:ss) and save the setting.
Avaya B179 SIP Conference Phone Installation and Administration Guide Daylight saving Select the Yes radio button if DST (Daylight Saving Time or Summer Time) is currently used in your country. Note that this setting only adjusts the time by one hour and does not change the time automatically when the DST starts and ends. NTP Server The NTP pool is a dynamic collection of networked computers that volunteer to provide highly accurate time via NTP to clients worldwide.
Avaya B179 SIP Conference Phone Installation and Administration Guide Application restart The Restart button restarts the phone application. This takes less than 30 seconds. On phone: > SYSTEM > RESTART (7,1). System reboot The Reboot button reboots the conference phone. The starting procedure may take about two minutes. On phone: > SYSTEM > REBOOT (7,2). Factory reset The Reset button resets the Avaya B179 to factory default settings.
Avaya B179 SIP Conference Phone Installation and Administration Guide Connecting a wireless headset Connect the headset to the Aux port on Avaya B179. The microphones from the Avaya B179 and the wireless headset will work simultaneously and transmit the call to other participants in the phone conference. Please refer to the headset manual for further information.
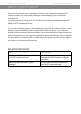
Avaya B179 SIP Conference Phone Installation and Administration Guide Headset and PA installation and settings Connecting a PA interface box The Avaya B179 can be connected to an external PA system using a PA interface box. 2.5 m connection cable To mixer/microphone To amplifier/speakers PA interface box AUX port Always disconnect the power supply from the electrical outlet before disconnecting or connecting equipment to the Avaya B179.
Avaya B179 SIP Conference Phone Installation and Administration Guide Select INTERNAL MIC and press OK to switch between on (shaded box) and off. To ensure maximum audio quality, do not use the internal microphone and external microphones connected via the PA box at the same time. Only the internal microphone is turned off. Any external microphones connected to the Avaya B179 are still turned on. Select INTERNAL SPKR and press OK to switch between on (shaded box) and off.
Avaya B179 SIP Conference Phone Installation and Administration Guide 45
Avaya B179 SIP Conference Phone Installation and Administration Guide Hard system recovery Reset configuration If you have forgotten the Admin PIN code, the only way to reset it to default is to do a hard factory reset. This is the same as the Factory reset in the system menu ( > SYSTEM > FACTORY RESET). This erases all settings including account information and contacts! Disconnect the power supply cable. Note that this is the same as the network cable if the phone uses Power over Ethernet.
Avaya B179 SIP Conference Phone Installation and Administration Guide Provisioning – upgrade and configuration Firmware upgrade on a single phone The easiest way to upgrade the Avaya B179 is via a computer connected to the same network. Via the web interface, you can check for a more recent version and then automatically install it. It is also possible to download the latest version, via the Avaya website (support.avaya.com), and then install the file via the web interface or using a SD card.
Avaya B179 SIP Conference Phone Installation and Administration Guide Disabling firmware upgrade from SD card To disable the firmware upgrade from the SD card, set the tag in the global configuration file to true. Note: You cannot enable the firmware upgrade from the SD card after it is disabled. The recovery process prompts to initiate the SD card-based firmware upgrade even if the option is disabled in the configuration file.
Avaya B179 SIP Conference Phone Installation and Administration Guide You can save a configuration xml file to be used as: • Backup (i.e. if the system has been reset to factory default) • Configuration interface (there are some settings that are not configurable via the web interface) • Management tool (export, edit and import settings to a set of phones instead of doing the settings on each phone) • Use with a Device Management server, see page 48.
Avaya B179 SIP Conference Phone Installation and Administration Guide
Avaya B179 SIP Conference Phone Installation and Administration Guide 2: add both NAT type number and name Specify whether support for reliable provisional response (100rel and PRACK) should be required by default. Note that this setting can be further customized in account configuration. Specify default value of secure media transport usage. Note that this setting can be further customized in account configuration.
Avaya B179 SIP Conference Phone Installation and Administration Guide If this account information is valid or not. User defined name of the account The full SIP URL for the account. This is the URL to be put in the request URI for the registration. If this flag is set, the presence information of this account will be published to the server where the account belongs.
Avaya B179 SIP Conference Phone Installation and Administration Guide Valid values: true or false. Specify whether SRTP requires secure signalling. This option is only used when use_srtp option above is non-zero. 0: SRTP does not require secure signalling 1: SRTP requires secure transport such as TLS 2: SRTP requires secure end-to-end transport (SIPS) Same as above for account 2 Place to find software upgrades.
Avaya B179 SIP Conference Phone Installation and Administration Guide
Avaya B179 SIP Conference Phone Installation and Administration Guide Export configuration Select Settings > Provisioning. Click on the Export button under Configuration. The configuration file is shown in the web browser. Choose to save the page as an xml file. The xml file is as default saved in your folder for downloaded files. If necessary, edit the xml file in a suitable editor. Import configuration Click on the Browse button under Configuration.
Avaya B179 SIP Conference Phone Installation and Administration Guide Using a Device Management Server Using Device management facilitates the upgrading and configuration of multiple conference phones. To use this feature, the Device management needs to be enabled (default) and configured and the appropriate files must be located on a server reachable from all phones, here called a device management server. The configuration and firmware download are controlled with a configurable frequency.
Avaya B179 SIP Conference Phone Installation and Administration Guide Avaya B179 searches for configuration files in the following order: Firmware binary Contains the firmware binary that will be downloaded and installed by Avaya B179 if the metadata file shows that this is a newer version than the present installed. The binary file can be downloaded from support.avaya.com. Firmware metadata file A metadata file in xml format with information of the firmware version in the binary file.
Avaya B179 SIP Conference Phone Installation and Administration Guide Device management configuration in Avaya B179 Select Settings > Provisioning. Device management Enable On enables Device management. Use DHCP option Set to on if you want to use DHCP option for DM server address. DHCP option Enter the DHCP option used for the DM server address.
Avaya B179 SIP Conference Phone Installation and Administration Guide File server address DM server address if not provided by DHCP option. HTTPS protocol Default is auto, but can be set to SSLv2 or SSLv3 if open-ssl auto detection fails. Check server cert. Enable authentication with certificate. Certificate Here you can upload a certificate to the Avaya B179 to be used for authentication when using Device management.
Avaya B179 SIP Conference Phone Installation and Administration Guide Firmware binary Place the firmware binary file on the Provisioning server. Create a Firmware metadata file according to page 49 and place it on the File server address specified above. Depending on the server used, and the security settings, there might be necessary to add the file type .kt to the MIME settings on the server. This is easily checked by trying to download the kt file from a web browser.
Avaya B179 SIP Conference Phone Installation and Administration Guide Importing and exporting contacts You can import contacts from a comma separated values (CSV) file. The maximum number of contacts allowed in the B179 phone book is 1000. During importing, the existing contacts are retained. Importing contacts Select Phone Book. Click the Scroll button under the heading Import in the web window. Open your CSV file. Click on Import.
Avaya B179 SIP Conference Phone Installation and Administration Guide Importing and exporting conference groups The conference group feature requires that your system allows multiple call appearances. Avaya Aura Communication Manager supports this while Avaya IP Office and Communication Server 1000 do not. The conference groups can be imported and exported in the same way as the contacts in the phone book, but use a three column csv instead of a two column csv.
Avaya B179 SIP Conference Phone Installation and Administration Guide Communication Server 1000 based conference You can configure the B179 Conference Phone to use a Avaya Communication Server 1000 (CS1000) for conference calls. A user can press the Conference button on the phone to invoke the CS1000 server for the conference call. To use the CS1000 server for conference calls: Open the configuration file in edit mode. In the tag, add the server IP address in the tag.
Avaya B179 SIP Conference Phone Installation and Administration Guide Technical data Size Diameter 240 mm, height 77 mm Weight 1 kg Color Liquorice black Display screen Illuminated graphics (LCD), 128x64 Keypad Alphanumerical 0–9, *, on, off, mute, hold, volume up, volume down, 5 buttons for menu navigation, line mode, conference guide Anti-theft protection Kensington security slot Memory Support for SD and SDHC memory cards (Recording capacity 35h/GB) Connectivity Network connecti
Avaya B179 SIP Conference Phone Installation and Administration Guide Directory Internal phone book 1,000 entries per profile (4 password protected profiles) Export/import of directory Call list External directory Support for LDAP Sound Technology OmniSound® Wideband Microphone Omni-directional Reception area Up to 30 metres2, >10 people Speaker Frequency band 200–7000 Hz, Volume 90 dB SPL 0.
Avaya B179 SIP Conference Phone Installation and Administration Guide Appendix A: Registering B179 Conference Phones To register a B179 Conference Phone to the Avaya network, you must create a communication profile for the phone. The communication profile contains a Avaya Aura Communication Manager endpoint profile and a Avaya Aura Session Manager profile. The Communication Manager endpoint profile associates the user with a station on a Communication Manager.
Avaya B179 SIP Conference Phone Installation and Administration Guide Configure the Communication Profile tab. When you add a user in Session Manager, System Manager automatically creates a station in Communication Manager.
Avaya B179 SIP Conference Phone Installation and Administration Guide Configuring the Communication Manager profile About this task To use the conference feature of the B179 Conference Phone, the phone must have atleast 4 call appearances. To assign the call appearances to the B179 phone, configure the station associated with the Communication Manager endpoint profile of the phone. When you add a user in Session Manager, System Manager automatically creates a station in Communication Manager.
Avaya B179 SIP Conference Phone Installation and Administration Guide Upgrade log Logs the upgrade procedure. Next Steps On the phone, check that the square icon next to the extension number is solid. An empty square indicates that the phone is not registered.
Avaya B179 SIP Conference Phone Installation and Administration Guide Appendix B: Configuring CS1000 Server for B179 Before you begin Install and configure the CS1000 call server, signaling server, and nodes. Obtain the administration credentials of the CS1000 call server.
Avaya B179 SIP Conference Phone Installation and Administration Guide b. Click the Element Name corresponding to the Element Type CS1000. The System Overview page is displayed.
Avaya B179 SIP Conference Phone Installation and Administration Guide 2. Enable SIP Line Service a. In the left pane of the System Overview page, click Customers. b. On the Customers page, click the Customer Number link. c. On the Customer Details page, click SIP Line Service.
Avaya B179 SIP Conference Phone Installation and Administration Guide d. Check the SIP Line Service checkbox, enter an appropriate User Agent DN prefix, and click Save. 3. Enable SIP Line Service on Telephony Node. a. On the Element Manager page, go to System > IP Network > Nodes: Servers, Media Cards. Note the IP address of the node, as it will be used in configuring the B179 later. Select the Node ID on which SIP Line service is to be enabled. b.
Avaya B179 SIP Conference Phone Installation and Administration Guide d. On the Node Details page, click Voice Gateway (VGW) and Codecs, and select the required codecs. For G.722 and G.729 support, select Enabled next to Codec G.722 and Codec G.729. For G.729 Annex B (silence suppression), select Voice Activity Detection (VAD). Ensure that the VAD setting on Element Manager is consistent with the VAD setting in the B179 phone. e. Click Save to complete the node configuration.
Avaya B179 SIP Conference Phone Installation and Administration Guide After the transfer is complete, the Synchronize Configuration Files (Node ID ) page is displayed. g. Select the CS1000 call server and click Start Sync. The screen automatically refreshes till the synchronization is complete. After synchronization is complete, the status of the Synchronization Status field changes from Sync required to Synchronized. h. To use the new SIP Gateway settings, click Restart Applications. 4.
Avaya B179 SIP Conference Phone Installation and Administration Guide e. Click to expand the Basic options (BSCOPT) link. f. Click the Edit button to configure Remote Capabilities. g. On the Remote Capabilities page, select Message waiting interworking with DMS-100 (MWI) and Network name display method 2 (ND2).
Avaya B179 SIP Conference Phone Installation and Administration Guide h. Click Return-Remote Capabilities. i. On the D-Channel Property Configuration page, click Submit. 5. Configure Application Module Link a. On the Element Manager page, click System > Interfaces > Application Module Link > Add. The New Application Module Link page is displayed. b. Enter the AML port number in the Port number text box. The SIP Line Service can use ports 32 through 127. c. Enter a description, and click Save.
Avaya B179 SIP Conference Phone Installation and Administration Guide 6. Configure Value Added Server (VAS) a. On the Element Manager page, click System > Interfaces > Value Added Server > Add. b. On the Add Value Added Server page, click Ethernet LAN Link. c. On the Ethernet LAN Link page, enter a Value added server ID. For example, 064. d. Select the AML number for Ethernet LAN Link. e. Ensure that the Application Security check-box is not selected, and click Save. 7. Configure Zone for SIP Phones a.
Avaya B179 SIP Conference Phone Installation and Administration Guide 8. Configure SIP Line Route Data Block (RDB) a. On the Element Manager page, click Routes and Trunks > Routes and Trunks. b. Click the Add route button for the customer number. c.
Avaya B179 SIP Conference Phone Installation and Administration Guide 9. Configure SIP Line Virtual Trunk a. On the Element Manager page, click Routes and Trunks > Routes and Trunks. b. To add new trunk members to the new SIP line route, click Add trunk. c. On the Trunk Property configuration page, set the following parameters to the values specified. The remaining parameters can have default values. d. Click Save.
Avaya B179 SIP Conference Phone Installation and Administration Guide 10. Configure Media Gateway Controller a. On the Element Manager page, click IP Network > Media Gateways. b. In the IPMG column, click the option that supports the digital and analog phones in the communication system. c. On the IPMG Property Configuration page, click Next. d. Click to expand the VGW and IP phone codec profile section. e. Select to expand the Codec G729A option.
Avaya B179 SIP Conference Phone Installation and Administration Guide f. For G.729 Annex B (silence suppression), select Voice Activity Detection (VAD). Ensure that the VAD setting on Element Manager is consistent with the VAD setting in the B179 phone. g. Click Save. h. On the Media Gateway page, select the configured IPMG and click Reboot. 11. Configure SIP Line Telephone a. On the Element Manager page, click Phones. b. On the Search for Phones page, click Add.
Avaya B179 SIP Conference Phone Installation and Administration Guide c. On the New Phones page, select the Customer. d. Select the Phone Type radio button, and from the list of options, select UEXT-SIPL – Universal Extension SIPL. e. Click Preview.
Avaya B179 SIP Conference Phone Installation and Administration Guide Appendix C: Using Certificates Follow these steps to authenticate the Avaya B179 SIP Conference Phones using TLS/SIPS and EAP-TLS: Download the root certificate from the Certificate Server. Create the server certificate from the Certificate Server. Generate the private key. Convert the certificates and private key to .PEM format. Import the .PEM files to the B179 Phone.
Avaya B179 SIP Conference Phone Installation and Administration Guide 2. Get the server certificate a. On the Microsoft Server Certification Authority page, click Request a certificate. b. On the Request a certificate page, click advanced certificate request. c. Enter the information required to create the certificate, and click Submit.
Avaya B179 SIP Conference Phone Installation and Administration Guide d. The certificate is saved to the location specified while setting up the CA. 3. Install the certificate a. Import the certificate to the web browser. 4. Export private key a. Go to Internet Options > Content > Certificates, select the certificate you installed, and click Export. b. Select Yes, export the private key, and click Next. c. Select the format in which you want to export the certificate file, and click Next. d.