BCM Rls 6.
Backup & Restore Copyright © 2010 Avaya Inc. All Rights Reserved. Notices While reasonable efforts have been made to ensure that the information in this document is complete and accurate at the time of printing, Avaya assumes no liability for any errors. Avaya reserves the right to make changes and corrections to the information in this document without the obligation to notify any person or organization of such changes.
Backup & Restore Downloading documents For the most current versions of documentation, see the Avaya Support. Web site: http://www.avaya.com/support Contact Avaya Support Avaya provides a telephone number for you to use to report problems or to ask questions about your product. The support telephone number is 1-800-242-2121 in the United States. For additional support telephone numbers, see the Avaya Web site: http://www.avaya.
Backup & Restore Table of Contents Backup & Restore ............................................................. 5 Overview .................................................................................................. 5 About Backups ......................................................................................... 5 Optional Component Description .......................................................................6 Backup File Size ..........................................................
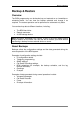
Backup & Restore Backup & Restore Overview The BCM programming can be backed up and restored on an immediate or scheduled basis. You can view the backup schedule and change it as required. The restore operation can be performed on a demand only basis. You can back up data to different locations, including: The BCM hard drive. Remote resources. A USB storage device. Note: Whichever destination you choose, a copy of the most recent backup always remains on the BCM.
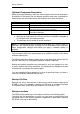
Backup & Restore Optional Component Description When performing a backup, there are various options that can be selected or de-selected. If the backup file and backup operation time are a consideration, these options can be omitted during the backup to save time and space. Attribute Call Detail Recording CallPilot Configuration CallPilot Messages IP Music Description Includes CDR logs containing call information. Includes Voicemail and Contact Centre information.
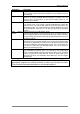
Backup & Restore Destination BCM My Computer Network Folder USB Device Storage FTP Server SFTP Server Description For an immediate backup, saves data to the hard drive of the BCM, You cannot specify a path. Each backup rewrites any pre-existing backup of the same type. For an immediate backup, saves data to any accessible location on the client PC on which the BCM Element Manager is installed. You can specify a name for the backup, so that the pre-existing backup is not automatically overwritten.
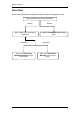
Backup & Restore Flow Chart Use the flow chart below to determine which sections of the guide to use. Which operation do you wish to perform? Backup Will the Backup be Immediate or Scheduled? Immediate Refer to the Performing Immediate Backups section of this guide. 8 Restore Refer to the Restore section of this guide. Scheduled Refer to the Scheduled Backups section of this guide. NN40011-029 Issue 1.2 BCM Rls 6.
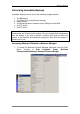
Backup & Restore Performing Immediate Backups Immediate backups can be sent to the following storage locations: The BCM itself. The Client PC running Element Manager. Network folder. A USB storage device inserted into the USB port of the BCM. An FTP server. A SFTP sever. Note: A backup operation will interrupt CallPilot services if CallPilot Components are included in the backup.
Backup & Restore 2. Alternatively, double-click on the Business Element Manager desktop icon. 3. You will be presented with the Element Manager interface. 4. Open the Network Elements folder and select the IP Address of the BCM. 5. Enter the User Name of the BCM in the User Name field, by default this is nnadmin. Then enter the Password in the Password field, by default the password is PlsChgMe!. Click the Connect button. 10 NN40011-029 Issue 1.2 BCM Rls 6.
Backup & Restore 6. A warning screen will appear, read the warning and click OK. 7. You will be presented with the Element Manager interface. NN40011-029 Issue 1.2 BCM Rls 6.
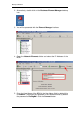
Backup & Restore 8. Select the Administration tab, open the Backup and Restore folder, and then click Backup. 9. The Backup panel opens and displays the Immediate Backup tab. Backup to the BCM Note: This is the least safe location to store a backup, should the BCM hard drive become corrupt; your backup will be lost. 1. In the Backup To selection field, choose BCM. 12 NN40011-029 Issue 1.2 BCM Rls 6.
Backup & Restore 2. Click the Backup button. The Backup window appears. 3. In the Optional Components table, select or clear the check box for Call Detail Recording, CallPilot configuration, CallPilot Messages, or IP Music to include or exclude these components from the backup operation. Click the OK button to proceed. Note: Including some of these options in the backup may cause service interruptions. 4. Then click Yes to perform the backup. NN40011-029 Issue 1.2 BCM Rls 6.
Backup & Restore 5. A progress window opens. 6. When the backup is complete, the Backup Complete message appears Click the OK button. Backup to Personal Computer 1. Select the Administration tab, open the Backup and Restore folder, and then click Backup. 2. The Backup panel opens and displays the Immediate Backup tab. 14 NN40011-029 Issue 1.2 BCM Rls 6.
Backup & Restore 3. In the Backup To selection field, select My Computer. 4. Click the Backup button. The Backup window opens. 5. In the Optional Components table, select or clear the check box for Call Detail Recording, CallPilot configuration, CallPilot Messages, or IP Music to include or exclude these components from the backup operation. Click the OK button to proceed. Note: including some of these options in the backup may cause service interruptions. NN40011-029 Issue 1.2 BCM Rls 6.
Backup & Restore 7. Then click Yes to proceed. 6. When the Backup files are ready to be transferred, a Browse window appears prompting for a location on your computer. Select a location, enter a file name, and click Save. 16 NN40011-029 Issue 1.2 BCM Rls 6.
Backup & Restore 7. A progress window opens. When the backup is complete, the Backup Complete message appears. Click the OK button. Backup to Network Folder Note: Ensure that the target location is a shared file on a networked PC The Shared file should have full read/write permissions. For example: 1. Select the Administration tab, open the Backup and Restore folder, and then click Backup. 2. The Backup panel opens and displays the Immediate Backup tab. 3.
Backup & Restore Attribute Network Folder User Name Password Directory Action Enter the hostname or IP address of the network folder and the resource name. For example, enter \\\. Enter the user name associated with the network folder. Enter the password associated with the network folder. Enter the path to the subdirectory (optional). 5. Click the Backup button. The Backup window opens. 6.
Backup & Restore 8. A progress window opens. When the backup is complete, the Backup Complete message appears Click the OK button. Backup to a USB Storage Device 1. Insert a USB storage device into the USB slot on the front of the BCM. 2. Select the Administration tab, open the Backup and Restore folder, and then click Backup. The Backup panel opens and displays the Immediate Backup tab. 3. Select USB Storage Device from the Backup to dropdown box. 4. Click the Backup button. The Backup window opens.
Backup & Restore 5. In the Optional Components table, select or clear the check box for Call Detail Recording, CallPilot configuration, CallPilot Messages, or IP Music to include or exclude these components from the backup operation. Click the OK button to proceed. Note: including some of these options in the backup may cause service interruptions. 6. Then click Yes to perform the backup. 20 NN40011-029 Issue 1.2 BCM Rls 6.
Backup & Restore 7. A progress window opens. When the backup is complete, the Backup Complete message appears. Click the OK button. Backup to FTP Server 1. Select the Administration tab, open the Backup and Restore folder, and then click Backup. The Backup panel opens and displays the Immediate Backup tab. 2. Select FTP Server from the Backup to dropdown box. NN40011-029 Issue 1.2 BCM Rls 6.
Backup & Restore 3. Configure the FTP Server attributes. Attribute FTP Server User Name Password Directory Action Enter the hostname or IP address of the FTP server. Enter the user name associated with the FTP server. Enter the password associated with the FTP server. Enter the path to the subdirectory (optional). 4. Click the Backup button. The Backup window opens. 5.
Backup & Restore 6. Then click Yes to perform the backup. 7. A progress window opens. When the backup is complete, the Backup Complete message appears. Click the OK button. Backup to SFTP Server 1. Select the Administration tab, open the Backup and Restore folder, and then click Backup. The Backup panel opens and displays the Immediate Backup tab. NN40011-029 Issue 1.2 BCM Rls 6.
Backup & Restore 2. Select SFTP Server from the Backup to dropdown box. 3. Configure the SFTP Server attributes. Attribute SFTP Server User Name Password Directory Action Enter the hostname or IP address of the SFTP server. Enter the user name associated with the SFTP server. Enter the Password associated with the SFTP server. Enter the path to the subdirectory (optional). 4. Click the Backup button. The Backup window opens. 24 NN40011-029 Issue 1.2 BCM Rls 6.
Backup & Restore 5. In the Optional Components table, select or clear the check box for Call Detail Recording, CallPilot configuration, CallPilot Messages, or IP Music to include or exclude these components from the backup operation. Click the OK button to proceed. Note: including some of these options in the backup may cause service interruptions. 6. Then click Yes to perform the backup. NN40011-029 Issue 1.2 BCM Rls 6.
Backup & Restore 8. A progress window opens. When the backup is complete, the Backup Complete message appears. Click the OK button. Scheduled Backups You can create scheduled backups in order to perform backups at a date and time that you choose. For example, you can choose a date and time during which the business is closed. This will avoid disrupting the normal work-day routine and may allow your backup file to transfer more quickly.
Backup & Restore Performing a Scheduled Backup 1. Select the Administration tab, open the Backup folder, and then click Backup. The Backup panel opens and displays the Immediate Backup tab. 2. Click the Scheduled Backups tab. 3. The Scheduled Backups panel opens. Click the Add button. 4. The Add Scheduled Backup window opens. Select the required backup type and click the OK button. 5. The Add Scheduled Backup window opens. Enter any specific location details.
Backup & Restore 6. In the Optional Components table, select or clear the check box for Call Detail Recording, CallPilot configuration, CallPilot Messages, or IP Music to include or exclude these components from the backup operation. 7. Next, configure the Schedule Recurrence and additional details, which determine when the backup operations will be performed. Click OK when finished. 28 NN40011-029 Issue 1.2 BCM Rls 6.
Backup & Restore 8. You now have the option of verifying the connection details, dependant on the backup location. Click Test Connection to verify the backup location, or Continue to bypass this operation. 9. The results of the connection test will be displayed. If the test has failed, re-enter the location details entered earlier. 10.
Backup & Restore Files without the timestamp will appear as follows: Files with a timestamp appear as follows: Note: This option is also available on the BCM Logs. Restore You can restore the BCM data using Element Manager. The restore software determines compatibility with the backup file. Incompatible backups cannot be restored at all. Note: Compatible backups may have incompatible sub-components which must be excluded from a Restore operation.
Backup & Restore Restore Options You can select the components for which you want to restore configuration or application data. Optional components You can restore configuration or application data for the following optional components: Activity Reporter. Alarm Settings. Auto Administration Manager. Call Data Recording. CallPilot Configuration. CallPilot Messages. Core Telephony. Data Services + Network interfaces. Date and Time. Doorphone. IP Music. IP Telephony. LAN CTE.
Backup & Restore Performing a Restore Use the following procedure to restore a previous configuration the BCM. 1. Select the Administration tab, open the Backup & Restore folder, and then click on Restore. 2. The Restore panel opens. In the Restore from drop down list, select one of the following to restore from: BCM. My Computer. Network Folder. FTP Server. SFTP Server. USB Storage Device. Factory Default (refer to the Restore to Factory Configuration section of this guide).
Backup & Restore 3. Select the location for the Backup file. You may need to enter further locations and security details so that the BCM can access the backup file. 4. The backup file detail box appears. If all details are correct, click OK. 5. The Select Components to Restore window opens. From the open window select the optional components that you want to include from the backup file. Click the OK button when ready. NN40011-029 Issue 1.2 BCM Rls 6.
Backup & Restore 6. A warning window opens and displays information about components that will be affected by the restore operation. If OK, click Yes to continue. 7. A progress window opens. When the operation is complete, the Restore complete window opens. Click the OK button. 8. The BCM will then reboot. To Restore the Factory Configuration Your BCM is delivered with a backup file that was created at the factory.
Backup & Restore 1. Click the Administration tab. Open the Backup and Restore folder, and then click Restore. 2. The Restore panel opens. 3. In the Restore from selection field, select Factory Default. 4. Click the Restore button. 5. The Backup File detail box appears. Click OK to continue. NN40011-029 Issue 1.2 BCM Rls 6.
Backup & Restore 6. The Select Components to Restore window opens. It is recommended that for this operation you leave all components selected. Alternatively, select the optional components that you want to include from the backup archive. Click the OK button when ready. 7. A warning window opens and displays information about components that will be affected by the restore operation. Click the Yes button to proceed. 36 NN40011-029 Issue 1.2 BCM Rls 6.
Backup & Restore 8. A progress window opens. When the operation is complete, the Restore complete window opens. Click the OK button. 9. The BCM will then reboot. NN40011-029 Issue 1.2 BCM Rls 6.
Backup & Restore Avaya Documentation Links 38 Administration and Security guide NN40011-029 Issue 1.2 BCM Rls 6.