
Installation Guide


Installing a Wallboard
Chapter 5
Installing the Wallboard 5-3
Installing the Wallboard 5
To install an external wallboard to use with BCMS Vu software, complete the
following tasks:
• Unpack the wallboard.
• Be sure that a converter box that converts the communication protocol from
RS-485 (the wallboard protocol) to RS-232 (the PC protocol) is included with
the wallboard.
• Be sure that the wallboard installation document is included with the wallboard.
• Connect the communications cable from the wallboard to the PC.
— If the serial port on the PC has 25 pins, use a DB25-to-RJ11 connection
cable.
— If the serial port on the PC has 9 pins, use a DB9-to-RJ11 connection cable.
For complete instructions on how to install Avaya wallboards, refer to the manuals
listed on the first page of this document.
For instructions on how to install other types of wallboards, refer to the user’s
manual that accompanies the wallboard.
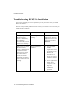
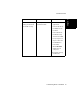
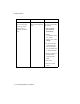
Note
Avaya wallboards are addressed using hexadecimal notation. You
address them using the remote control unit that comes with the
wallboards. Refer to the user’s guide that comes with the
wallboard.
However, when you enter a wallboard address in the BCMS Vu
configuration procedure, you must use decimal notation.
Furthermore, BCMS Vu accepts wallboard addresses only from 0 to
127 (decimal).
The table at the end of this chapter relates decimal addresses from
0 to 127 to corresponding hexadecimal addresses.