
Installation Guide


Installing the Data Module, Hardware Key, and Remote Maintenance Line
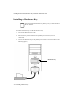
3-12 Installing the Data Module
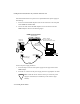
3. Insert the AC connector of the power supply unit into an appropriate AC outlet.
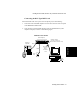
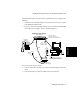
Installing an 8400B Plus Data Module without a
Telephone
3
The 8400B Plus options must be set with a terminal (715 BCS system
administration terminal) or PC with terminal emulation.
Windows NT 4.0 comes with HyperTerminal. To access it,
1. Click on Start/Programs/Accessories/Hyperterminal/HyperTerm.
2. Enter test in the “name” field.
3. Select OK.
4. Change “connect using” to direct to COM 1, COM 2, COM 3, and so forth,
depending on which COM Port you are using to connect to the data
module.
5. Select OK until you get a blank screen.
Issue the following commands:
Command Response
1. at OK (This indicates a good connection between the termi-
nal/PC and the 8400B Plus.)
2. at&f OK (This resets to factory default settings.)
3. ats24? 000 (Default setting.)
4. ats24=001 001 OK (This indicates that the option has been changed to
“without a voice telephone.”)
5. at&w0 OK (Options are stored in profile 0.)
6. at&y0 OK (Profile 0 is designated to be used in case the 8400B Plus
loses power.)
Caution
Be certain that the AC outlet to which you connect the power supply
is unswitched (not controlled by a wall switch or light dimmer).