
User Guide


Working with Reports
Chapter 7
Creating a Wallboard Display 7-21
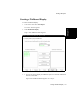
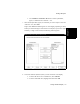
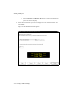
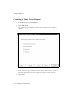
The display at the bottom of this wizard reflects the choice you made from the
pull-down menu on Page 5 of the wizard.
In the previous example, “Two Lines” was chosen on page 1 of the wizard. This
reflects the fact that the targeted extended wallboard is constructed to display
only two rows of text.
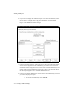
“Three line wallboard” was selected on page 5 of the wizard. This distributes
the reported data items over three lines of text. Since the external wallboard can
display only two rows of characters at a time, the three lines of the text must
alternate on the external wallboard. If “Fixed first line” is checked on page 5 of
the wizard, the first line of text (split/skill) always appears on the top row of the
wallboard and lines 2 and 3 of the text alternate on the second row.
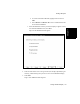
If “Display data on physical wallboard” was not checked on page 1 of the
wizard, the number of lines chosen on page 5 of the wizard appears in the black
window at the bottom of pages 5 and 6.
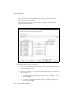
15. If you are satisfied with the settings you have specified, select Finish.
The Wallboard Properties Wizard closes and the Wallboard Display you have
just defined appears in the BCMS Vu main window.
The display also appears on the external wallboard if you selected the “Display
data on physical wallboard” checkbox on page 1 of the wizard.