
Configuration manual


Chapter 3 WAN and Dial Backup Setup 65
Nortel Business Secure Router 222 Configuration — Advanced
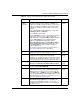
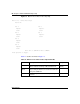
Network
Address
Translation
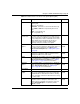
With Network Address Translation (NAT), you can
translate an Internet protocol address used within one
network (for example a private IP address used in a local
network) to a different IP address known within another
network (for example, a public IP address used on the
Internet).
Press [SPACE BAR] and then [ENTER] to select either
Full Feature, None or SUA Only.
Choose None to disable NAT.
Choose SUA Only if you have a single public IP address.
SUA (Single User Account) is a subset of NAT that
supports two types of mapping: Many-to-One and Server.
Choose Full Feature if you have multiple public IP
addresses. Full Feature mapping types include:
One-to-One, Many-to-One (SUA/PAT), Many-to-Many
Overload, Many- One-to-One and Server. When you
select Full Feature you must configure at least one
address mapping set!
See Chapter 9, “Network Address Translation (NAT),” on
page 107 for a full discussion on this feature.
None
(default)
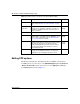
Metric Enter a number from 1 to 15 to set this route’s priority. The
smaller the number, the higher priority the route has.
15
(default)
Private This parameter determines if the Business Secure Router
includes the route to this remote node in its RIP
broadcasts. If set to Yes, this route is kept private and not
included in RIP broadcasts. If No, the route to this remote
node is propagated to other hosts through RIP broadcasts.
No
(default)
RIP Direction Press [SPACE BAR] and then [ENTER] to select the RIP
direction from Both/ None/In Only/Out Only and None.
Both
(default)
Version Press [SPACE BAR] and then [ENTER] to select the RIP
version from RIP-1/RIP-2B/RIP-2M.
RIP-1
Multicast IGMP (Internet Group Multicast Protocol) is a
network-layer protocol used to establish membership in a
Multicast group. The Business Secure Router supports
both IGMP version 1 (IGMP-v1) and version 2 (IGMP-v2).
Press the [SPACE BAR] to enable IP Multicasting or select
None to disable it. See Chapter 4, “LAN setup,” on page
71 for more information on this feature.
None
(default)
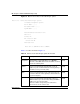
Once you have completed filling in Menu 11.2.2 Remote
Node Network Layer Options, press [ENTER] at the
message “Press ENTER to Confirm...” to save your
configuration and return to menu 11.2, or press [ESC] at
any time to cancel.
Table 11 Remote node network layer options menu fields
Field Description Example