DEFINITY® Business Communications System and GuestWorks™ server Issue 3.
Copyright 1997, Lucent Technologies All Rights Reserved Printed in U.S.A. Notice Every effort was made to ensure that the information in this book was complete and accurate at the time of printing. However, information is subject to change. Your Responsibility for Your System’s Security Toll fraud is the unauthorized use of your telecommunications system by an unauthorized party, for example, persons other than your company’s employees, agents, subcontractors, or persons working on your company’s behalf.
Contents ■ ■ ■ About This Document 1 Reasons for Reissue 1 Assumptions 2 Conventions 2 Related Documents 4 Basic Operation 5 Console Layout 5 Status Lamps 9 Call Purpose Indicators 10 Administrable Features 12 Activate the Console 13 Deactivate the Console 13 Answer Calls 14 Make Calls 15 Forced Release 18 Split Calls 19 Split Swap 20 Auto Start and Don’t Split 24 Class of Restriction 25 Night Service 26 Feature Operation 27 Attendant Backup 27 Busy Verificatio
Contents ii Issue 2 Conference 33 Crisis Alert 34 Emergency Access to Attendant 36 Hold 37 Integrated Directory 38 Intrusion 40 Loudspeaker Paging 42 Override 44 Recall 46 Serial Calling 47 Transfer 49 Trunk Identification 52 April 1997
Console Operations About This Document This document contains basic telephony procedures for using the DEFINITY® Business Communications System and GuestWorks™ server attendant console. These procedures are done by the attendants or front desk personnel. All office staff personnel that operate the attendant console or do console operations at a backup voice terminal should be familiar with these procedures.
Assumptions Assumptions It is assumed throughout this document that the hotel staff is familiar with the basic operation of telephones, voice terminals, and attendant consoles. If your staff has access to a multimedia personal computer, there is training available on CD-ROM for basic console and voice terminal operations.
About This Document ■ Messages appearing on the display are shown as follows: a= CONFERENCE 2 rc When the display examples show a value within “arrows” (< >), this represents a variable that will differ for each example. ■ The term “attendant console” signifies the Model 302B, 302C, or PC console that is usually found at the front desk. The term “backup voice terminal” signifies either a Model 8410D or Model 8434 voice terminal with attendant-type feature buttons.
Related Documents ■ The following table lists the features described in this document. Ask your administrator for these codes and write them down in this table.
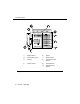
Basic Operation Basic Operation Console Layout The Attendant Consoles and DXS Selector Console are shown in Figure 1, Figure 2, and Figure 3. 1) Display Buttons 6) Display 2) Call Processing Area 7) Ringer Volume 3) Handset 8) Trunk Group Select Buttons 4) Handset Cradle 9) Feature Buttons 5) Lamp Test Switch 10) Call Appearance Buttons Figure 1.
Console Layout Ringer Select Volume Date Time Control Control Warning Warning Busy Busy Forced Release ABC DEF 1 2 3 GHI JKL MNO 4 5 6 PRQS TUV WXYZ 7 8 9 Night Pos Busy Calls Waiting Calls Waiting Warning Individual Calls Waiting Alarm Alarm Reported 0 Position Available Split Cancel Start Release a Hold b c d e f pha302c PDH 042497 1) Display Buttons 6) Display 2) Call Processing Area 7) Ringer Volume 3) Handset 8) Trunk Group Select Buttons 4) Ha
Basic Operation 11) DXS Hundreds Group Select Buttons 12) DXS/BLF Buttons Figure 3. DXS Selector Console The following list items correspond with the callouts shown in Figure 1, Figure 2, and Figure 3. All the feature buttons, trunk access buttons, and display buttons are on this console. The DXS Selector Console allows you to dial a room number and view the busy, occupied, and maid status for each room 1. Display Buttons — These eight buttons are used to control access to the alphanumeric display. 2.
Console Layout 4. Handset Cradle — This is where you place the handset when it is not in use. If you use a headset, the handset cradle can be removed from the console. 5. Lamp Test Switch — This is a switch under the front panel of the Model 302B console that allows you to test the console lamps. The test starts when you press the switch and stops when you release the switch. On the Model 302C console, you must simultaneously press and hold the Pos Busy and Volume Up buttons to test the console lamps.
Basic Operation 12. DXS/BLF Buttons — These are known as the direct extension select/busy lamp field (DXS/BLF) buttons. They are used with the hundreds group select buttons to place calls to guest rooms and to determine the status of guest rooms. Status Lamps The buttons on the console have status lamps associated with their use. These status lamps come on, go off, or flash as you use the console features. When the lamps come on, the feature is active. When the lamps go off, the feature is inactive.
Call Purpose Indicators The trunk group select buttons have three status lamps associated with each button. ■ Control — This lamp is on if the trunk group has controlled restrictions administered. ■ Warning — This lamp is on when some trunks are busy. Select an alternate trunk group if possible, or use this group if necessary. ■ Busy — This lamp is on when all the trunks in a trunk group are busy. You must select another trunk group or try again later.
Basic Operation ■ ld — Direct Inward Dialing (DID) Listed Directory Number (LDN) Call. Indicates that an incoming call came in on the LDN over a DID trunk. ■ rc — Recall Call. Indicates that a call being held on the console is requesting more help. ■ rt — Return Call. Indicates that a call transferred to another telephone or parked at an extension was not answered, and has returned to the console for processing. ■ s — Send All Calls.
Administrable Features Administrable Features Some of the features on the attendant console are administrable, which means that you may or may not be able to use the feature, depending on whether the server is administered for that feature. The administrable features include the following: 12 ■ Attendant Lockout — If Attendant Lockout is on, you cannot reenter a conference call.
Basic Operation Activate the Console To use the attendant console, you must first activate the console by doing the following: 1. Plug in the handset or the headset on either side of the console. 2. If the Night lamp is on, press the Night button. ■ The ■ The Position Available lamp goes on. Night lamp goes off. Deactivate the Console If you do not want anyone using the attendant console after hours, do the following to deactivate the attendant console: 1. Unplug the handset or the headset.
Answer Calls Answer Calls To answer calls from guest rooms or from callers outside of the hotel, do the following: 1. A call comes in to the console: ■ You hear a 1-burst repetitive ring. ■ The guest name (if available) and room number are displayed. If this is a call from outside your hotel, incoming trunk information is displayed. ■ The Position Available lamp goes off. ■ A call appearance lamp flashes. 2. Press the call appearance button where the lamp is flashing. ■ The ringing stops.
Basic Operation Make Calls You can make calls to rooms using the normal dial keypad or using the DXS selector console. To make outside calls, you can use the normal dial keypad or the trunk group select buttons. To make calls to rooms using the selector console, do the following (use room number 7062 as an example): 1. At the selector console, press the hundreds group select button that is marked 7000 . This button controls all rooms that start with 70. 2. Press the 62 button in the DXS/BLF button field.
Make Calls To make calls to rooms not using the selector console, do the following: 1. Press the Start button or an idle call appearance button. ■ You hear a dial tone. ■ The call appearance lamp goes on. ■ The Position Available lamp goes off. 2. Dial the room number. ■ You hear a ringback tone. ■ The display shows the dialed number. ■ The ringback tone stops when the called party answers. 3. To end the call, press the Release button. ■ You are disconnected from the call.
Basic Operation Making a call to an outside number requires an outgoing trunk. You can access an outgoing trunk in two different ways: ■ You can make a call to an outside number by dialing a code for the Automatic Route Selection feature or a specific trunk group, or ■ You can make a call to an outside number by pressing the trunk group select button for the desired trunk. NOTE: Trunk group select buttons are not available at some locations.
Forced Release 3. Listen for the call progress tones. If you hear: ■ Dial tone, this is a valid trunk access code. Continue with Step 4. ■ Busy or reorder tone, this indicates that there are no outgoing trunks available. Press the Cancel button and redial, or press the Release button and try again later. ■ Intercept tone, this is an invalid code. Press the Cancel button and redial, or press the Release button and try again later. 4. Dial the outside number, and listen for call progress tones.
Basic Operation Split Calls You can temporarily disconnect from a call, make a call to another person, and then connect the two people together. You must always split a call in order to transfer an incoming call to a guest room or to an outside number. Splitting allows you to do the following: ■ Either talk with the second person to announce the waiting call, or drop out of the call before the second person answers. ■ Connect the two calls together.
Split Swap While the calling person is split from the console, the Split lamp is on. The split condition is canceled, and the Split lamp goes off when you do one of the following: ■ Press the Release button to connect the split person to the called person and disconnect the console. ■ Press the Split button to establish a 3-way connection with you, the calling person, and the called person. ■ Press the Cancel button to cancel the outgoing call attempt, and reconnect to the calling person.
Basic Operation 2. Dial the number for the person to whom you may transfer the call. ■ You hear a ringback tone. ■ The display shows the number you are calling. 3. After the person answers, press the Split Swap between the original call and the new call. ■ button to alternate The Split Swap lamp goes on and will stay on as long as you alternate between calls. 4. Use one of the following steps, a, b, c, or d, to complete the call. a. To set up a 3-way connection, press the Split button.
Split Swap b. To transfer the call, press the Split button (this joins all three parties together), followed by the Release button. ■ You are disconnected from the call. ■ The ■ The call appearance lamp goes off. ■ The display goes blank. ■ The Position Available lamp goes on. ■ The console returns to the normal operating mode. Split lamp goes off. c. While alternating between calls using the Split Swap button, you may want to disconnect one of the calls.
Basic Operation d. While alternating between calls using the Split Swap button, you may want to place one of the calls on hold. Press the Hold button when you are connected with the caller you wish to place on hold. ■ The On Hold lamp at the call appearance button goes on. ■ The call appearance lamp goes off. ■ The active call is placed on hold. ■ The console is connected to the other caller. ■ The Split Swap lamp goes off. To disconnect the caller, press Release .
Auto Start and Don’t Split Auto Start and Don’t Split Auto Start is an administrable feature that allows you to initiate a phone call by pressing any button on the dial keypad. If you are on an active call and you dial digits on the keypad, the console automatically splits the call and begins dialing the next call. When the Auto Start feature is enabled, the Start button is disabled. To disable the Auto Start feature, use the Don’t Split feature.
Basic Operation Class of Restriction When guests request that you place long-distance or even local calls, you should check their assigned class of restriction (COR) before you complete the call. If they are not restricted from certain calls, you may complete the call for them. To check on a guest’s COR, do the following: 1. While on an active call, press the Class (COR) button.
Night Service Night Service The Night Service feature prevents calls from terminating at the attendant console. Calls to the attendant console enter the attendant call waiting queue and can be answered from the backup voice terminals or by hotel staff at other voice terminals using the Trunk Answer Any Station feature (see Page 27). To activate Night Service, do the following: 1.
Feature Operation Feature Operation This section contains user operation for features used from an attendant console or from a backup voice terminal. Attendant Backup The Attendant Backup feature allows you to access most attendant console features from one or more specially-administered multiappearance voice terminals. The recommended voice terminals are the Lucent Technologies Model 8410 and Model 8434.
Attendant Backup When the attendant console is in night mode (the Night lamp is on), all calls to the attendant console immediately beep at the backup voice terminals and the Queue Calls and the Queue Time lamps go on. You can then answer calls using the TAAS feature access code _____ or an automatic dialing button administered with that feature access code. The following is a typical scenario for answering overflow attendant console calls from a backup voice terminal: 1.
Feature Operation ■ Do Not Disturb Extension ■ Night Service (a terminal) ■ Busy indicators for the attendant console and the other backup voice terminals. Night button can be assigned on only one backup voice Busy Verification The Busy Verification feature allows attendants and backup voice terminal users to make test calls to see if a trunk is actually busy or out of service. To use the Busy Verification feature, do the following: 1.
Call Forwarding Call Forwarding There are two Call Forwarding features you can activate and cancel for any guest room: Call Forwarding - All Calls, and Call Forwarding - Busy/Don’t Answer. Call Forwarding - All Calls causes calls to a guest room to be forwarded immediately to a different telephone number. Call Forwarding - Busy/Don’t Answer causes calls to a guest room to be forwarded to a different telephone number only if no one answers or if the line is busy.
Feature Operation 4. Dial the number to which you want to forward calls (the forwarded-to number). Listen for call-progress tones: ■ Confirmation tone — Call Forwarding is activated. ■ Intercept tone — The feature cannot be activated because of restrictions assigned to the forwarding number or the forwarded-to number. 5. Press Release . ■ The call appearance lamp goes off. ■ The display goes blank. ■ The Position Available lamp goes on. ■ The Call Forwarding feature is now activated.
Call Park ■ The Position Available lamp goes on. ■ The console returns to the normal operating mode. Call Park The Call Park feature allows you to put a call on hold and then retrieve the call from any other voice terminal within the system. Calls can be parked using the attendant console or any voice terminal that does not have a “client room” COS. To use Call Park from the attendant console, do the following: 1. While on an active call, press the ■ You hear a dial tone.
Feature Operation Conference The Conference feature allows you to set up a conference call for up to six parties. To use the Attendant Conference feature, do the following: 1. While on an active call, press the ■ You hear a dial tone. ■ The Split Start button. lamp goes on. 2. Call the person you want to add to the conference. ■ You hear a ringback tone. 3. After contacting the new person, press the Split button. ■ All parties, including the console, are connected together.
Crisis Alert Crisis Alert The Crisis Alert feature provides a visual, audible, and printed record when guests or hotel staff place a call to the local emergency service agency. This gives hotel personnel the ability to assist emergency personnel when they arrive at the hotel by identifying where the call came from and when the call was made. Other than the emergency call, which can be placed from any telephone on the server, all user operation occurs at the attendant console. 1.
Feature Operation 4. Write down the emergency information displayed on the console. Follow your local procedures for handling emergencies. Even though the console is set to “position busy,” you can place calls to assist with the emergency. 5. Press the ■ The button a second time. Crisis Alert Crisis Alert lamp stops flashing, but remains on. 6. When you are finished handling the emergency, press the button a third time. ■ The ■ The display goes blank. 7.
Emergency Access to Attendant Emergency Access to Attendant The server is administered to provide guests an emergency access to the attendant by either taking the handset off-hook or by dialing a feature access code. It works as follows: 1. A guest in a room takes the handset off-hook or dials the feature access code. ■ If the guest took the handset off-hook, the call automatically rings at the attendant console after a predetermined amount of time (usually 10 seconds after dial tone times out).
Feature Operation Hold You can place callers on hold to answer other calls or to find information for the caller. You can have a call on hold at each of the six call appearances. To place a call on hold, do the following: 1. While on an active call, press the Hold button. ■ The On Hold lamp at the call appearance button goes on. ■ The call appearance lamp goes off. ■ The display goes blank. ■ The Position Available lamp goes on. ■ The console returns to the normal operating mode.
Integrated Directory 2. To end the call, press the Release button. ■ You are disconnected from the call. ■ The call appearance lamp goes off. ■ The display goes blank. ■ The Position Available lamp goes on. ■ The console returns to the normal operating mode. NOTE: When the On Hold lamp flashes, it indicates that the hold time has expired. When this happens, the console also beeps to indicate that a call needs attention. Press the call appearance button and answer the call.
Feature Operation 2. Dial the keypad digits that correspond to the letters used to spell the name of the person you want to locate. You can use either of the formats listed below: ■ Last name, first name (for example, Grimaldi, Damian; use instead of the comma) ■ Single name of an organization or group (for example, housekeeping). * NOTE: When you dial the keypad digit for the first letter of a name, the first name that matches that letter displays on the console or display telephone.
Intrusion Intrusion The Intrusion feature enables you to interrupt a guest’s call to deliver an urgent message or telephone call. To interrupt a guest to deliver an urgent message, do the following: 1. Press the Start button or an idle call appearance button. ■ You hear a dial tone. ■ The call appearance lamp goes on. ■ The Position Available lamp goes off. 2. Dial the guest’s room number. ■ You hear ringback tone, busy tone, or Call Waiting tone. 3.
Feature Operation To interrupt a guest to transfer a call, do the following: 1. Transfer the call to the guest’s room number as described in the Transfer section on Page 49. 2. If you hear a busy tone or a Call Waiting tone, press the Intrusn button. ■ You are connected to the call. ■ The people on the call may hear an intrusion tone, depending on how the server is administered. 3. Announce the incoming call. 4. Press the Release button.
Loudspeaker Paging ■ An attendant attempts to intrude on a call on a station that is a forward-to point of another station. ■ An attendant attempts to intrude on a busy station, where the station is talking to another attendant. Loudspeaker Paging The Loudspeaker Paging feature allows you to access loudspeaker paging equipment. Nine paging zones and a paging zone to activate all paging zones at the same time can be provided.
Feature Operation To use Loudspeaker Paging with trunk access codes, do the following: 1. Press the Start button or an idle call appearance button. ■ You hear a dial tone. ■ The call appearance lamp goes on. ■ The Position Available lamp goes off. 2. Dial the trunk access code for the zone you wish to page. ■ If you hear confirmation tone, continue with Step 3. ■ If you hear busy tone, the zone is not available; press try again later. Cancel and 3.
Override Override The Attendant Override of Diversion feature allows you to bypass these features: ■ Call Forwarding When the attendant calls a guest that has Call Forwarding active, the call rings at the guest’s telephone and is not forwarded. ■ Call Coverage When the attendant calls a guest that has an assigned Call Coverage path, the call rings at the guest’s telephone and does not follow the Call Coverage path.
Feature Operation 3. Dial the room number. ■ You hear a ringback tone. ■ The display shows the dialed number. ■ The Ovrride lamp goes off. 4. To end the call, press the Release button. ■ You are disconnected from the call. ■ The call appearance lamp goes off. ■ The display goes blank. ■ The Position Available lamp goes on. ■ The console returns to the normal operating mode.
Recall Recall The Attendant Recall feature allows callers, who are part of a conference or two-party call being held on the console, to recall the attendant for assistance. You should treat this as you would treat any other incoming call. Users at single-line analog telephones must press the Recall button or flash the switchhook to recall the attendant. Users at multiappearance voice terminals must press the Conf or Transfer button to recall the attendant.
Feature Operation Serial Calling The Serial Calling feature allows incoming trunk calls that you have transferred to a guest room to automatically recall the console after the guest hangs up. You can then transfer the call to another guest room. To use the Serial Calling feature, do the following: 1. Answer the call the same way you would answer any other incoming call. 2. Press the ■ Serial Call The 3. Press the Serial Call Start button. lamp goes on. button. ■ You hear a dial tone.
Serial Calling 6. When the called person hangs up on the calling person, the calling person is automatically routed back to the console. ■ You hear a 1-burst repetitive ring. ■ The display identifies the incoming call as a serial call: a= co to front desk ■ The Position Available lamp goes off. ■ The call appearance lamp flashes. sc 7. Answer the recall. ■ You are reconnected to the caller. ■ The call appearance lamp stops flashing, but remains on. ■ The Serial Call lamp goes on. 8.
Feature Operation Transfer ! SECURITY ALERT: Social Engineering — “Social Engineering” is a con game that hackers frequently use. It is sometimes referred to as “Operator Deceit.” The success of this con requires gullibility or laxity on the part of the operator or employee, of which the hacker takes full advantage. For example, hackers call an employee, claim to have the wrong extension number, and ask to be transferred back to the operator. To the operator, the call appears to be an internal call.
Transfer To transfer a call, do the following: 1. Answer the incoming call. Tell the calling person that you are going to transfer their call. 2. Press the Start button. ■ You hear a dial tone. ■ The Split lamp goes on. 3. Dial the number for the person to whom you want to transfer the call. ■ You hear a ringback tone. ■ The display shows the room number you are calling. 4. Use one of the following steps, a, b, c, or d, to complete the call. a. To transfer the call, press the starts ringing.
Feature Operation ■ The display goes blank. ■ The Position Available lamp goes on. ■ The console returns to the normal operating mode. c. If the called person does not want to talk to the calling person, does not answer, or the number is busy, press the Cancel button. ■ The outgoing call is canceled. ■ The call progress tone stops. ■ The console is connected to the original call. ■ The Split lamp goes off. Explain to the calling person that the called person is not available.
Trunk Identification ■ The call appearance lamp goes off. ■ The display goes blank. ■ The Position Available lamp goes on. ■ The console returns to the normal operating mode. Trunk Identification The Trunk Identification feature allows you to use the attendant console or a backup voice terminal to identify a specific trunk being used on any trunk call, incoming or outgoing.
Index Numerics D 302B Attendant Console, 5 302C Attendant Console, 6 Deactivate the Console, 13 Directory, 38 Display Languages, 12 Don’t Split, 24 A About This Document, 1 Activate the Console, 13 Administrable Features, 12 Alarms, 9 Answer Calls, 14 Assumptions, 2 Attendant Auto Start, 12 Attendant Backup, 27 Attendant Crisis Alert, 34 Attendant Lockout, 12 Auto Answer, 12 Auto Start, 24 E Emergency Access to Attendant, 36 F Feature Access Codes, 4 Forced Release, 18 H B Hold, 37 Basic Operation
Index M T Make Calls, 15 Test Switch, 8 Transfer, 49 Trunk Group Select Button, 17 Trunk Identification, 52 N Night Service, 26 O Override, 44 P Paging, 42 R Reasons for Reissue, 1 Recall, 46 Related Documents, 4 Release, 18 S Security, 49 Selector Console, 7, 15 Serial Calling, 47 Split Calls, 19 Split Swap, 20 Status Lamps, 9 54 Issue 2 April 1997