DEFINITY® Network Management Release 4.
DNM-NT/Windows 2000 4.
DNM-NT/Windows 2000 4.
DNM-NT/Windows 2000 4.
DNM-NT/Windows 2000 4.0 Installation and Getting Started Resources and Notices 0 December 2001 Page 5 Introduction This chapter contains resources and notices that are pertinent to the DEFINITY Network Management (DNM) products. Avaya Resources Avaya provides customers with a variety of planning, consulting, and technical services. The client executives are the customers’ primary source to obtain information and explore custom options to meet their specific business needs.
DNM-NT/Windows 2000 4.0 Installation and Getting Started Resources and Notices Sales and Design Support Center (SDSC) December 2001 Page 6 Sales and Design Support Center (SDSC) The Sales and Design Support Center (SDSC) works with customers and client teams to develop detailed solutions for connectivity to the DEFINITY system and other supported systems. The SDSC also designs network configurations to support DNM and DPA.
DNM-NT/Windows 2000 4.0 Installation and Getting Started Resources and Notices Technical Services Center (TSC) December 2001 Page 7 Technical Services Center (TSC) The Technical Services Center (TSC) provides support for DNM and DPA to client teams, field technicians, and customers.
DNM-NT/Windows 2000 4.0 Installation and Getting Started December 2001 Page 8 Resources and Notices References References This section contains references to web sites, phone numbers, and email addresses for Avaya and third-party vendors. The contact information is listed in the sections below: • "Avaya References" on page 9 • "Vendor References" on page 12 Customers can access web sites that are outside the Avaya fire wall.
DNM-NT/Windows 2000 4.0 Installation and Getting Started December 2001 Page 9 Resources and Notices Avaya References Avaya References The table below contains Avaya web sites, phone numbers, and email addresses for various sources. Some of the web sites are inside the fire wall and are not accessible to customers. Table 1.
DNM-NT/Windows 2000 4.0 Installation and Getting Started December 2001 Page 10 Resources and Notices Avaya References Table 1. Avaya resource sites Source Web Sites Sales and Design Support Center (SDSC) Phone: 1-888-297-4700, prompt 6 Main web site (requires a password) http://sdsc.avaya.com Technical Services Center (TSC) Technical Support: 1-800-242-2121, ext. 4-1080 or 720-444-1080 Fax for PA001 form: 1-303-804-3367 Connectivity Guide: http://associate2.avaya.
DNM-NT/Windows 2000 4.0 Installation and Getting Started December 2001 Page 11 Resources and Notices Avaya References Table 2. Avaya resource sites INSIDE Firewall Source Web Sites Documentation and Training Information Development DNM 4.0 project web site: http://pubnet.avaya.com/Projects/DNM/ DEFINITY Enterprise Management Support http://aem-support.dr.avaya.com/ Project Provisioning Package http://aem-support.dr.avaya.
DNM-NT/Windows 2000 4.0 Installation and Getting Started December 2001 Page 12 Resources and Notices Vendor References Vendor References The table below contains the web sites for third-party vendors. Table 3. Vendor web sites Vendor Web Sites AIX AIX patches: http://techsupport.services.ibm.com/rs6000/support Computone I/O cards Main site: http://www.computone.com Equinox Main site: http://www.equinox.com Hewlett Packard Main site: http://www.hp.com OpenView site: http://www.openview.hp.
DNM-NT/Windows 2000 4.0 Installation and Getting Started December 2001 Page 13 Resources and Notices Vendor References Table 3. Vendor web sites Vendor Web Sites Sun Microsystems, Inc. Main site: http://www.sun.com Solutions site: http://sunsolve.sun.com Telamon TelAlert Main site: http://www.telamon.com Tivoli Main site: http://www.tivoli.com Versant Main site: http://www.versant.
DNM-NT/Windows 2000 4.0 Installation and Getting Started Resources and Notices System Security Notices December 2001 Page 14 System Security Notices Customers are solely responsible for the security of their system, network, and access to hardware and software. The sections below define the precautions that all customers should take to maintain the security of their systems.
DNM-NT/Windows 2000 4.0 Installation and Getting Started Resources and Notices Toll Fraud Security December 2001 Page 15 Toll Fraud Security Although DNM and DPA are generally not at risk for toll fraud, customers are solely responsible for the security of their entire telecommunications systems. Toll Fraud is the unauthorized use of a company’s telecommunications system by unauthorized parties.
DNM-NT/Windows 2000 4.0 Installation and Getting Started 1 Overview December 2001 Page 16 1 Introduction DEFINITY Network Managment (DNM) and DEFINITY Proxy Agent (DPA) provide a complete solution to manage network resources from a central point of entry. These products provide you with a view of the health and performance of your network systems.DNM and DPA work together as an integrated application. Software-only offer DNM and DPA are software-only offers.
DNM-NT/Windows 2000 4.0 Installation and Getting Started 1 Overview Product Description December 2001 Page 17 Product Description DEFINITY Proxy DPA is a protocol conversion resource. It resides on a stand-alone personal computer and Agent operates on the UnixWare operating system. DPA uses serial ports and TCP/IP ports to collect configuration and management data from supported systems. It converst the data into the Simple Network Management Protocol (SNMP).
DNM-NT/Windows 2000 4.0 Installation and Getting Started December 2001 Page 18 1 Overview Product Description DEFINITY Network Management DNM provides you with graphical and tabular tools to monitor the status and performance of a network of DEFINITY systems. The primary features of DNM include: • Graphical User Interface (GUI) -- The DNM main window contains a navigation tree that lists all the supported systems and displays a colored alert symbol that indicates highest exception level.
DNM-NT/Windows 2000 4.0 Installation and Getting Started December 2001 Page 19 1 Overview Product Description c Report Manager -- You can define the parameters for individual reports for all or selected systems. The report options include: – Performance – Board – Exceptions You can immediately view the reports on screen in both the table and chart formats or direct the output of reports to a printer, ASCII file, or an HTML file.
DNM-NT/Windows 2000 4.0 Installation and Getting Started December 2001 Page 20 1 Overview New Features New Features New features, improvements, and changes to DNM for Release 4.0 include: • DNM 4.
DNM-NT/Windows 2000 4.0 Installation and Getting Started December 2001 Page 21 1 Overview Network Configuration Scenarios Network Configuration Scenarios The figure below shows an example of the network configuration between a DEFINITY system, the DPA computer, and the NT/Windows 2000 on which DNM runs.
DNM-NT/Windows 2000 4.0 Installation and Getting Started December 2001 Page 22 1 Overview Network Configuration Scenarios The following figure shows an example of the network configuration over IP between a DEFINITY system and an NMS network server. 1 2 3 4 cynmpa15 LJK 080701 1 DEFINITY system with CLAN circuit pack 2 Internet connection (LAN or WAN) Figure 2.
DNM-NT/Windows 2000 4.0 Installation and Getting Started December 2001 Page 23 1 Overview Supported Systems Supported Systems DNM Release 4.0 supports both SNMP V2 set/get requests and SNMP V1 alarm traps for the systems listed below: • DEFINITY G3 Release 4.0 and DEFINITY ECS Releases 5.0 through 9.x • Survivable Remote Processors (SRPs) • Multipoint Conferencing Unit (MCU) Release 6.0. • IP600 • DEFINITY One DNM treats SRPs and MCUs as DEFINITY systems.
DNM-NT/Windows 2000 4.0 Installation and Getting Started December 2001 Page 24 1 Overview System Requirements System Requirements DNM 4.0 for NT/Windows 2000 operates on Microsoft Windows NT/Windows 2000 4.0 (Service Pack 4 and greater) and Windows 2000 systems. DNM 4.0 for NT/Windows 2000 operates with: • DEFINITY Proxy Agent Release 4.0 • Symantec pcAnywhere Release 9.2.
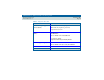
DNM-NT/Windows 2000 4.0 Installation and Getting Started 1 Overview DEFINITY Network Management CD-ROMs December 2001 Page 25 DEFINITY Network Management CD-ROMs Avaya delivers the product software and documentation to customers on two separate CD-ROMs, which are entitled: • DEFINITY Network Management for NT/Windows 2000 • DEFINITY Proxy Agent The contents of each of the CD-ROMs are listed below: DEFINITY Network Management Release 4.
DNM-NT/Windows 2000 4.0 Installation and Getting Started 2 Preparing to Install DNM December 2001 Page 26 2 Customer Pre-Installation Checklist Customers must complete all of the pre-installation tasks before DNM can be installed or upgraded. 1 Install or upgrade Windows NT/Windows 2000 platform. Refer to "System Requirements" on page 24 and the vendor documentation. (See also Understanding pcAnywhere Security) 2 Connect the DPA computer’s serial connection to the managed nodes.
DNM-NT/Windows 2000 4.0 Installation and Getting Started 2 Preparing to Install DNM Understanding pcAnywhere Security December 2001 Page 27 pcAnywhere. Having it installed does not pose a security risk; it must be up and running, and be configured to receive calls, before a remote user can enter the system. In addition, pcAnywhere offers a number of security features. Follow these guidelines to protect PCs with pcAnywhere installed: 1 Unplug the modem from the phone jack when pcAnywhere is not in use.
DNM-NT/Windows 2000 4.0 Installation and Getting Started 3 Installing DNM December 2001 Page 28 3 Introduction This chapter contains the procedures to install DEFINITY Network Management (DNM) Release 4.0 as a new or upgrade installation. User documentation The installation script for this release automatically copies DEFINITY Network Management for NT/Windows 2000 Installation and Getting Started to the doc subdirectory where the you installed DNM.
DNM-NT/Windows 2000 4.0 Installation and Getting Started December 2001 Page 29 3 Installing DNM Installation Checklist Installation Checklist Installers must complete the installation tasks in the order presented below. 1 Verify that the customer has completed the pre-installation tasks and installed the current release of the Windows NT/Windows 2000 platform. Refer to "Customer Pre-Installation Checklist" on page 26.
DNM-NT/Windows 2000 4.0 Installation and Getting Started 3 Installing DNM Technical Verification Checklist December 2001 Page 30 Technical Verification Checklist At the completion of the DNM installation, the engineer at the Technical Services Center (TSC) must complete the tasks below to insure that DEFINITY Proxy Agent (DPA) is properly administered and functioning: 1 Verify that the customer completed and faxed PA001 Administration Request form (Rev. 08/01) to the TSC.
DNM-NT/Windows 2000 4.0 Installation and Getting Started 3 Installing DNM Customer Acceptance Checklist December 2001 Page 31 Customer Acceptance Checklist At the completion of the DNM installation, the engineer at the TSC and the customer must complete the following tasks to insure the that customer can operate DPA and accepts the installation as “complete.” 1 Review the sections in Chapter 4, "System Administration" with the customer.
DNM-NT/Windows 2000 4.0 Installation and Getting Started December 2001 Page 32 3 Installing DNM Installing DNM Installing DNM This section contains the procedure to install a new DEFINITY Network Management 4.0 for NT/Windows 2000. The installation script simplifies the installation process and makes the installation of DNM more automatic.
DNM-NT/Windows 2000 4.0 Installation and Getting Started December 2001 Page 33 3 Installing DNM Starting the Installation Starting the Installation Complete the procedure below to install the new DEFINITY Network Management product on the Windows NT/Windows 2000 network server. 1 Start the installation in any of the following ways: • From CD-ROM autorun menu • From My Computer > CD-ROM > DNM > setup.exe • From Start > Run > enter your CD-ROM Drive:\DNM\setup.
DNM-NT/Windows 2000 4.0 Installation and Getting Started 3 Installing DNM Installing the Java Runtime Environment December 2001 Page 34 Installing the Java Runtime Environment 4 (If the Java Runtime Environment Installation component was not selected, skip to step 10) This will install Java™ Runtime Environment 1.1.7. Do you wish to continue? Click Yes 5 Java Runtime Environment 1.1.
DNM-NT/Windows 2000 4.
DNM-NT/Windows 2000 4.0 Installation and Getting Started 3 Installing DNM Installing the Java Versant Interface December 2001 Page 36 Installing the Java Versant Interface 15 (If the Java Versant Interface Installation component was not selected, skip to step 22) Warning dialog box During the following JVI installation, DNM requires these options be selected – Versant ODBMS Version = 5.2.2 – Process Model = 2p (default) – JDK Environment = JDK 1.
DNM-NT/Windows 2000 4.
DNM-NT/Windows 2000 4.0 Installation and Getting Started 3 Installing DNM Installing the DNM Component December 2001 Page 38 Installing the DNM Component 24 Choose Destination Location Screen Browse… - choose the directory for the DNM application files Click Next 25 Select Program Folder Screen Choose the Program Folder name for the DNM shortcuts on the Start menu. Click Next 26 Enter Information Screen (SNMP trap port) Enter the SNMP trap port number from the PA001 form.
DNM-NT/Windows 2000 4.
DNM-NT/Windows 2000 4.0 Installation and Getting Started 3 Installing DNM Adding DEFINITY Proxy Agents December 2001 Page 40 Adding DEFINITY Proxy Agents DNM collects configuration, fault, and performance data from DPA through SNMP. DNM requires you to enter the names of their DEFINITY Proxy Agents and administer the UDP port on which DNM will receive traps.
DNM-NT/Windows 2000 4.0 Installation and Getting Started December 2001 Page 41 3 Installing DNM Removing DNM Removing DNM This section contains the procedure to remove DEFINITY Network Management Release 4.0 for NT/Windows 2000 from the network server. Generally, the main reason to remove the software would be to restore data that has been lost or corrupted. Only the system administrator or root users should execute the procedure to remove DNM.
DNM-NT/Windows 2000 4.0 Installation and Getting Started 4 System Administration December 2001 Page 42 4 Introduction Only the system administrator should edit the files described in this section.
DNM-NT/Windows 2000 4.0 Installation and Getting Started December 2001 Page 43 4 System Administration System Commands System Commands System administrators can execute these commands. Start and Stop Commands The commands in the following table give the system administrator additional control of DNM background processes. Note: The Graphical User Interface (GUI) will shut down when background processes are stopped. Table 4.
DNM-NT/Windows 2000 4.0 Installation and Getting Started 4 System Administration System Health Commands December 2001 Page 44 System Health Commands Administrators and root users can print a process status to check the system health. Procedure From the Windows Command Prompt : 1 Type: cd %DNM% 2 Press: Enter 3 Type: dnmstatus 4 Press: Enter Result: Prints process status.
DNM-NT/Windows 2000 4.0 Installation and Getting Started 4 System Administration Backing Up and Restoring the Database December 2001 Page 45 Backing Up and Restoring the Database Only the system administrator should execute the procedure to backup and restore the database. Backup and Restore should only be started after DNM background processes have been stopped. You can execute the BackupDEF utility to backup the database during installation or at any time after the product is installed.
DNM-NT/Windows 2000 4.0 Installation and Getting Started December 2001 Page 46 4 System Administration Backup Backup Required materials You need the following materials and information: • System administrator login and password • File name or device name to back up the database Procedure Complete the procedure below to back up the database. 1 Close all windows and applications. 2 Optional. Hook up the archive device to back up the database.
DNM-NT/Windows 2000 4.0 Installation and Getting Started December 2001 Page 47 4 System Administration Restore Restore Required materials You need the following materials and information: • System administrator login and password • File name or device name to restore from the database Procedure Complete the procedure below to restore the database. 1 Close all windows and applications.
DNM-NT/Windows 2000 4.0 Installation and Getting Started 4 System Administration System Configuration Files December 2001 Page 48 System Configuration Files The list below contains files that the system administrator can edit to customize DNM. Any changes made to the files take effect when the system is restarted. ! CAUTION: System administrators should back up these files before they edit them. Validation is not trivial.
DNM-NT/Windows 2000 4.0 Installation and Getting Started 4 System Administration Administer the Alarm Notification December 2001 Page 49 Administer the Alarm Notification Only the system administrator should edit the scripts to enable the alarm notification features. Script directories The scripts reside in the "scripts" subdirectory of the DNM installation directory.
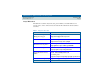
DNM-NT/Windows 2000 4.0 Installation and Getting Started December 2001 Page 50 4 System Administration Description of Alarm Notification Options Description of Alarm Notification Options The tables below outline the sample scripts available in DNM or from third-party vendors. These scripts are samples and will need to be customized for your environment. DNM options The table below contains the description of product options within DNM. Table 5.
DNM-NT/Windows 2000 4.0 Installation and Getting Started December 2001 Page 51 4 System Administration Description of Alarm Notification Options TelAlert options The table below contains the descriptions of the notification options in Telamon’s TelAlert product. See also Table 3 on page 12 Table 6. TelAlert notification options Option Description Alpha Page Pages the system administrator and sends a code that identifies the type of exception received from the managed system.
DNM-NT/Windows 2000 4.0 Installation and Getting Started December 2001 Page 52 4 System Administration Description of Alarm Notification Options Remedy ARS option The table below contains the description of the notification option in Remedy’s ARS product. The sample script only supports ticketing. The Remedy ARS product supports additional forms of alerting. See also Table 3 on page 12 Table 7.
DNM-NT/Windows 2000 4.0 Installation and Getting Started 4 System Administration DEFINITY_ARS Script December 2001 Page 53 DEFINITY_ARS Script DNM looks for the DEFINITY_ARS script when an exception event is created for DEFINITY and MCU managed nodes. Then DNM calls the script and passes the values listed below to the alarm notification program. If a value is not defined, then DNM assigns the alarm the string "NULL_ FIELD.
DNM-NT/Windows 2000 4.
DNM-NT/Windows 2000 4.0 Installation and Getting Started 5 Getting Started December 2001 Page 55 5 Introduction This chapter explains how to start DNM and access the online help for more information on how to use the product. To better view the graphics in this chapter, use your zoom tool. Most graphics are best viewed at 200%, but this may vary depending on your monitor screen size and resolution setting.
DNM-NT/Windows 2000 4.0 Installation and Getting Started 5 Getting Started DNM Graphical Overview DNM Graphical Overview Figure 3.
DNM-NT/Windows 2000 4.0 Installation and Getting Started 5 Getting Started Starting the DNM Client December 2001 Page 57 Starting the DNM Client To start DNM, choose Start > Programs > Avaya > DEFINITY Network Management from the Windows Start menu. Starting the Online Help The online help system replaces the user guide in DNM. Purpose of the Help system DNM’s online help system provides information you may find helpful when using DNM day-to-day.
DNM-NT/Windows 2000 4.
DNM-NT/Windows 2000 4.
DNM-NT/Windows 2000 4.
DNM-NT/Windows 2000 4.
DNM-NT/Windows 2000 4.