
User's Manual

DAP controller software 125
Procedure 42
Configuring the built-in DHCP server using the IP DECT Configurator
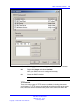
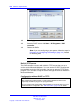
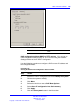
Network Settings Window
Step Action
1 Start the IP DECT Configurator and select Modify the system.
2 Choose the system to modify.
Note: If you are configuring a new system, follow the steps in
these procedures before setting up built-in DHCP server.
•
Procedure 46 “Launching the IP DECT Configurator”
(page 137)
• Procedure 47 “Adding a new system using the IP
DECT Configurator” (page 138)
• Procedure 51 “Configuring SIP Settings” (page 141)
3 Select the check box next to Run DHCP server on this PC.
4 Enter the DAP IP range, for example, 192.168.100.200-210.
5 Select the DAP IP Range exclusive for DAPs only.
6 Enter the Subnet Mask, for example, 255.255.255.0.
7 Enter the Default gateway, for example, 192.168.100.1.
8 Enter the TFTP IP address on the PC where the DAP controller
software is installed, for example, 192.168.100.10.
9 If it is necessary to assign manually IP addresses to the DAP,
click More.
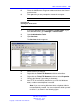
10 Enter MAC address of the DAP and the IP address assigned
to the DAP.
You can add DAPs to the list, delete DAPs from the list, or edit
the addresses.
11 Click Apply to save the changes or Close to exit.
Nortel Communication Server 1000
SIP DECT Fundamentals
NN43120-123 01.07
6 January 2009
Copyright © 2008-2009 Nortel Networks
.