Avaya Integrated Management Release 3.
Copyright 2005, Avaya Inc. All Rights Reserved Notice Every effort was made to ensure that the information in this document was complete and accurate at the time of printing. However, information is subject to change. Warranty Avaya Inc. provides a limited warranty on this product. Refer to your sales agreement to establish the terms of the limited warranty.
Electromagnetic Compatibility (EMC) Standards This product complies with and conforms to the following international EMC standards and all relevant national deviations: Limits and Methods of Measurement of Radio Interference of Information Technology Equipment, CISPR 22:1997, EN55022:1998, and AS/NZS 3548.
A plug and jack used to connect this equipment to the premises wiring and telephone network must comply with the applicable FCC Part 68 rules and requirements adopted by the ACTA. A compliant telephone cord and modular plug is provided with this product. It is designed to be connected to a compatible modular jack that is also compliant. It is recommended that repairs be performed by Avaya certified technicians. The equipment cannot be used on public coin phone service provided by the telephone company.
Contents Chapter 1: Introduction . . . . . . . . . . . . . . . . . . . . . . . . . . . 7 Purpose. . . . . . . . . . . . . . . . . . . . . . . . . . . . . . . . . . . . . . . . . 7 Prerequisites . . . . . . . . . . . . . . . . . . . . . . . . . . . . . . . . . . . . . . 7 Intended Audience. . . . . . . . . . . . . . . . . . . . . . . . . . . . . . . . . . . 7 Conventions Used in This Book . . . . . . . . . . . . . . . . . . . . . . . . . . . 8 Support Resources . . . . . . . . . . . . . . . . . .
Contents VoIP Monitoring Manager System Requirements . . . . . . . . . . . . . . . . . . 23 Ensuring Windows SNMP Service is Installed . . . . . . . . . . . . . . . . . . . . 26 Checking for Valid Community ID . . . . . . . . . . . . . . . . . . . . . . . . . . 27 Configuring the Avaya Communication Manager Administration Forms . . . . . Configuring the IP Network Region Form . . . . . . . . . . . . . . . . . . . . Configuring the System Parameters IP-Options Form . . . . . . . . . . . . .
Chapter 1: Introduction Purpose The purpose of this book is to provide the following information: ● Hardware and software requirements for Microsoft® Windows® servers and Windows client PCs. ● Pre-installation tasks that must be completed prior to installation. ● Procedures to install the products in the Avaya Integrated Management, Standard Management offer. If any of the products included in this offer are already installed on your system, those products will be upgraded during this installation.
Introduction Conventions Used in This Book The following typographical conventions are used: ● Bold type is used to indicate information that you type, buttons in a window, and the Enter key on the keyboard. It is also used for emphasis. ● Courier font is used for any information that the computer screen displays. ● Arrows indicate options that you select from cascading menus; for example, “Select File > Open” means choose the “Open” option from the “File” menu.
Support Resources The CSI Group consists of the following two teams: ● Converged Solutions Implementation Engineering The Converged Solutions Implementation Engineering (CSIE) team implements multi-site media gateway (G350/G650/G700) deployment projects for both voice and data design.
Introduction Customized Management Solutions for Avaya Integrated Management The Integrated Management Product Team understands customer’s needs and is focused on customer satisfaction. See Table 1: Customer-Accessible Resources on page 11 for contact information.
Support Resources Avaya Contact Information Table 1 and Table 2 provide contact information that you may use if you need assistance during the process of installing and setting up Avaya Integrated Management. To access the links in Table 2, you must be able to access the Avaya intranet. Table 1: Customer-Accessible Resources Resource Contact Information Avaya Support Center http://www.avaya.
Introduction Product Documentation The latest version of Avaya Integrated Management product documentation, including this book, is available from the Avaya Support Web Site. To view or download these books from the Web, you must have access to the Internet, an Internet browser, and Adobe Acrobat Reader, version 5.0 or later. Adobe Acrobat Reader is provided on the Avaya Integrated Management CDs and is also available from http://www.adobe.com.
Chapter 2: Overview Standard Management The Standard Management is a Windows solution for Avaya Integrated Management. It is designed for small-to-medium size networks that run Windows platforms. With this offer, you receive the following management tools: ● Avaya Site Administration Avaya Site Administration enables you to administer and manage Avaya voice systems and Avaya converged devices.
Overview 14 Avaya Integrated Management Standard Management Installation and Upgrade
Chapter 3: Avaya Site Administration Installation Overview of Avaya Site Administration Avaya Site Administration is a Windows application that enables you to ● administer and manage voice systems running Avaya Communication Manager software ● add, change, and remove mailboxes on messaging systems To simplify your day-to-day administration tasks (such as finding unused stations, changing users, and adding users), Avaya Site Administration provides several wizards.
Avaya Site Administration Installation 3. Carefully review Avaya Integrated Management Implementation Guidelines, document number 555-233-163. This document is available from the Avaya Support Web Site. (See How to Access Books on the Web on page 12.) This document describes server configuration requirements and provides pre-installation forms that must be completed before you begin installing the Avaya Integrated Management products.
Installing the Software Installing the Software The procedure to install or upgrade the contents of the Avaya Site Administration CD is generally the same. 1. Close all open windows and applications. 2. Insert the Avaya Integrated Management 3.0, Avaya Site Administration CD into the CD-ROM drive. The Avaya Integrated Management Avaya Site Administration 3.0 window appears. It provides a main menu. Note: Note: Install Acrobat Reader if it is not already installed on the computer. 3.
Avaya Site Administration Installation 9. Click the Finish button. 10. Remove the CD from the drive, and then click Exit. To run Avaya Site Administration, select Start>All Programs>Avaya>Site Administration, or double-click on the Site Administration icon on your desktop. For information on how to use Avaya Site Administration, access the online help. Note: Note: Regularly check the Avaya Support Web Site for software updates.
Chapter 4: VoIP Monitoring Manager Installation Overview of Avaya VoIP Monitoring Manager Avaya Voice Over IP (VoIP) Monitoring Manager is a VoIP Quality of Service (QoS) monitoring tool. It enables you to monitor and review the quality of a call on an Avaya VoIP Network. Avaya VoIP Monitoring Manager allows you to view QoS data experienced at the endpoints and during a session. This data displays in real-time or for previously active endpoints.
VoIP Monitoring Manager Installation VoIP Monitoring Manager also uses a database. During installation, the VoIP Monitoring Manager Integrated MSDE Database is installed by default. However, you can choose to install a different Microsoft SQL database. The components and their relationship are described in more detail in the following sections.
Pre-Installation Tasks ● Note: The Web server must be configured to publish the file to the following VoIP Monitoring Manager installation path: C:\Program Files\Avaya\VoIP Monitoring Manager\jars\ClientApplet.htm Note: The server installation will apply this configuration. If you run the Web client, you will not have access to some of the features—such as connecting to a new server — that are available in the application.
VoIP Monitoring Manager Installation 2. If you are upgrading from the previous release, check that all previous sequential upgrades and/or major releases of Avaya VoIP Monitoring Manager were installed before installing this release. If the wizard detects a software upgrade that is not sequential, the wizard will stop and display a message to install the skipped releases. The wizard will then abort the installation.
VoIP Monitoring Manager System Requirements VoIP Monitoring Manager System Requirements Table 4 and Table 5 provide the minimum system requirements to install and operate the VoIP Monitoring Manager Server and Client software.
VoIP Monitoring Manager Installation Table 4: VoIP Monitoring Manager Server Requirements (continued) Component Required Comments Extra Software Anti-virus software pcAnywhere Required for Avaya support. pcAnywhere is required for remote access by Avaya Services. Web Browser Internet Explorer 6.0 Required for access to the Integrated Management Launch Page and web-based clients. Integration with HP OpenView Network Node Manager HP OpenView 7.0.1 or HP OpenView 7.5. HP OpenView 7.
VoIP Monitoring Manager System Requirements Table 5: VoIP Monitoring Manager Client Requirements Component Required Comments Operating System Microsoft Windows 2000, Windows XP Professional, or Windows 2003. Only English operating systems are supported. Processor 600 MHz Pentium® Hard Drive 1 GB Memory 256 MB RAM Monitor SVGA 1024 X 768 display Network Connectivity TCP/IP 10/100 Network Card Modem 56K Modem CD-ROM Drive Web Browser May be required for remote access to the client PC.
VoIP Monitoring Manager Installation Ensuring Windows SNMP Service is Installed The Windows SNMP Service must be installed on the VoIP Monitoring Manager Server. The Windows SNMP Service enables the RTCP Monitor to publish the data and is required for the VoIP Monitoring Manager Server software to function. The Windows SNMP Service is provided on the Microsoft Windows operating system CD. It is not automatically installed when the Windows operating system is installed.
Checking for Valid Community ID Checking for Valid Community ID The Community ID assigned for your Windows SNMP Servicemust match the Community ID defined in the Server Options dialog box. By default, the Community ID with read-write privileges is private, but this may have been changed. Read-write privileges are required for loading, changing, and saving configuration options. To check for a valid Community ID, follow these steps: 1. Click Start > Settings > Control Panel. 2. Select Administrative Tools.
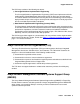
VoIP Monitoring Manager Installation Configuring the IP Network Region Form Figure 1 shows an IP Network Region form. To configure this form, follow these steps: 1. Set the RTCP Reporting Enabled? field to y (yes). 2. Set the Use Default Server Parameters? field to y (yes). This indicates that this network region uses the default values specified on the System Parameters IP-Optionsform. Figure 1: IP Network Region Form In some cases, you may not want to set the Default Parameters to yes.
Configuring the Avaya Communication Manager Administration Forms If multiple Servers are installed on the system then the endpoints in each network region can be configured to send their RTCP reports to different RTCP Monitors. Configuring the System Parameters IP-Options Form Figure 2 shows a Systems Parameters IP-Options form. To configure this form, locate the heading RTCP MONITOR SERVER and follow these steps: 1.
VoIP Monitoring Manager Installation VoIP Monitoring Manager CD The VoIP Monitoring Manager CD contains the following applications: Note: ● VoIP Monitoring Manager Client (90-day trial version) ● VoIP Monitoring Manager Server (90-day trial version) ● WebLM License Server (optional component required when multiple VoIP Monitoring Manager servers are installed) ● Adobe Acrobat Reader (required to view documents) Note: The VoIP Monitoring Manager Server software must be installed on a machine connec
Installing the Software To uninstall MSDE, follow these steps: 1. Click Start > Settings > Control Panel. 2. Select Add or Remove Programs. 3. Click Microsoft SQL Server Desktop Engine. 4. Click the Remove button. Installing the Software Use this procedure to install VoIP Monitoring Manager Server, VoIP Monitoring Manager Client, and WebLM Server on the Windows server. The procedure to install or upgrade Avaya VoIP Monitoring Manager is generally the same.
VoIP Monitoring Manager Installation 7. Read the license agreement. If you accept the license agreement, click the I accept the terms of the license agreement option button, and then click the Next button. Note: Note: You cannot install VoIP Monitoring Manager unless you accept the license agreement. The Choose Destination Location dialog box appears. By default, the application will be installed in c:\Program Files\Avaya. 8.
Installing the Software 11. Enter the number of the RTCP Listen Port, and then click the Next button. Note: Note: The RTCP Listen Port must be the same as that administered on the Avaya Communication Manager Server. The default is 5005. See Configuring the Avaya Communication Manager Administration Forms on page 27. The Install New Database or Use an Existing Database dialog box appears. 12.
VoIP Monitoring Manager Installation 4. Enter the MSDE Administrator password, confirm the password, and then click the Next button. Note: Note: After you set the MSDE Administrator password, make a note of it in a secure location. Do not change the MSDE Administrator login provided. ● If you are installing the WebLM License Server, the Enter WebLM Port Information dialog box appears. Go to Step 5.
Installing the Software 10. Enter the Network Domain, Server Name, and Administrator’s e-mail address. By default, Apache HTTP server programs and short cuts will be installed for all users. Choose to install only for current user if desired. Note: Note: Network Domain, Server Name, and Administrator’s e-mail fields must be completed. The Administrator’s e-mail address allows the system to notify the administrator if problems occur during the Apache installation. 11. Click the Next button.
VoIP Monitoring Manager Installation 17. Perform one of the following steps: ● To install the files in the default folder, click the Next button. ● To change the folder where the files will be installed, click the Change button, specify the folder you want to use, and then click the Next button. The Browser Registration dialog box appears. 18. Click the Install button. The installation status bar for Java appears. When the installation is complete, the InstallShield Wizard Completed dialog box appears.
Installing the Software 28. Click the OK button. The installation status bar appears. When the installation is complete, the InstallShield Wizard Complete dialog box appears. 29. Click the Finish button to restart the server. You can access VoIP Monitoring Manager by selecting Start > Programs > Avaya > VoIP Monitoring Manager. For more information about VoIP Monitoring Manager, access the online help after you start the application.
VoIP Monitoring Manager Installation ● If you are not installing the WebLM License Server, the Enter WebLM Server Information dialog box appears. Perform one of the following steps: - If you have licenses to activate VoIP Monitoring Manager beyond the 90-day trial period, enter the IP address of the server on which the WebLM License Server application is installed, and then click the Next button. The Enter WebLM Port Information dialog box appears. Go to Step 5.
Installing the Software 13. Enter the Network Domain, Server Name, and Administrator’s e-mail address. By default, Apache HTTP server programs and short cuts will be installed for all users. Choose to install only for current user if desired. Note: Note: Network Domain, Server Name, and Administrator’s e-mail fields must be completed. The Administrator’s e-mail address allows the system to notify the administrator if problems occur during the Apache installation. 14. Click the Next button.
VoIP Monitoring Manager Installation 20. Perform one of the following steps: ● To install the files in the default folder, click the Next button. ● To change the folder where the files will be installed, click the Change button, specify the folder you want to use, and then click the Next button. The Browser Registration dialog box appears. 21. Click the Install button. The installation status bar for Java appears. When the installation is complete, the InstallShield Wizard Completed dialog box appears.
Installing the Software 3. Based on whether the database is installed on this server or another server, go to one of the following sections: ● If the database is installed on this machine, go to Database is Installed on This Machine on page 41. ● If the database is installed on another machine, go to Database is Installed on Another Machine on page 44. Database is Installed on This Machine Use this procedure if the database you are using is installed on this server. 1.
VoIP Monitoring Manager Installation ● If no, select No, it has existing VoIP data, and click the Next button. The Upgrade Existing Database on Local Machine dialog box appears. Back up the existing database as recommended. After the database is backed up, click the Next button. ● If you are installing the WebLM License Server, the Enter WebLM Port Information dialog box appears. Go to Step 4. ● If you are not installing the WebLM License Server, the Enter WebLM Server Information dialog box appears.
Installing the Software 9. Enter the Network Domain, Server Name, and Administrator’s e-mail address. By default, Apache HTTP server programs and short cuts will be installed for all users. Choose to install only for current user if desired. Note: Note: Network Domain, Server Name, and Administrator’s e-mail fields must be completed. The Administrator’s e-mail address allows the system to notify the administrator if problems occur during the Apache installation. 10. Click the Next button.
VoIP Monitoring Manager Installation 16. Perform one of the following steps: ● To install the files in the default folder, click the Next button. ● To change the folder where the files will be installed, click the Change button, specify the folder you want to use, and then click the Next button. The Browser Registration dialog box appears. 17. Click the Install button. The installation status bar for Java appears. When the installation is complete, the InstallShield Wizard Completed dialog box appears.
Installing the Software b. Back up the existing database as recommended. After the database is backed up, click the Next button. ● If you are installing the WebLM License Server, the Enter WebLM Port Information dialog box appears. Go to Step 4. ● If you are not installing the WebLM License Server, the Enter WebLM Server Information dialog box appears.
VoIP Monitoring Manager Installation 4. Enter the port number on which the WebLM License Server should run, and click the Next button. The default is 3999. The Setup Summary dialog box appears. 5. Review the setup information, and then click the Next button. The Apache HTTP Server Welcome dialog box appears. 6. Click the Next button. The Apache License Agreement dialog box appears. 7. Read the license agreement.
Installing the Software 14. Click the Finish button. The installation status bar for JRE appears. When the installation is complete, one of the following dialog boxes appears: ● If you are installing the WebLM License Server, the Java 2 License Agreement dialog box appears. Go to Step 15. ● If you are not installing the WebLM License Server, the Installation Wizard Completed dialog box appears. Go to Step 19. 15. Read the license agreement.
VoIP Monitoring Manager Installation Installing the Client Software Use this procedure to install VoIP Monitoring Manager Client on the Windows server or another PC. The procedure to install or upgrade Avaya VoIP Monitoring Manager Client is generally the same. The VoIP Monitoring Manager Client may be installed on the same machine as the VoIP Monitoring Manager Server, or it may be installed on another machine on the network. 1. Ask all users to log off the system. 2.
Changing the RTCP Listen Port 9. Click the check boxes for VoIP Monitoring Manager Server and WebLM Server to deselect them. Only VoIP Monitoring Manager Client should be selected. Click the Next button. The Enter Avaya Integrated Management Server IP Address dialog box appears. 10. Enter the IP Address of your Avaya Integrated Management Launch Page Server, and then click the Next button. The Enter VoIP Monitoring Manager Server IP Address dialog box appears. 11.
VoIP Monitoring Manager Installation Note: Note: Note: Changing the RTCP port displays a warning indicating it must match the port configured on the Avaya Communication Manager Server. See http:// www.iana.org/assignments/port-numbers and your Avaya Communication Manager documentation. It is unusual to change the listen port from the default of 5005. The default should be suitable in most situations. Note: An SNMP Community ID with write privileges must be configured before changes can be applied.
Index Index Symbols R >, meaning of in text . . . . . . . . . . . . . . . . . 8 requirements Windows client . . . . . . . . . . . . . . . . . Windows server . . . . . . . . . . . . . . . . . resources Avaya Communications, Solutions, and Integration (CSI) Group of Software Services . . . . . . . . Avaya Network Management Software Systems Support Group (NMSSS) . . . . . . . . . . . . Avaya Technical Service Organization (TSO) . . . Avaya Technology and Consulting (ATAC) . . . .
Index 52 Avaya Integrated Management Standard Management Installation and Upgrade