
User's Manual


VoIP Monitoring Manager Installation
26 Avaya Integrated Management Standard Management Installation and Upgrade
Ensuring Windows SNMP Service is Installed
The Windows SNMP Service must be installed on the VoIP Monitoring Manager Server. The
Windows SNMP Service enables the RTCP Monitor to publish the data and is required for the
VoIP Monitoring Manager Server software to function.
The Windows SNMP Service is provided on the Microsoft Windows operating system CD. It is
not automatically installed when the Windows operating system is installed. Before installing the
VoIP Monitoring Manager software, you must confirm that the Windows SNMP Service is
installed on the VoIP Monitoring Manager server and set to start automatically. To do this, follow
these steps:
1. Click Start > Settings > Control Panel.
2. Select Administrative Tools.
3. Select Services from the list in the Name column.
4. Scroll down to see if SNMP Service is installed. It should appear in the Name column and
be set to start automatically.
5. If SNMP Service is not set to run automatically or does not appear, do one of the following:
● If the SNMP service is installed but not set to run automatically, do the following:
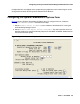
1. Right-click on SNMP and select Properties from the context menu.
The SNMP Service Properties dialog box opens.
2. Select Automatic from the Startup Type drop down list and click OK.
● If the Windows SNMP Service is not installed, you must install it from the Windows
operating system CD.
Note:
Note: When you install the SNMP Service from the Windows operating system CD, you
must configure a community name with write-access. VoIP Monitoring Manager
will attempt to initially connect using the community name, private. For security
reasons, it is recommended that a different community name be chosen. (See
Checking for Valid Community ID
on page 27.)